SwaggerHub 2.x Configuration
To view or change SwaggerHub On-Premise configuration settings, use the Config tab of the Admin Console. The available settings are listed below.
Important
If you change any settings, remember to scroll down and click Save config, then use the Version history tab to deploy the updated configuration. See Deploying Configuration Changes for details.
 |
Kubernetes settings
Number of replicas - How many replicas of SwaggerHub pods you would like to run. This number usually matches the number of nodes in the cluster. For example, two nodes mean two replica sets.
Use 1 for a VM (embedded cluster) installation.
Ingress class name - Specify which ingress class references the ingress controller that should be used. This setting is optional, and it is required only when there are multiple ingress controllers in the cluster or no ingress controller in the cluster is marked as the default class.
Available only for a Clustered installation.
Basic settings
Connection protocol - HTTP or HTTPS. To use HTTPS, you must configure SSL on the ingress controller or load balancer that runs in front of your SwaggerHub cluster.
Note
This option affects the main SwaggerHub application. It does not affect the KOTS Admin Console.
DNS name for SwaggerHub - The domain name that will be used to access SwaggerHub in your network. For example, swaggerhub.yourcompany.com. The links in email notifications, mocks, and elsewhere in the SwaggerHub application will also use this domain.
This domain name must already be configured in your DNS service and routable on your network.
If SwaggerHub is deployed to an existing Kubernetes cluster, this DNS name must point to the cluster’s ingress controller.
Port for this server - Leave blank.
Lazy loading - Lazy loading is disabled by default, but you can enable it if needed.
Search Type - Enhanced search is disabled by default. Enabling Enhanced search will deploy additional services to allow for a more effective search function when using SwaggerHub.
Important
If installation is failing due to the Enhanced search being enabled, this feature can be toggled off in the Admin Console before running installation again.
Authentication
In this section, you configure how SwaggerHub users will be authenticated.
Authentication type - The authentication method. Possible values:
Internal - Default. Built-in authentication using a username and password.
GitHub - Single sign-on using GitHub.com or GitHub Enterprise Server. See GitHub-specific settings below for additional configuration.
Internal and GitHub - A combination of built-in authentication and GitHub single sign-on. GitHub users can log in using their GitHub accounts, and non-GitHub users can create regular accounts in SwaggerHub that have a username and password (the so-called “internal users”). Internal users can link their account to GitHub at any time to enable GitHub sign-on.
LDAP - Single sign-on using Active Directory or OpenLDAP. See LDAP Configuration for additional configuration.
SAML - Single sign-on using a SAML 2.0 identity provider, such as Okta. See SAML 2.0 Settings for additional configuration.
Disable internal signup - Available if Authentication Type is Internal. You can disable sign-ups to prevent arbitrary people from creating an account in your SwaggerHub instance. This will remove the Sign Up button and make your SwaggerHub portal invite-only.
Authentication: GitHub settings
The following settings are required if the Authentication Type is GitHub or Internal and GitHub.
GitHub client ID and GitHub client secret - To authenticate SwaggerHub users via GitHub, you must register an OAuth application in GitHub. Specify the application’s client ID and secret here.
GitHub authorization endpoint:
For GitHub.com:
https://github.com/login/oauth/authorizeFor GitHub Enterprise Server:
http(s)://{GITHUB-SERVER}/login/oauth/authorize
GitHub token endpoint:
For GitHub.com:
https://github.com/login/oauth/access_tokenFor GitHub Enterprise Server:
http(s)://{GITHUB-SERVER}/login/oauth/access_token
Authentication: LDAP settings
See LDAP Settings for a list and description of the available LDAP settings.
Authentication: SAML settings
See SAML 2.0 Settings for a list and description of the available SAML settings.
Integration settings
These settings are used by some of the source control and API gateway integrations.
GitHub UI location - Required. Use
https://github.comfor GitHub.com, orhttp(s)://{GITHUB-SERVER}for self-hosted GitHub Enterprise Server.GitHub API URL - Required. Use
https://api.github.comfor GitHub.com, orhttp(s)://{GITHUB-SERVER}/api/v3for self-hosted GitHub Enterprise Server.GitLab server URL - Optional. The default GitLab server for integrations. For example,
https://gitlab.comorhttps://gitlab.mycompany.com. Can be overridden in individual integrations.Bitbucket server API URL - Optional. The URL of your self-hosted Bitbucket Server, for example,
https://bitbucket.mycompany.com. If you use multiple Bitbucket Servers, specify the primary one. The target server can be overridden in individual integrations.Azure DevOps Server URL - Optional. The URL of your Azure DevOps Server or TFS instance, typically
http(s)://SERVER/tfs. Use the same value as the Public URL in the Azure DevOps Server (TFS) Administration Console.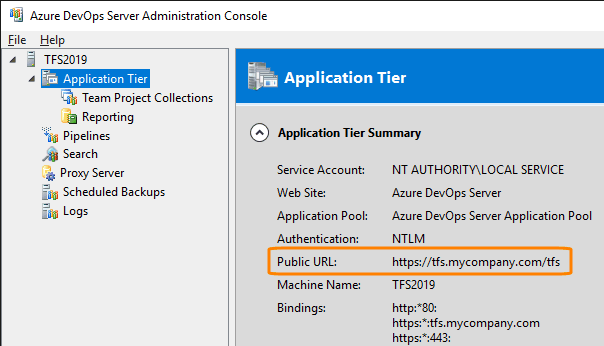
If you use multiple Azure DevOps Server or TFS instances, specify the primary one. The target server can be overridden in individual integrations.
Azure DevOps Services default organization - Optional. The name of your organization in Azure DevOps Services. You can view a list of your organizations at https://aex.dev.azure.com/me. Enter the organization name without the dev.azure.com or .visualstudio.com part. For example, if your organization’s account is dev.azure.com/my-org or my-org.visualstudio.com, enter just my-org.
If you have multiple organizations, specify the primary one. The target organization name can be overridden in individual integrations.
Azure API Management client ID and Azure API Management client secret - To integrate SwaggerHub On-Premise with Azure API Management, you first need to register an application in Azure that would authenticate requests from your SwaggerHub instance to the Azure platform. For the instructions, see Configuring Azure API Management Integration. After you have registered the application, specify its client ID and secret here.
Database settings
During the initial SwaggerHub installation, this is where you choose between internal and external databases. Both options can be used with any SwaggerHub deployment method (clustered or VM-based). In the case of external databases, you need to specify the database connection strings.
Important
Switching from internal to external databases and vice versa after the initial installation is not supported.
MongoDB type
Internal MongoDB - If selected, SwaggerHub creates and manages its own internal MongoDB database.
External MongoDB - Select this option to use an external MongoDB database.
Mongo connection string - The connection string for your external MongoDB database should be in the format:
mongodb[+srv]://admin_username:password@host[:port]?authSource=admin
If the password contains special characters, it must be URL-encoded.
Mongo TLS/SSL connection string - The connection string for your external MongoDB with TLS/SSL enabled should be in the format:
mongodb[+srv]://admin_username:password@host[:port]?authSource=admin&tls=true
If the certificate is self-signed, which we don't recommend for security reasons, the connection string should be in the following format:
mongodb[+srv]://admin_username:password@host[:port]?authSource=admin&tls=true&tlsInsecure=true
Note
If you use TLS settings for MongoDB, see TLS configuration for MongoDB in the Security section.
PostgreSQL type
Internal Postgres database - If selected, SwaggerHub creates and manages its own internal PostgreSQL database.
External Postgres database - Select this option to use an external PostgreSQL database.
PostgreSQL connection string - The connection string for your external PostgreSQL database should be in the format:
postgresql://admin_username:password@host[:port]/[db_name]
If the password contains special characters, it must be URL-encoded.
Postgres TLS/SSL connection string - The connection string for your external PostgreSQL with TLS/SSL enabled should be in the format:
postgresql://admin_username:password@host[:port]/[db_name]?sslMode=[ssl_mode]
To ensure functionality, the server certificate must also be included in the TLS certificate trust chain within the administration panel.
SMTP settings
SwaggerHub requires an SMTP server to send email notifications.
If you are trialling SwaggerHub and would like to use a temporary SMTP server, see the temporary SMTP examples.
Email address - The "From" address of email notifications, for example, [email protected] or [email protected]. Depending on the SMTP service you use, this may need to be a real address verified with the SMTP service provider. For example, Amazon SES requires that you verify the ownership of the "From" email address or the domain of this address.
Sender - The "From" name used in email notifications. For example, SwaggerHub.
SMTP mail host - The SMTP server used for outbound email from SwaggerHub. For example, smtp.sendgrid.com.
SMTP mail port - The SMTP server port. The typical port numbers are 465 for SSL, 587 for STARTTLS, and 25 for unencrypted (plain) connections.
SMTP username and SMTP password - If your SMTP server requires authentication, specify the username and password.
SMTP protocol - The type of the connection to the SMTP server: PLAIN, SSL, or TLS (STARTTLS). Please check with your SMTP provider.
Tip
To verify that the SMTP settings are correct, you can use the test-smtp command.
Security
SwaggerHub proxy allowlist - The SwaggerHub Proxy feature allows users to route “try it out” requests through the SwaggerHub back end. Proxy requests to private domain names and IP addresses are blocked by default for security purposes.
To allow access to private servers, enter a comma-separated list of domain names and IP addresses here. Use * as a wildcard. Port numbers can be added to limit access to a single port.
Example:
*.corp, server.local:443, 203.0.113.*
TLS Certificate Trust Chain - Trusted certificates for outgoing HTTPS connections. Upload a PEM file containing one or more root or intermediate certificates. The file should have this format:
-----BEGIN CERTIFICATE-----
certificate 1
-----END CERTIFICATE-----
-----BEGIN CERTIFICATE-----
certificate 2
-----END CERTIFICATE-----
...
Important
There must be no blank lines at the beginning and end of the file, and between the -----END CERTIFICATE----- and -----BEGIN CERTIFICATE----- lines. Additionally, the order of certificates is important - the root-certificate needs to be placed at the end.
Important
You can validate your chain by pasting it into this tool. If the chain is incorrect, the following error message will be displayed: “Chain issues detected. Possible reasons are missing intermediate certificate or wrong order of the certificates.”
Enable TLS - This allows you to choose to apply TLS to incoming connections. Enabling or disabling this option can be done outside of install or upgrade time.
If the option is enabled, two file fields will be displayed to allow for the uploading of the TLS certificate and key. The certificate and private key must be uploaded separately in the PEM format. The typical extension is .pem, but it may also be .key for private keys. You can convert your certificate to the PEM format by using OpenSSL tools.
Important
If you are disabling TLS, the certs should be removed from the file fields to remove them from the system.
Important
These steps are only applicable for a VM (embedded cluster) installation.
TLS Certificate - The PEM file containing the TLS certificate. The PEM file should contain the certificate itself along with any required intermediate certificates. The file should have this format:
-----BEGIN CERTIFICATE-----
certificate 1
-----END CERTIFICATE-----
-----BEGIN CERTIFICATE-----
certificate 2
-----END CERTIFICATE----- ...
TLS Key - The PEM file containing the TLS key. The file should have this format:
-----BEGIN PRIVATE KEY-----
private key
-----END PRIVATE KEY-----
TLS Configuration for SwaggerHub Portal - The cert needs SANs that includes:
swaggerhub dns nameportal.<swaggerhub dns name><portal_subdomain>.portal.<swaggerhub dns name>for each of the portals created, for example,portal1.portal.<swaggerhub dns name>,portal2.portal.<swaggerhub dns name>,portal3.portal.<swaggerhub dns name>
Note
For SwaggerHub Portal and embedded installations, update your TLS certificate to include SANs information. For more information, go to Security Configuration.
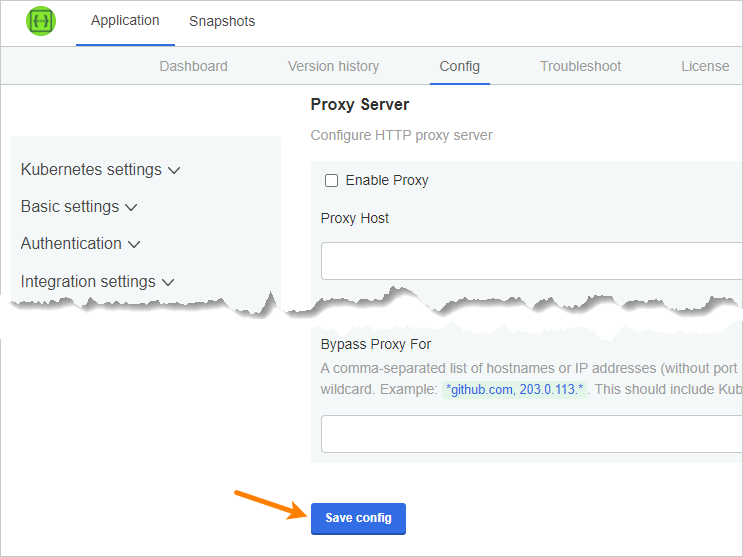
Proxy server
SwaggerHub can use a proxy server to connect to the Internet. The proxy server is used for outgoing HTTP and HTTPS connections from SwaggerHub services: “try it out” requests, integrations, outgoing webhooks, importing external OpenAPI files, and resolving external $refs.
Important
This proxy server is not used for:
non-HTTP traffic from SwaggerHub services (such as SMTP and LDAP connections),
traffic from KOTS services and the KOTS Admin Console (such as downloading SwaggerHub updates and license updates).
Note
The SOCKS proxy is not supported.
Use these settings to specify the proxy server:
Enable proxy - Select this checkbox to use a proxy server.
Proxy host - The proxy hostname or IP address.
Proxy port - The proxy port.
Proxy username and Proxy password - Optional. If your proxy server requires authentication, specify the username and password.
Bypass proxy for - Optional. A comma-separated list of hostnames or IP addresses (without port numbers) that will not be proxied. This list should include Kubernetes pod and service IP ranges. Use
*as a wildcard. For example:*github.com, 203.0.113.*
Tip
To test connectivity through the proxy server, use the test-url command.