API Auto Mocking
The API Auto Mocking integration creates and maintains a semi-static mock of your API based on the responses and examples defined in your OpenAPI 3.0 or 2.0 definition. The mock is updated every time you save your API.
The mock helps you test your API when designing it, that is, before it is implemented by developers. Also, the mock allows developers to start building client applications even before the API back end is ready.
You can create a mock automatically when you create a new API in SwaggerHub, or you can add it manually any time later. The base path for mock service calls is:
https://virtserver.swaggerhub.com/{owner}/{api}/{version}For example, you can call the /users path as https://virtserver.swaggerhub.com/{owner}/{api}/{version}/users.
Features
Free for all SwaggerHub users.
Supports OpenAPI 2.0 and OpenAPI 3.0 definitions.
Generates JSON, XML and YAML responses based on response schemas and examples.
Supports
enum,default,example, andexamples(the first example is returned), except forexternalValueexamples.Supports string formats:
date,date-time,email,uuid.Supports
$refandallOf.Supports
oneOfandanyOf(the first subschema is returned).Adds response headers defined in the spec.
Supports cross-origin resource sharing (CORS): automatically accepts CORS preflight requests from any origin and adds CORS headers to all responses. See Handling OPTIONS Requests below.
Rate limit: 10 requests per minute per API version, though sometimes, you may experience a higher throughput. After the limit is reached, you will get a 429 (Too Many Requests) response to subsequent requests.
If you need a higher rate limit, consider using SwaggerHub On-Premise, which does not have a rate limit for mock requests.
The mock is powered by SmartBear VirtServer, which is part of SmartBear ReadyAPI.
Note that the mock does not support business logic, that is, it cannot send specific responses based on the input. The responses are static and are based on the response definitions in your API specification. See How Response Mocking Works below.
Enable the mock
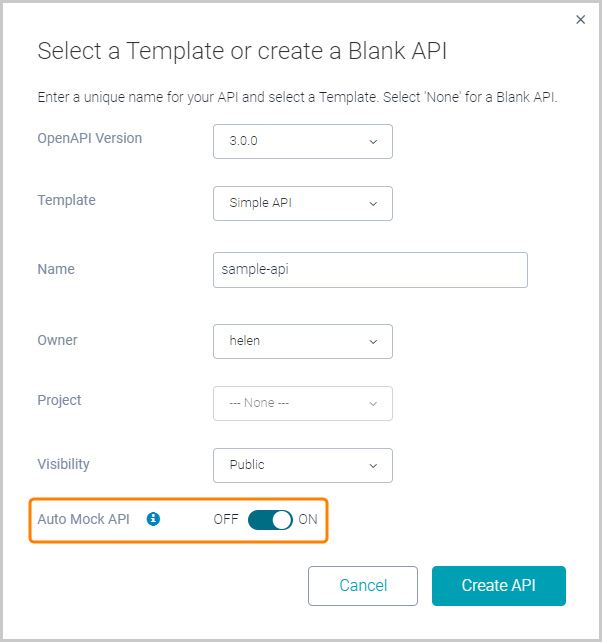
When you create a new API, set Auto Mock API to ON to enable mocking for your API.
 |
Click the image to enlarge it.
To add a mock for an existing API:
Open your API page in SwaggerHub.
If the API has several versions, select the version that you want to mock.

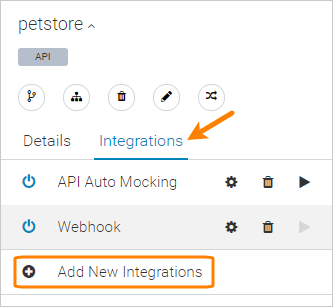
Click the API name, switch to the Integrations tab, and click Add New Integrations:

Select API Auto Mocking from the list of integrations.
Specify the mock server parameters (see below).
Click Save and Execute, then Done.
The mock is now ready to use.
You can send requests to the mock as follows:
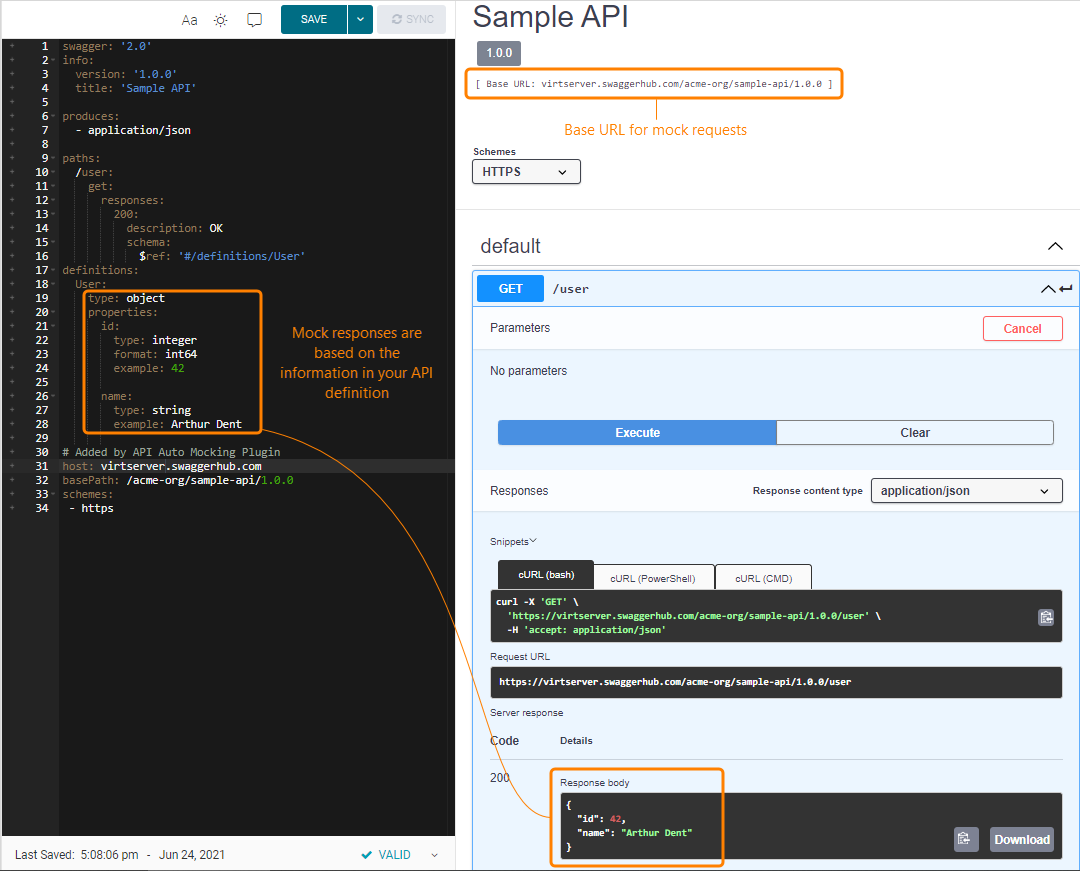
curl -X GET https://virtserver.swaggerhub.com/{owner}/{api}/{version}/{path}Or if you use the Update host setting option, you can call the mock API directly from the interactive API docs on SwaggerHub:
 |
Click the image to enlarge it.
Mock parameters
Name – A display name for this integration.
API Token – If your API is private, enter an arbitrary token that the users will need to include in the
Authorizationheader when making requests to the mocked API.Default response Content-Type – The response content type to return in the following cases:
The request does not include the
Acceptheader.The request specifies
Accept: */*(accept any content type).The request header
Acceptspecifies the content type that is not supported by the operation.
The default content type can be JSON, XML, or YAML.
Update host setting – If selected, the mock server will be saved as a target server in your API definition. This way, “try it out” requests will be directed to the mock server instead of your production server. Choose this option if you do not have a live server yet.
In OpenAPI 3.0 definitions, the mock server will be appended to the
serversarray:servers: - https://myapi.example.com/v1 # Added by API Auto Mocking Plugin - description: SwaggerHub API Auto Mocking https://virtserver.swaggerhub.com/owner-id/api-name/1.0In OpenAPI 2.0 definitions, your original
host,basePathandschemeswill be commented out and replaced with the mock server values:# host: api.example.com # basePath: / # schemes: # - http ... # Added by the API Auto Mocking Plugin host: virtserver.swaggerhub.com basePath: /owner-id/api-name/1.0 schemes: - https
Notes:
This option can be used only with unpublished APIs. If your API is published, you will have to unpublish it.
If Update host setting is left unselected, the mock will be created, but the mock server will not be added to your API definition and interactive API docs. You can still send requests to the mock server directly, for example, using cURL or SoapUI.
Unselecting the Update host setting option or removing the API Auto Mocking integration does not remove the mock server URL from your API definition. You will need to remove it manually.
Enabled – If this option is selected, the mock will be updated every time you save the API. Otherwise, the mock will work, but saving the API will not update it, that is, new operations and schema changes will not be reflected in the mock.
How response mocking works
The mock generates static responses for each API operation based on its responses and the response media types defined in the spec.
Response status codes
If an operation has multiple response codes, the mock returns the response with the lowest status code. For example, if an operation has responses 201, 202 and 400, the mock returns the 201 response.
When using OpenAPI 3.0 wildcard response ranges, such as 4XX, the lowest code of that range is returned – in this example, 400.
If an operation defines just the default response instead of specific status codes, the mock returns status 200 for GET, HEAD, DELETE and OPTIONS, and status 201 for POST, PUT and PATCH.
Requests to non-existent paths return HTTP status 404 "Not Found".
Requests that use HTTP methods not defined for the given path will return HTTP status 405 "Method Not Allowed" (except for OPTIONS, which always returns 200 to support CORS).
Response body
The response body is included if a schema is defined for the response. Mock responses use the example, default and enum values where possible. If your schemas do not include example values, the mock will generate values based on data types (integer, string, array and so on).
For example, this schema:
definitions:
  User:
    type: object
    properties:
      id:
        type: integer
        example: 42
      name:
        type: string
        example: Arthur Dent
    xml:
      name: user
will produce the following response for application/json:
{
  "id": 42,
  "name": "Arthur Dent"
}
for application/xml:
<?xml version='1.1' encoding='UTF-8'?>
<user>
  <id>42</id>
  <name>Arthur Dent</name>
</user>
for application/yaml:
---
id: 42
name: "Arthur Dent"
Alternatively, if media type examples are defined for the response, the mock will use those examples:
      # OpenAPI 2.0
      produces:
        - application/json
      responses:
        200:
          description: OK
          schema:
            type: object
          examples:
            application/json:
              id: 42
              name: Arthur Dent
In OpenAPI 3.0 definitions, if examples contain multiple examples, the first example will be used, except if it is an externalValue example, in which case the first non-external example will be used.
      responses:
        '200':
          description: OK
          content:
            application/json:
              schema:
                type: object
              examples:
                # This example will be used
                cat:
                  summary: An example of a cat
                  value:
                    name: Moon
                    petType: cat
                    color: gray
                    gender: female
                dog:
                  summary: An example of a dog
                  value:
                    name: Gromit
                    petType: dog
                    color: white
                    gender: male
To learn more about how to define API responses and examples, see the syntax guide on swagger.io:
OpenAPI 3.0: Describing Responses, Adding Examples
OpenAPI 2.0: Describing Responses, Adding Examples
How OPTIONS requests are handled
OPTIONS requests are accepted on any paths (even non-existing ones) and with any headers, and always return 200 OK. This is done to avoid leaking of private API information through the mock and to support CORS. Custom handling of the OPTIONS method (returning custom status code and headers) is not supported.
Responses to OPTIONS requests include the following headers:
Access-Control-Allow-Origin: *
Access-Control-Allow-Methods: *
Access-Control-Allow-Headers: X-Requested-With,Content-Type,Accept,Origin
In CORS preflight requests, the response headers Access-Control-Allow-Headers and Access-Control-Allow-Methods mirror the corresponding request headers Access-Control-Request-Method and Access-Control-Request-Headers. For example, if a client sends:
OPTIONS /foo/bar HTTP/1.1
Access-Control-Request-Method: POST
Access-Control-Request-Headers: Authorization, X-Custom-Header
Origin: https://yourdomain.com
the mock responds with:
HTTP/1.1 200 OK
Access-Control-Allow-Origin: *
Access-Control-Allow-Methods: POST
Access-Control-Allow-Headers: Authorization,X-Custom-Header
To learn more about how CORS works, see these articles on MDN:
