Install SwaggerHub On-Premise on VirtualBox
SwaggerHub On-Premise is distributed as a virtual machine that can be installed on VirtualBox. You can configure the SwaggerHub VM either via the VirtualBox GUI or from the command line. This guide explains both approaches.
Download
Download the latest SwaggerHub On-Premise OVA image:
 https://onprem-downloads.swaggerhub.com/swaggerhub-vm-vbox.ova
and the security patch:
 https://onprem-files.s3.amazonaws.com/log4j-patch.enc
You also need a license file to activate the instance during the installation. Contact your SmartBear sales representative or use the contact form to request a license for your trial or purchase.
Host requirements
To run SwaggerHub On-Premise, your VirtualBox host must meet the following requirements:
Must be a bare-metal server. VirtualBox running on a VM is not supported.
Dual-core CPU or better.
Memory: A SwaggerHub VM needs 16 GB of memory for production deployments or 8 GB for temporary proof-of-concept use. We recommend that the host have twice the VM’s memory, that is 32 GB for production use or 16 GB for proof-of-concept use.
200 GB disk storage for the SwaggerHub VM.
Key points
The SwaggerHub On-Premise VM can work in the Bridged or NAT networking mode.
A Bridged VM gets its own IP address on the network.
If you use NAT, the VM shares the host’s IP address. You will need to expose VM port 80 via some host port (for example, 8000) by using port forwarding. The VM will be accessed via
host:port, and VirtualBox will redirect the connections toVM:80. The selected host port must not be used by other applications on the host.
Deploy SwaggerHub VM using VirtualBox GUI
If you have access to the desktop environment, you can use VirtualBox’s GUI to import and configure the VM.
Note
The steps below are for VirtualBox v. 6. The steps for other versions may differ slightly.
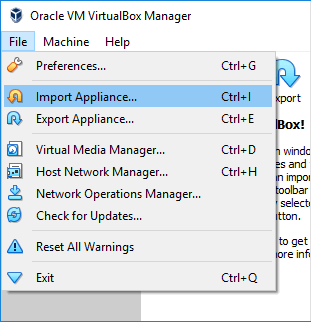
From the VirtualBox main menu, select File > Import Appliance.
Browse for the .ova file and click Next.
Specify the following settings:
RAM – Change to 16384 MB for production deployment, or leave 8192 MB for temporary proof-of-concept deployment.
MAC Address Policy – Include only NAT network adapter MAC addresses.
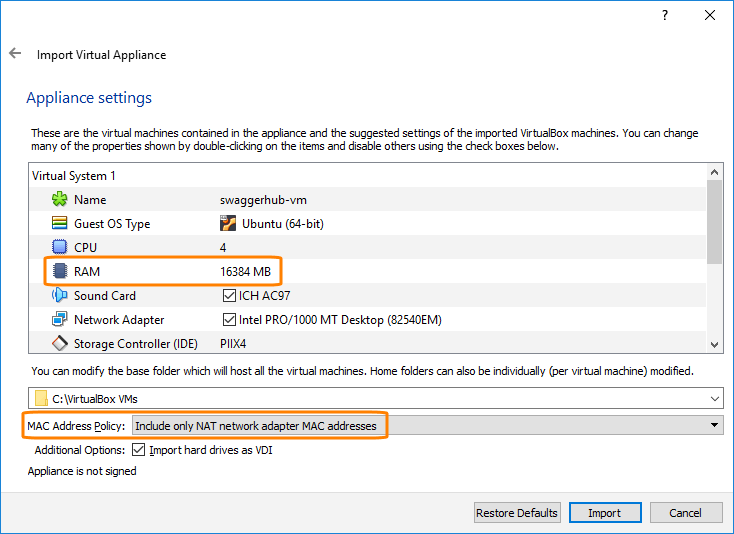
Click Import.
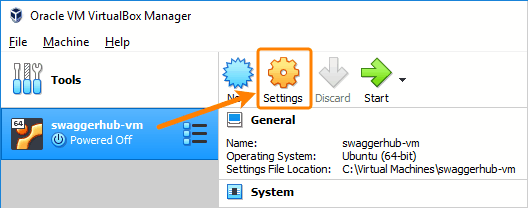
Select the imported VM and click Settings.
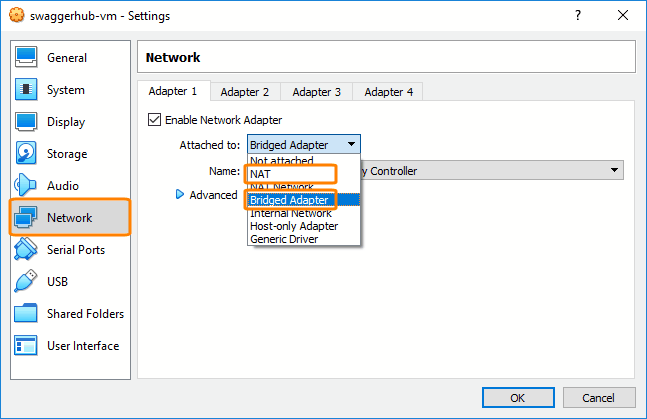
On the Network tab, set the network adapter mode to either Bridged Adapter (recommended) or NAT.
If you choose NAT, configure port forwarding for the ports used by SwaggerHub On-Premise:
Expand the Advanced section and click Port Forwarding.
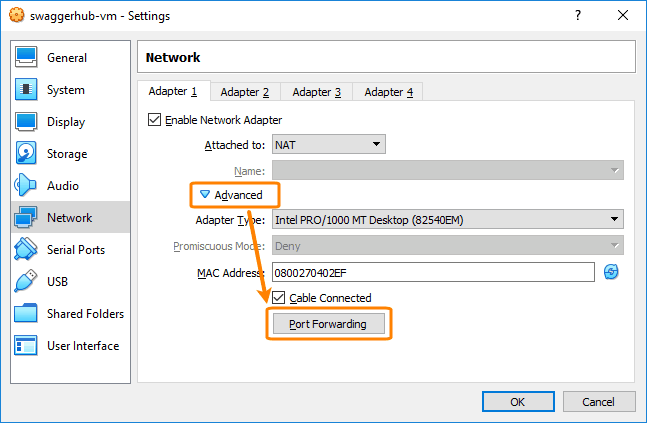
Add the following rules:
Protocol
Host IP
Host Port
Guest IP
Guest Port
Comments
TCP
8000
80
For HTTP access to SwaggerHub
TCP
2222
22
Optional, for SSH access (supported since SwaggerHub On-Premise 1.19.1)
Note
If the above-mentioned host ports (8000 or 2222) are used by other applications on the host, specify other port numbers that are not in use.
Leave the Host IP and Guest IP blank.
Click OK.
Click OK to save the changes.
Now you can start the VM:
Select the VM and click Start.
Wait until you see the following lines in the VM console:
Access Installer UI at http://<IP_address>/ui/index.html Access Main UI at http://<IP_address>
See Configure SwaggerHub below for further steps.
Deploy SwaggerHub VM from command line
If you do not have access to the graphical desktop, you can set up a VM by using VirtualBox’s CLI tools.
1. Import the VM to VirtualBox
VBoxManage import --vsys 0 --memory 16384 --vmname swaggerhub-vm swaggerhub-vm-vbox.ova
Upon completion, you should see Successfully imported the appliance.
2. Configure the network
SwaggerHub On-Premise can operate either in the Bridged or in the NAT networking mode.
a. Bridged network
List the available bridged network interfaces:
VBoxManage list bridgedifs
Enable bridge networking and specify which network interface to use:
VBoxManage modifyvm swaggerhub-vm --nic1 bridged --bridgeadapter1 <name>
Refer to the VirtualBox documentation for more information about configuring the correct adapter and adapter type.
To verify the VM configuration on Mac or Linux:
VBoxManage showvminfo swaggerhub-vm | grep NIC
on Windows:
VBoxManage showvminfo swaggerhub-vm | find "NIC"
You should see something like this:
NIC 1: MAC: ..., Attachment: Bridged Interface '...', Cable connected: on, ...
b. NAT network
SwaggerHub requires that VM port 80 be exposed via a host port by using port forwarding. We recommend using host port 8000, provided that it is not used by other applications on the host.
If you need SSH access to the VM, you also need to expose VM port 22 via some host port, such as 2222.
Check which host ports are in use
As a pre-check, run this command to see which host ports are in use:
sudo nmap –sT –O localhost
or if you do not have nmap:
sudo netstat –vatn
or on Windows:
netstat -a -b
If the recommended host ports 8000 and 2222 are in use, specify other port numbers when configuring the port forwarding rules (see below).
Enable NAT and configure port forwarding
Run the following commands to change the VM to use NAT and forward host ports (marked with **) to VM ports. If the specified host ports are in use, you can use other port numbers that are not in use. Do not include ** in your command.
VBoxManage modifyvm swaggerhub-vm --nic1 nat --natpf1 "rule1,tcp,,**8000**,,80" --natpf1 "rule2,tcp,,**2222**,,22"
Verify network configuration
Run the following command to retrieve the configuration settings:
VBoxManage showvminfo swaggerhub-vm | grep NIC
You should see something like this:
NIC 1: MAC: ..., Attachment: NAT, Cable connected: on, ... NIC 1 Settings: ... NIC 1 Rule(0): name = rule1, protocol = tcp, host ip = , host port = 8000, guest ip = ,
                  guest port = 80 NIC 1 Rule(0): name = rule2, protocol = tcp, host ip = , host port = 2222, guest ip = , guest port = 22
3. Start the VM
VBoxManage startvm swaggerhub-vm --type headless
Configure SwaggerHub
Once the VM is up and running, navigate to the Admin Center at http://<VM_IP>/ui/index.html (in the Bridged mode) or http://<host_IP>:8000/ui/index.html (in the NAT mode; change the port accordingly). Follow the prompts to activate your license and configure the system. For details, see:
After the configuration is complete, the SwaggerHub web application will be available at http://<VM_IP> (in the Bridged mode) or http://<host_IP>:8000 (in the NAT mode).
If SSH access is required, it can be enabled through the Admin Center as explained here.
Post-installation patch
After the installation is complete, be sure to apply the security patch (log4j-patch.enc) to improve the security and stability of your SwaggerHub On-Premise instance.
Upload and run the
log4j-patch.encpatch on the System tab of the Admin Center, as explained here.Note: Since the patch file size is large, it will take a few minutes to upload to the Admin Center, and a few more minutes to execute. If you have a load balancer in front of your SwaggerHub On-Premise instance, you may need to increase the load balancer timeout so that the file upload does not time out.
Wait for the following output to appear:
******************************************************************
The patch for CVE-2021-44228 and CVE-2021-45046 has been applied.
Please restart SwaggerHub to apply the changes.
******************************************************************
Click Restart SwaggerHub.