AWS Installation: Using a Load Balancer for SSL Termination
After deploying SwaggerHub On-Premise to AWS, you may want to enable HTTPS access to the instance. There are two ways to set up HTTPS for SwaggerHub On-Premise:
Install an SSL certificate directly on your SwaggerHub EC2 instance. This approach is straightforward and is explained here.
-- OR --
Configure a load balancer for SSL termination (also known as SSL offloading). The users will connect to the load balancer using HTTPS, and the load balancer will forward the requests to your SwaggerHub EC2 instance through HTTP. You may want to use this approach if you use AWS Certificate Manager (ACM) to manage your SSL certificates.
This guide explains how to configure a load balancer with an SSL certificate and how to route inbound traffic to your SwaggerHub EC2 instance through this load balancer.
1. Get an SSL certificate
This guide assumes you already have an SSL certificate with a matching private key. You can get an SSL certificate from a certificate authority (CA) of your choice, request a certificate from AWS Certificate Manager (ACM), or use a self-signed certificate. Make sure your certificate meets the AWS requirements.
The certificate common name (CN) must match the domain name you will use for SwaggerHub, such as swaggerhub.MyCompany.com. You can also use a wildcard certificate for the base domain (*.MyCompany.com).
2. Create a security group for the load balancer
Open the Amazon EC2 console at https://console.aws.amazon.com/ec2.
Switch to the AWS region where your SwaggerHub On-Premise instance is deployed.
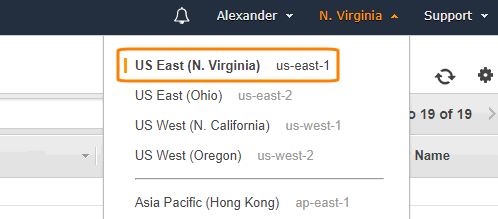
On the left, select Security Groups.
Click Create Security Group.
Give this group a unique name (for example, SwaggerHub On-Premise-LB) and enter a description.
Select the VPC where the instance is deployed.
Add the following Inbound rules:
Type
Protocol
Port Range
Source
Description
HTTP
TCP
80
Anywhere
Port 80 will be redirected to port 443 (HTTPS)
HTTPS
TCP
443
Anywhere
HTTPS access to SwaggerHub
Note
Anywhere or 0.0.0.0/0, ::/0 means inbound access from all IP addresses. You may want to restrict access to specific IP addresses and ranges instead.
3. Configure target groups
In this guide, we will use an Application Load Balancer (ALB). Application Load Balancers use target groups to route requests to a specific port of the target EC2 instance. Target group configuration also includes health checks.
To create a target group:
Make sure you are still in the same AWS region where your SwaggerHub On-Premise instance is.
In the left part of the EC2 console, under Load Balancing, select Target Groups.
Click Create target group.
Specify the following values:
Option
Target group 1
Target group name
SwaggerHub-OnPrem-Frontend
Target type
instance
Protocol
HTTP
Port
80
VPC
Select the VPC used by your SwaggerHub EC2 instance
Health check settings
(see below)
Protocol
HTTP
Path
/_healthAdvanced health check settings
(see below)
Port
traffic port
Healthy threshold *
5 *
Unhealthy threshold *
2 *
Timeout *
5 *
Interval *
30 *
Success codes
200
* You may use other values for the thresholds, timeout and interval based on your requirements.
Click Create.
Select the created target group and switch to the Targets tab at the bottom.
Click Edit.
In the list at the bottom, select your SwaggerHub EC2 instance, and click Add to registered.
Note
If your SwaggerHub EC2 instance is not on the list, make sure it is running.
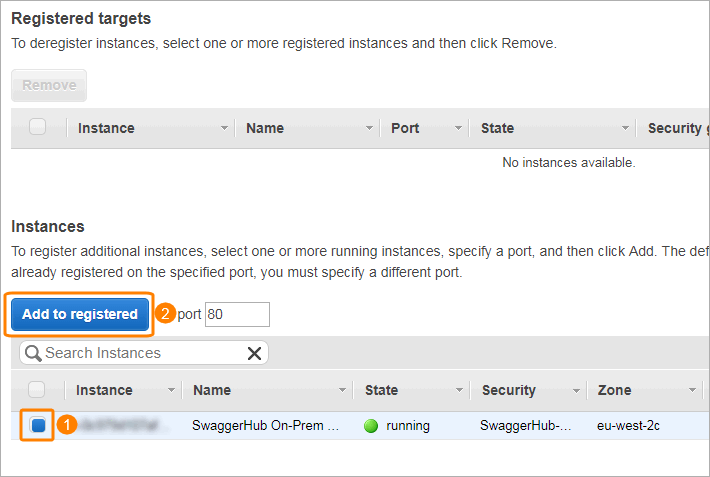
Click Save.
4. Create a load balancer
Make sure you are still in the same AWS region where your SwaggerHub On-Premise instance is.
In the EC2 console, select Load Balancers on the left.
Click Create Load Balancer.
Choose to create an Application Load Balancer.
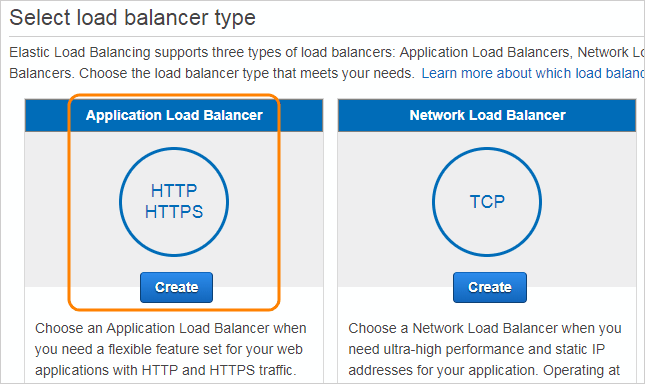
Configure the load balancer:
Option
Value
Name
Give this load balancer a name, for example, SwaggerHub-OnPrem-LB.
Scheme
internal or internet-facing depending on your needs.
IP address type
ipv4
Listeners
Add a listener for HTTPS port 443 (we will add a port 80 listener later).
VPC
Select the same VPC as the one used by your SwaggerHub EC2 instance.
Availability Zones
Select at least two availability zones.
Click Next: Configure Security Settings.
Specify the SSL certificate the load balancer will use to negotiate SSL connections with the clients. You can upload your certificate, or if it is already stored in AWS Certificate Manager (ACM), select it from the list.
Note
This should be the certificate issued for your SwaggerHub On-Premise domain, such as
swaggerhub.MyCompany.com, or a wildcard certificate, such as*.MyCompany.com.Click Next: Configure Security Groups.
Select the security group you created earlier for the load balancer.
Click Next: Configure Routing.
Change Target group to Existing target group, and select the group named SwaggerHub-OnPrem-Frontend. Leave the other settings unchanged.
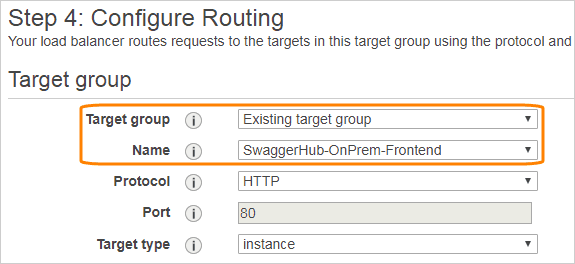
Click Next until you get to the Review page, then click Create.
Click Close.
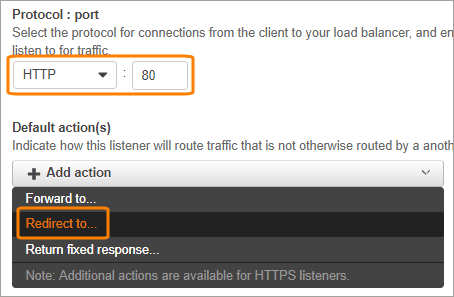
Now, we will add a rule to redirect inbound HTTP connections to HTTPS. In the load balancer details, switch to the Listeners tab and click Add listener.
Make sure the protocol and port are set to HTTP : 80.
Click Add action and select Redirect to.
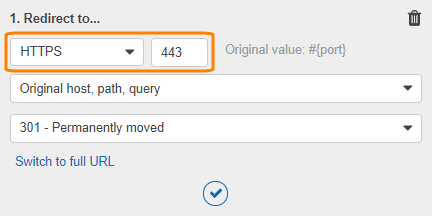
Specify HTTPS port 443 as the target port. Leave other values as is and click the check mark icon.
Click Save at the top of the page.
Your load balancer configuration should now look like this:

On the Description tab, note down the DNS name of your load balancer.
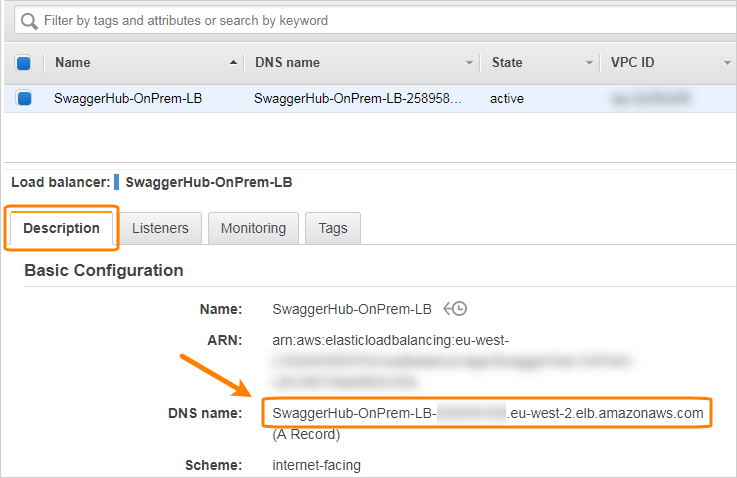
To verify that the load balancer works, wait until its state becomes active, then navigate to
https://Load.Balancer.DNS.Namein your browser. Choose to ignore the certificate error (it occurs because you access the site using a different DNS name, not the one the certificate is issued for). You should see the SwaggerHub home page.To test that HTTP is redirected to HTTPS, navigate to
HTTP://Load.Balancer.DNS.Nameand confirm that the redirect occurs.
Once your load balancer is set up, use your DNS service to create a CNAME record that will point your desired SwaggerHub domain (such as swaggerhub.MyCompany.com) to the load balancer DNS name. For more information on how to create CNAME records, refer to the documentation of your DNS service. If you use Route 53, the steps are provided below.
5. Register a domain name in Route 53 (optional)
If you use Amazon Route 53 as the DNS service for your domain, you can use it to register a domain name for your SwaggerHub On-Premise instance.
This guide assumes that you already have a hosted zone in Route 53. To learn how to create hosted zones, refer to the Route 53 documentation:
 Working with Public Hosted Zones
 Working with Private Hosted Zones
To create a DNS entry for SwaggerHub:
Open the Amazon Route 53 console at https://console.aws.amazon.com/route53/.
On the left, select Hosted Zones.
Click your hosted zone in the list.

Click Create Record Set.
Specify the following:
Option
Value
Name
The desired domain name for your SwaggerHub instance. For example,
swaggerhub.MyCompany.com. This domain name must match the Common Name (CN) of the SSL certificate used by the load balancer.Type
A - IPv4 Address
Alias
Yes
Alias Target
Select your load balancer from the list
Routing Policy
Simple
Evaluate Target Health
Select Yes or No based on your needs
Click Create.
6. Configure SwaggerHub for HTTPS access
Once you have a domain name pointing to your load balancer, you need to specify this domain name in the SwaggerHub system settings, and indicate that SSL offloading is in place:
Navigate to
http://VM_IP_address/uito open the Admin Center.Select Settings on the left.
In the DNS name for this instance field, enter the domain name you registered for SwaggerHub, such as
swaggerhub.MyCompany.com. This domain name must point to the load balancer.In the Privacy section, change the SSL Termination setting to .
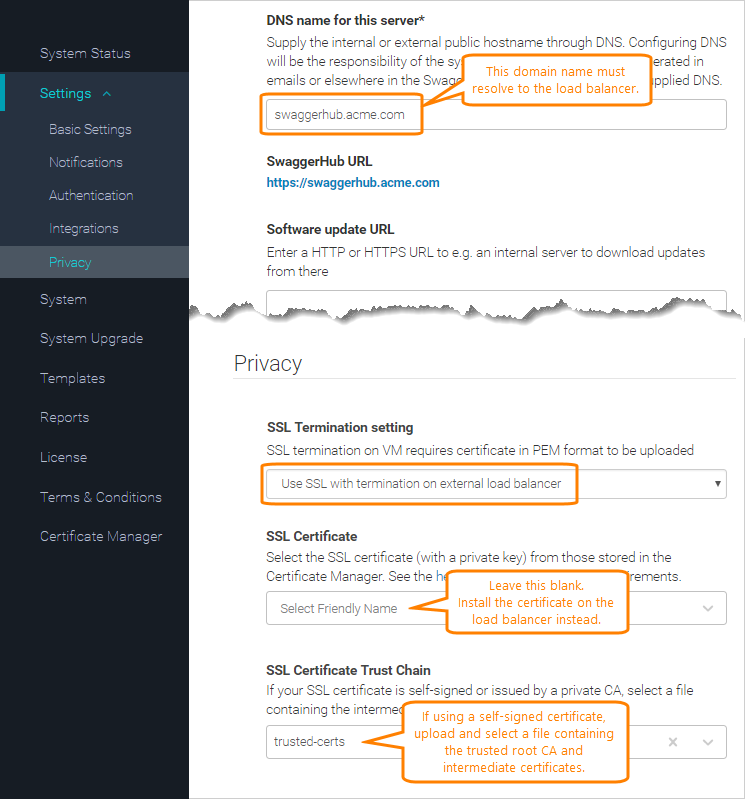
If your SSL certificate is self-signed or issued by a private CA:
Upload your trusted CA root and any intermediate certificates in the PEM format to the Certificate Manager.
In Settings > Privacy, add your custom certificates to the SSL certificate trust chain list.
Click Save Changes and Restart. Wait a few minutes for the system to restart completely.
Now you can access SwaggerHub at https://Your.SwaggerHub.Domain, and the Admin Center at https://Your.SwaggerHub.Domain/ui.