Create VM Snapshots
Note: This information applies to SwaggerHub On-Premise.
You should make regular backups of your SwaggerHub On-Premise VM, particularly, right before upgrading it. This way you can easily restore the VM when needed.
Below are instructions for creating VM snapshots (the first method) in various hypervisors.
AWS
To back up your EC2 instance, you can either create a snapshot of its EBS storage or create a new AMI from the entire instance.
EBS snapshots
To create an EBS snapshot of you SwaggerHub On-Premise instance:
Open the Amazon EC2 console at https://console.aws.amazon.com/ec2/.
Switch to the AWS region where your SwaggerHub On-Premise instance is running.
On the left, select Instances.
Select your SwaggerHub On-Premise instance.
On the Description tab, click the path of the Root device.
Click the EBS ID.
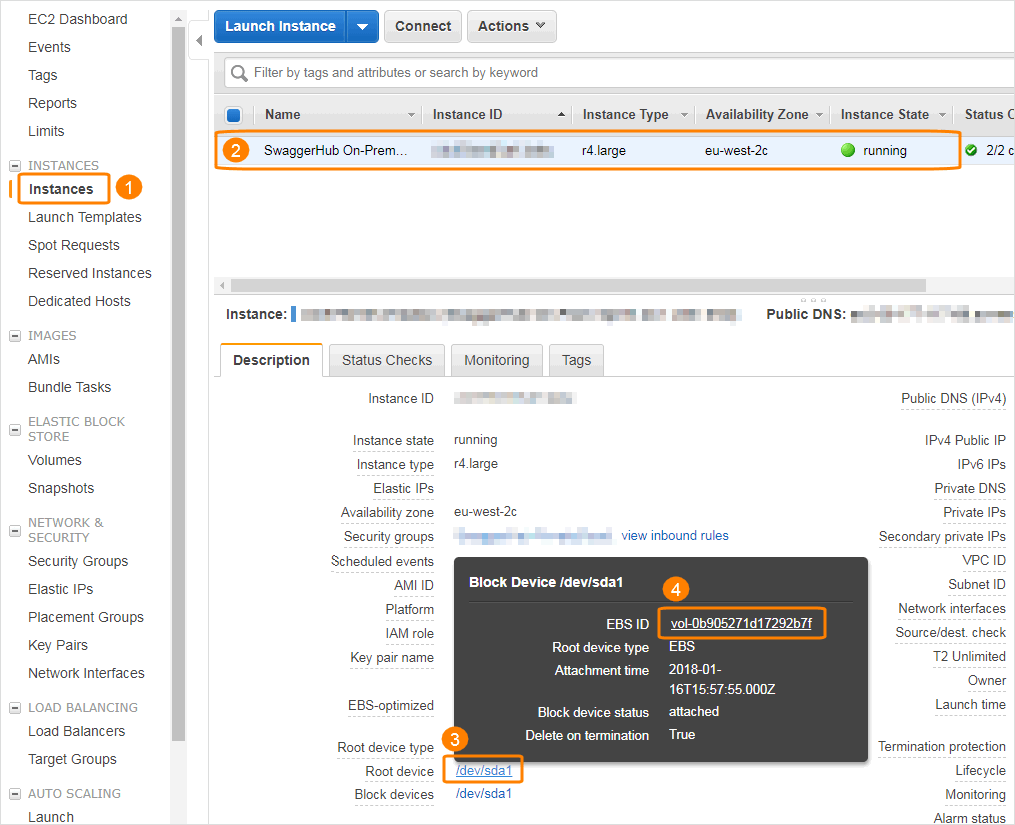
You will jump to the specified EBS volume. Click Actions and select Create Snapshot.

Give the snapshot a unique name and provide a description (we recommend that you include the creation date).
Click Create.
The created snapshot will appear in the Snapshots section of the EC2 Console.
Automate EBS snapshots
You can automate EBS snapshots by using CloudWatch. For instructions, see Schedule Automated Amazon EBS Snapshots Using CloudWatch Events in AWS documentation.
AMI backups
To create an AMI from your entire SwaggerHub On-Premise instance:
Open the Amazon EC2 console at https://console.aws.amazon.com/ec2/.
Switch to the AWS region where your SwaggerHub On-Premise instance is running.
On the left, select Instances.
Select your SwaggerHub On-Premise instance.
Click Actions and select Image > Create Image.

Give your AMI a unique name and provide a description (we recommend that you include the creation date).
Click Create Image.
The created AMI will appear in the AMIs section of the EC2 Console.
Azure
You can schedule VM backups in Azure in the VM settings:
In the Azure portal, open the VM settings.
Select the Backup category.
Specify the backup settings:
Recovery Services vault – Select a backup vault or create a new one.
Resource group – Select the same resource group that contains your SwaggerHub VM.
Choose backup policy – Click Create (or edit) a new policy and specify the backup frequency, time, and retention settings.
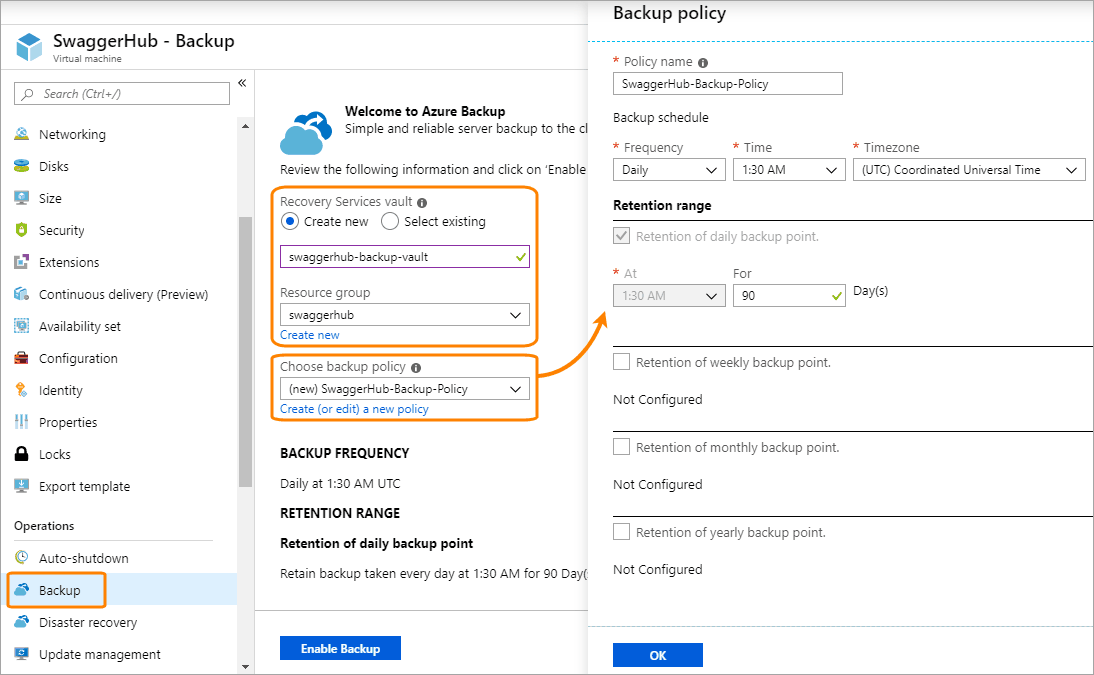
Click Enable Backup.
After you enable backup, the initial backup will run. You can also create a backup at any time by clicking Backup now in the VM’s Backup settings.
For more information, see About Azure VM backup.
VMware
Snapshots on ESXi servers can be created through the ESXi web client or through the vSphere client.
Log in to the ESXi web client or vSphere.
Right-click your SwaggerHub On-Premise VM and select Snapshot > Take Snapshot.
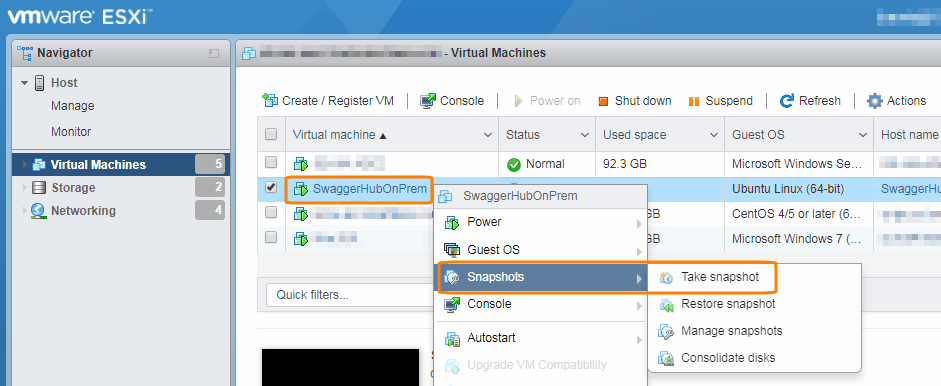
Give your snapshot a name and provide a description.
VirtualBox
You can create a backup of your VirtualBox VM in two ways:
Take a VM snapshot – Recommended for SwaggerHub On-Premise v. 1.20.0 and later. Snapshots can be created from a running VM.
Clone a VM – Recommended for SwaggerHub On-Premise v. 1.19.3 and earlier.
Snapshots can be created from running VMs, whereas cloning requires stopping the VM temporarily.
VM snapshots
Create snapshots via GUI
In VirtualBox, select your SwaggerHub On-Premise VM, then click
 > Snapshots.
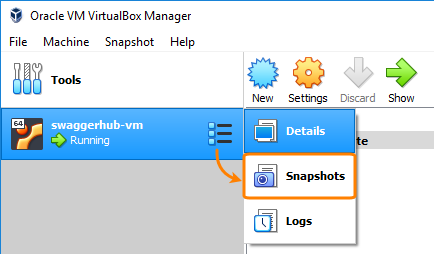
Click Take on the toolbar.
Give this snapshot a name and, optionally, a description and click OK.

Create snapshots via command line
If you do not have access to the graphical desktop, you can create VM snapshots by using the vboxmanage command-line tool:
Find the name of your SwaggerHub On-Premise VM:
vboxmanage list vms
The default name is swaggerhub-vm.
Create a snapshot:
vboxmanage snapshot <VM name> take <snapshot name> --live
See VBoxManage snapshot for details.
Clone entire VM
VirtualBox can clone only stopped virtual machines. Make sure to coordinate the temporary downtime with your users in advance.
Important
We recommend using VirtualBox v. 6 or later to clone VMs – it has the Keep Hardware UUIDs option that helps preserve SwaggerHub license information on the cloned VMs.
Clone the VM via GUI
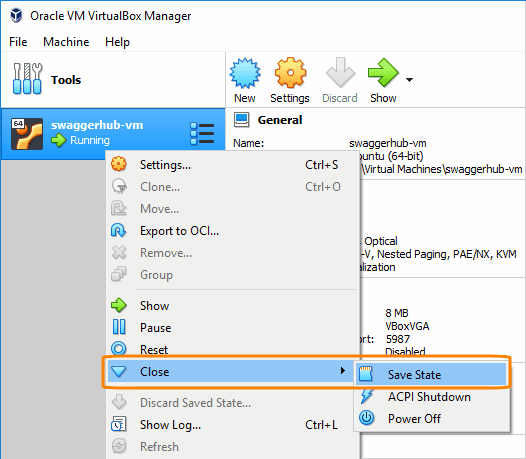
In VirtualBox, right-click your SwaggerHub On-Premise VM and select Close > Save State.
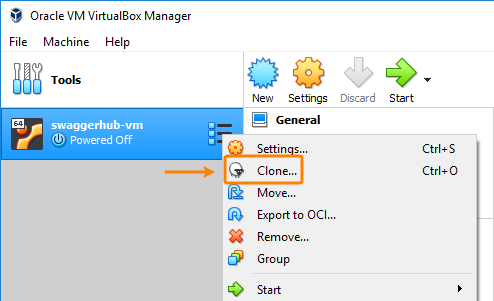
Right-click the VM and select Clone.
Give the cloned VM a name and select a location to store it.
If you use VirtualBox v. 6 or later, select Keep Hardware UUIDs. This will preserve SwaggerHub license information on the cloned VM.
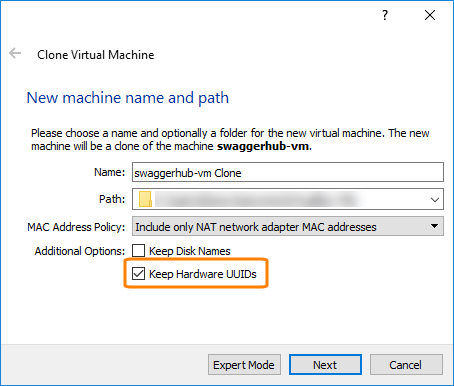
Click Next.
Select Full clone and click Clone.
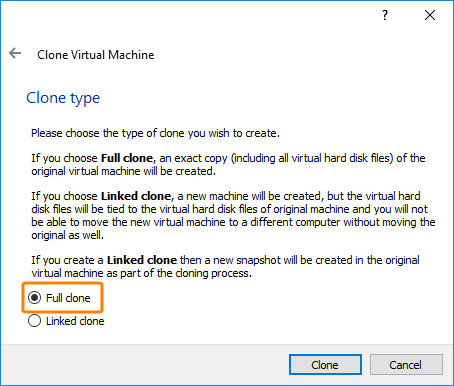
After the clone is created, start your original SwaggerHub On-Premise VM again.
Clone the VM via command line
If you do not have access to the graphical desktop, you can back up the VM by using the vboxmanage command-line tool:
Find the name of your SwaggerHub On-Premise VM:
vboxmanage list vms
The default name is swaggerhub-vm.
Stop the VM and save its state:
vboxmanage controlvm <VM name> savestate
Clone the VM:
vboxmanage clonevm <VM name> --name <new VM name> --options keephwuuids
See VBoxManage clonevm for details.
Start the original VM again:
vboxmanage startvm <VM name>
Back up VM files only
If you wish, you can back up only the VM files which can be imported to create another instance. By default, the VM files are stored in the following directory:
Windows: C:\Users\<username>\VirtualBox VMs\<VM name>\
Mac or Linux: ~/VirtualBox VMs/<VM name>/
Browse to the above-mentioned directory.
Create a new backup directory.
Copy all the contents from the original directory to the new backup directory.
Restore VM from snapshot
To learn how to restore your SwaggerHub On-Premise VM from a snapshot, please refer to the documentation of your hypervisor.
AWS:
Azure:
VMware:
VirtualBox: