Codegen Templates
Note: This information applies to SwaggerHub On-Premise.
SwaggerHub On-Premise lets you upload custom Swagger Codegen modules for code generation. Custom generators will appear along with the built-in generators in the Export menu. They can be used in source control integrations.
OpenAPI version compatibility
SwaggerHub On-Premise 2.6.0 and later support custom generators for OpenAPI 2.0 and 3.0.
Generators created with Swagger Codegen 2.x are used for OpenAPI 2.0 definitions, and generators created with Swagger Codegen 3.x are used for OpenAPI 3.0 definitions.
Create custom generators
Swagger Codegen uses Java code and template files (Mustache or Handlebars) to transform API definitions into the desired output format. You can create boilerplate code for your custom codegen by using Swagger Codegen CLI, and then customize the code to suit your needs. The code should be compiled into a JAR file, which can then be uploaded to SwaggerHub On-Premise. A single JAR file can contain one or more custom generators.
Prerequisites
JDK 8 or later
Apache Maven 3.3.3 or later
Mustache vs Handlebars
Swagger Codegen 2.x uses the Mustache templating engine whereas 3.x uses the Handlebars engine. The template file extension is the same (.mustache), but the processing engine is different. Handlebars is a superset of Mustache, which means it supports the Mustache syntax and adds some extra features. Keep the differences in mind when creating templates for both OpenAPI 2.0 and 3.0, or when migrating OpenAPI 2.0 templates (Mustache) to OpenAPI 3.0 (Handlebars).
To learn more about the Mustache and Handlebars syntax and about the differences, see:
Create a generator
Follow these steps to create a custom generator:
Download Swagger Codegen CLI:
 swagger-codegen-cli-3.0.34.jar –OpenAPI 3.0 code generatorsswagger-codegen-cli-2.4.27.jar –OpenAPI 2.0 code generators
Run the following command to create a boilerplate project for your codegen (replace the arguments with your values):
java -jar path/to/swagger-codegen-cli-VERSION.jar meta -o OUT_DIR -n CODEGEN_NAME -p com.mycompany.openapi.codegen
Where the arguments are:
metais a command to create a project for a custom generator.-o OUT_DIRspecifies the output directory where the project will be created. The default directory is the current folder.-n CODEGEN_NAMEspecifies the name of your custom generator that will be displayed in SwaggerHub’s Export menu. This name must differ from the built-in generator names. You can use this command to see the built-in generator names:java -jar path/to/swagger-codegen-cli-VERSION.jar langs
-p PACKAGEspecifies the package name of your generator class. The default package isio.swagger.codegen.The generated project includes a Java class that implements the generator, sample .mustache templates,
pom.xml(Maven configuration file), and a README file.Modify the generator code and .mustache templates to suit your needs. For some tips, see:
(Optional.) If your code uses custom dependencies not covered by Swagger Codegen, you need to package these dependencies into your final JAR file. You can do this by using the Maven Assembly Plugin. Add the following to the
pluginssection of yourpom.xml:<plugin> <groupId>org.apache.maven.plugins</groupId> <artifactId>maven-assembly-plugin</artifactId> <version>3.1.1</version> <executions> <execution> <phase>package</phase> <goals> <goal>single</goal> </goals> <configuration> <descriptorRefs> <descriptorRef>jar-with-dependencies</descriptorRef> </descriptorRefs> </configuration> </execution> </executions> </plugin>Build the project by running the following command in the project’s root directory:
mvn package
This will create the
{name}-{version}.jarfile (or {name}-{version}-jar-with-dependencies.jar if the Maven Assembly Plugin is used) in thetargetsubdirectory. This is the file you will need to upload to SwaggerHub.Before uploading your generator to SwaggerHub, test it locally to make sure it works correctly and produces the expected output. In the command below, replace the
-largument with your generator name,-owith the desired output directory, and-iwith your API definition path or URL. Useio.swagger.codegen.Codegenif you are testing OpenAPI 2.0 templates with Swagger Codegen 2.x, andio.swagger.codegen.v3.Codegenif you are testing OpenAPI 3.0 templates with Swagger Codegen 3.x.On Mac and *nix:
java -cp /path/to/swagger-codegen-cli-VERSION.jar:/path/to/your.jar \
     io.swagger.codegen.Codegen \
     -i http://petstore.swagger.io/v2/swagger.yaml \
     -l CODEGEN_NAME \
     -o GENERATED_DIR
On Windows, use
;instead of:as a separator in the-cpargument, and write the whole command on one line (line breaks are added for readability):java -cp path\to\swagger-codegen-cli-VERSION.jar;path\to\your.jar io.swagger.codegen.Codegen -i http://petstore.swagger.io/v2/swagger.yaml -l CODEGEN_NAME -o GENERATED_DIR
Upload custom generators
Open KOTS Admin Console.
Navigate to Custom Codegen Templates section.
Select Enable custom codegen templates and upload
tar.gzfile containing custom codegen templates.Note
The file uploaded must be packaged correctly.
Ensure that:
the
.jarfiles of the custom codegen template are in the root directory of the uploadedtar.gzfile.the size of the uploaded
tar.gzfile doesn't exceed 1 MB.in case of using multiple Codegen templates, they are packed into one
tar.gzfile for an upload in the following format:MyCodeGen.tar.gz ¦ {name}-{version}.jar ¦ {name2}-{version2}.jarOnce you created the
.jarfiles, package them as follows:Sample Command:
Single
.jarfiletar -zcvf file.tar.gz {name}-{version}.jarMultiple
.jarfilestar -zcvf file.tar.gz *.jar
If you already have two custom codegens, to add the third one:
download the existing
.tarfile.extract it using
tar-xvzf.add the new
.jarfile to the directory.compress it as a new
.tarwithtar -czvf file.tar.gzdirectory.
Select Save config once the tar.gz file is uploaded and deploy the latest changes.
Note
Ensure the file being uploaded is in the
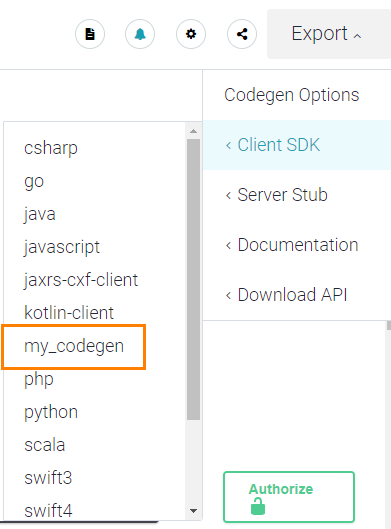
tar.gzformat.Your custom generator will now appear in the Export menu for API definitions:
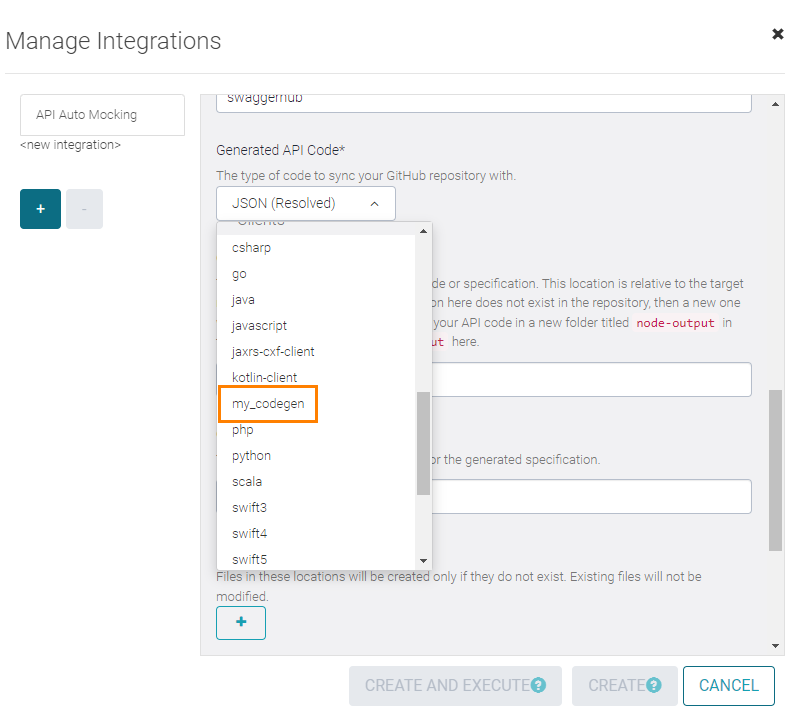
in source control integrations:
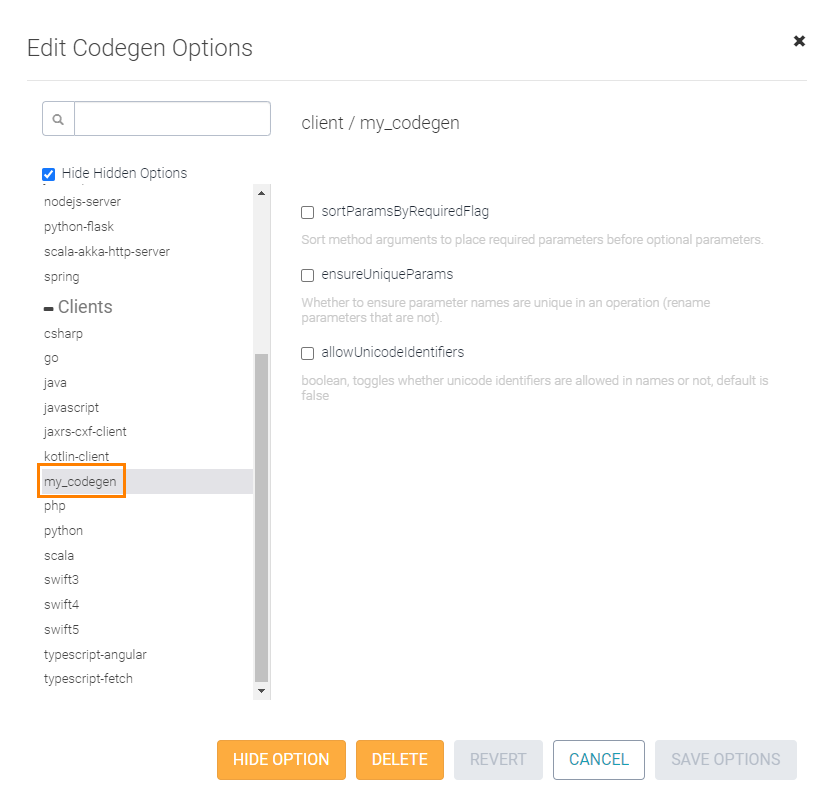
and in the Codegen Options dialog:
Remove custom generators
Open KOTS Admin Console.
Navigate to Custom Codegen Templates section.
Disable Enable custom codegen templates.
Select Save config and deploy the latest changes.
Update generators
Open KOTS Admin Console.
Navigate to Custom Codegen Templates section.
Upload
tar.gzfile containing updated custom codegen templates.Note
Ensure the
.jarfiles of the custom codegen template are in the root directory of the uploadedtar.gzfile. The maximum size of the uploadedtar.gzfile is limited to 1 MB.Select Save config and deploy the latest changes.
To list the codegen templates on the system the list-custom-templates operator command can be used.
Usage
kubectl exec -it deploy/swaggerhub-operator [-n NAMESPACE] -- cmd list-custom-templates
Example
~ ? k exec -it deploy/swaggerhub-operator -n swaggerhub -- cmd list-custom-templates List of custom templates: dara_2_0_custom_codegen_1-swagger-codegen-1.0.0.jar
            dara_2_0_custom_codegen_2-swagger-codegen-1.0.0.jar dara_3_0_custom_codegen_1-swagger-codegen-1.0.0.jar dara_3_0_custom_codegen_2-swagger-codegen-1.0.0.jar