Install SwaggerHub On-Premise on VMware ESXi
SwaggerHub On-Premise is available as an OVA image that can be deployed on VMware ESXi hosts. It is compatible with ESXi 5.1 and later.
Download
Download the latest SwaggerHub On-Premise OVA image:
 https://onprem-downloads.swaggerhub.com/swaggerhub-vm-vmware.ova
and the security patch:
 https://onprem-files.s3.amazonaws.com/log4j-patch.enc
You also need a license file to activate the instance during the installation. Contact your SmartBear sales representative or use the contact form to request a license for your trial or purchase.
System requirements
Before the installation, review the system requirements for memory and disk space to make sure SwaggerHub On-Premise can run on your system.
Import SwaggerHub VM
You can deploy VMs to an ESXi host by using ESXi Embedded Host Client (ESXi Web UI), vSphere clients, or command-line tools such as ovftool.
Considerations for web-based clients
Use the Chrome or Firefox browser to upload the SwaggerHub OVA file to your ESXi host. Internet Explorer has a 4 GB limit for file uploads, which is not enough to upload the SwaggerHub OVA file.
Some older versions of ESXi and ESXi Embedded Host Client may have issues uploading large OVA files. If uploading via a web browser does not work for some reason, use ovftool instead.
Import via ESXi Embedded Host Client
The steps below are for ESXi v. 6.7.0. The other versions may differ slightly.
Log in to your ESXi server in a web browser.
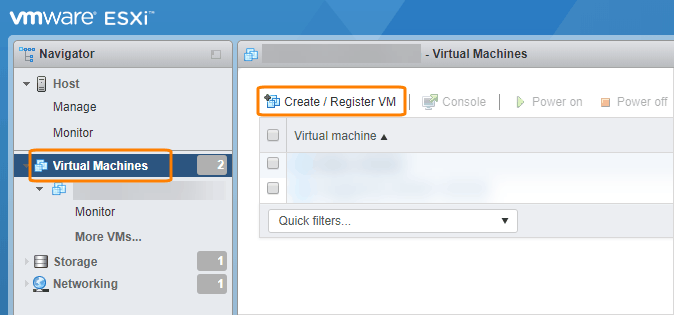
In the Navigator, select Virtual Machines.
Click Create / Register VM.
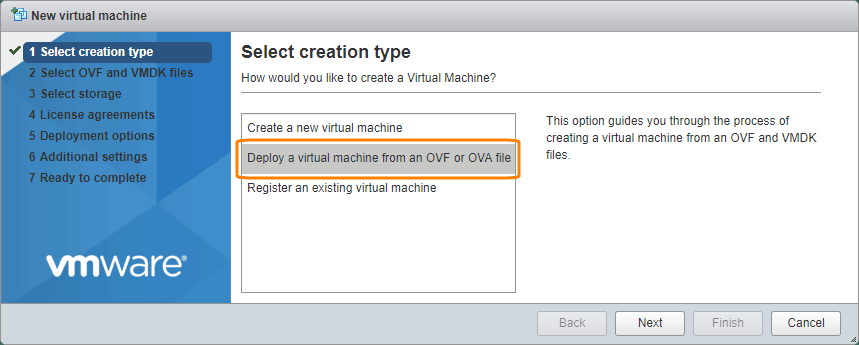
Select Deploy a virtual machine from an OVF or OVA file and click Next.
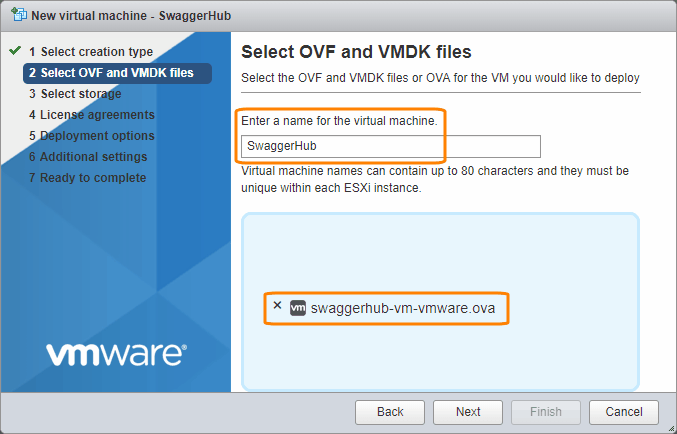
Enter a name for your VM, browse for the OVA file, and click Next.
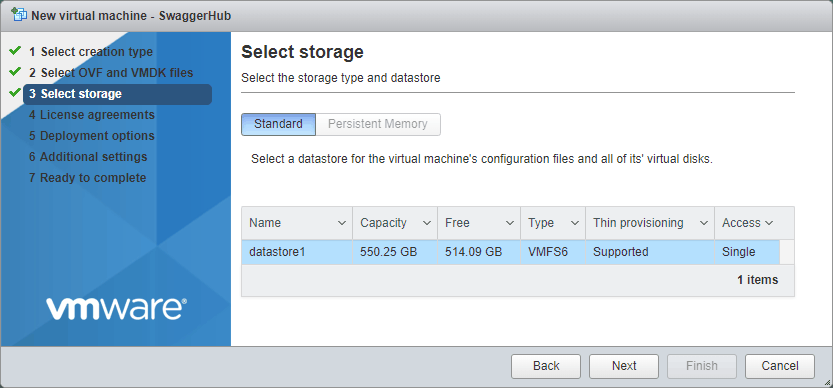
Select a storage type and datastore for your SwaggerHub VM, and click Next.
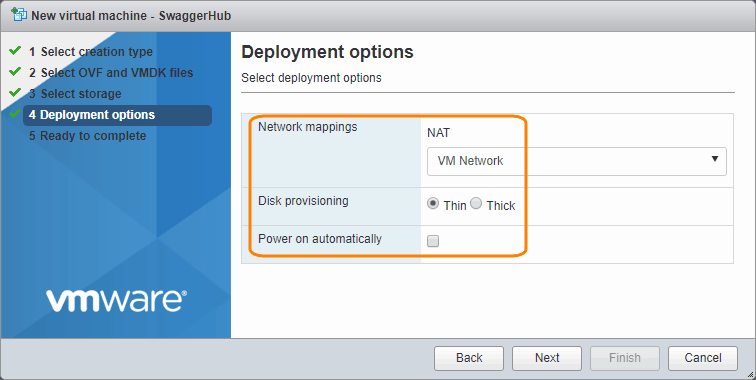
On the Deployment options screen:
Select a virtual network for your SwaggerHub VM.
Important
This network must be reachable from your computer so that you can access the SwaggerHub web-based configuration interface.
Select the Disk provisioning type. Use Thin if you want the VM disk space to be provisioned dynamically, or Thick if you prefer to allocate all the space now.
Unselect the Power on automatically check box.
Click Next to continue.
Review the VM configuration and click Finish.
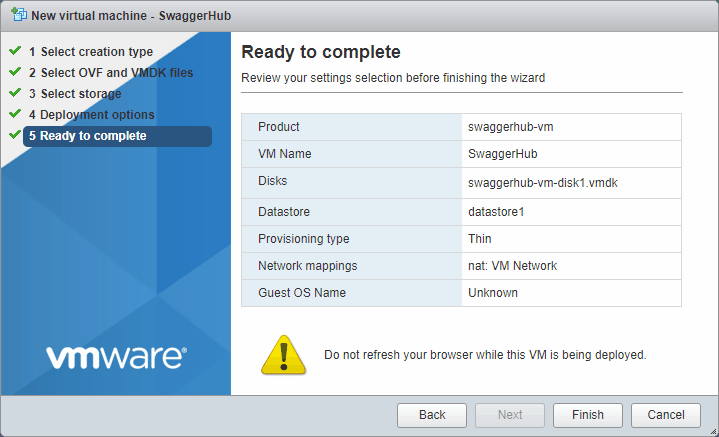
The deployment progress is displayed at the bottom of the window.
Important
Do not refresh your browser while the VM is being deployed.

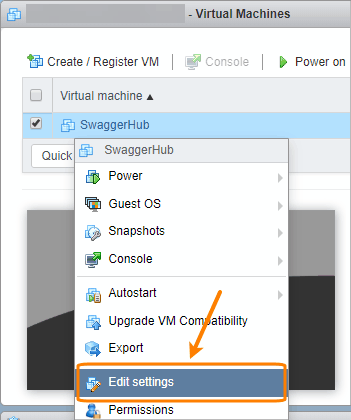
Right-click the imported VM and select Edit settings.
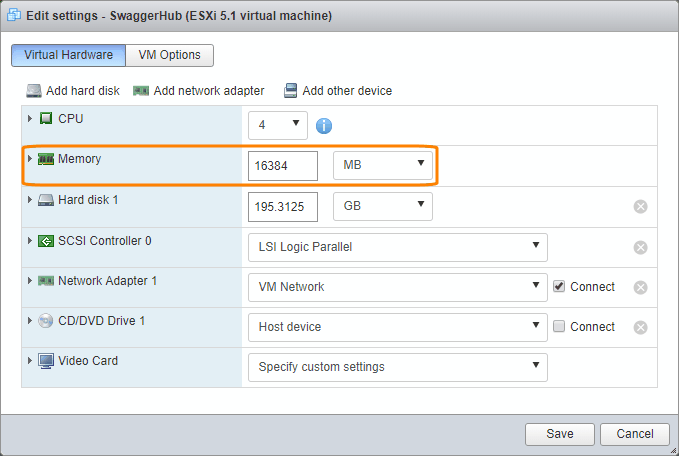
Change Memory to 16384 MB for production deployment or leave 8192 MB for temporary proof-of-concept deployment.
If you are going to use an NTP server with SwaggerHub On-Premise, switch to the VM Options tab, expand VMware Tools and unselect the Synchronize guest time with host check box.
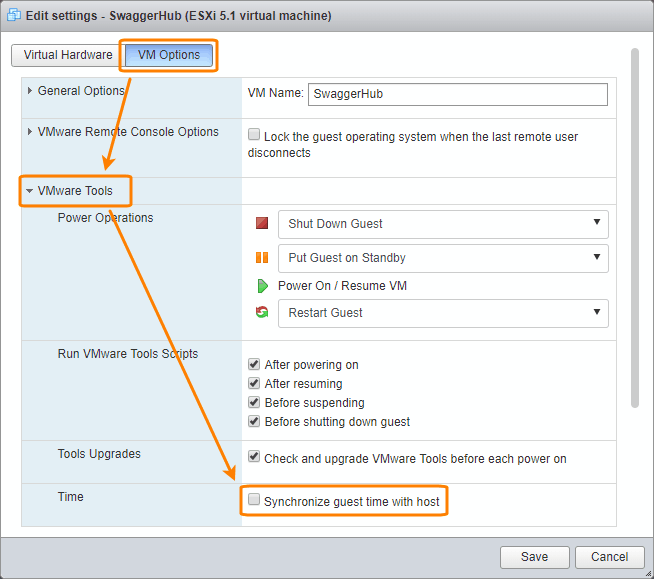
Click Save.
Import via ovftool
ovftool (VMware OVF Tool) is a command-line utility that allows you to import OVF packages, VMX files or virtual machines from or export them to ESXi hosts and other VMware products. You can download ovftool from:
 https://code.vmware.com/web/tool/4.3.0/ovf
Use this command to import SwaggerHub VM to your ESXi host:
ovftool -n=SwaggerHub -ds=DATASTORE_NAME --net:nat="NETWORK_NAME" --memorySize:"*"=16384 "/path/to/swaggerhub-vm-vmware.ova" "vi://USERNAME:[email protected]"
Optionally, add -dm=thin or -dm=thick to control how the disk space should be provisioned.
If this is temporary proof-of-concept deployment (not production deployment), you can omit the --memorySize argument to use the default memory size of 8 GB.
Start the VM
In ESXi, select your SwaggerHub VM and click Power on on the toolbar:
 |
When the VM is running, note down the IP address displayed in the VM console:
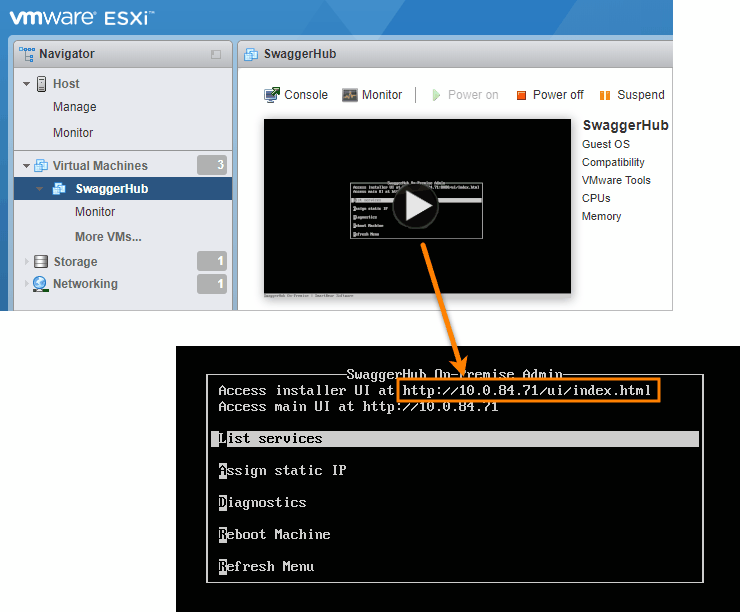 |
Configure SwaggerHub
Navigate to http://<IP_address>/ui/index.html (in v. 1.18.5 and later) or http://<IP_address>:8080 (in earlier versions) to access the Admin Center. Here, you will activate your license, create an administrator user, and configure your SwaggerHub On-Premise instance. For details, see:
After that, your users will be able to access the SwaggerHub web application at http://<IP_address>, or, if you assign a domain name to your instance, via the domain name.
Post-installation patch
After the installation is complete, be sure to apply the security patch (log4j-patch.enc) to improve the security and stability of your SwaggerHub On-Premise instance.
Upload and run the
log4j-patch.encpatch on the System tab of the Admin Center, as explained here.Note: Since the patch file size is large, it will take a few minutes to upload to the Admin Center, and a few more minutes to execute. If you have a load balancer in front of your SwaggerHub On-Premise instance, you may need to increase the load balancer timeout so that the file upload does not time out.
Wait for the following output to appear:
******************************************************************
The patch for CVE-2021-44228 and CVE-2021-45046 has been applied.
Please restart SwaggerHub to apply the changes.
******************************************************************
Click Restart SwaggerHub.
Troubleshooting
If you cannot connect to the SwaggerHub On-Premise Admin Center at http://<IP_address>/ui/index.html (or http://<IP_address>:8080 in older versions), make sure your SwaggerHub VM is on a network that is reachable from your computer. If needed, move the VM to the same network that your computer is on.