SSH Access to SwaggerHub On-Premise
Note: Introduced in SwaggerHub On-Premise 1.19.1.
SSH, or secure shell, is a method for securely connecting to a remote server. SwaggerHub On-Premise provides SSH access (with sudo privileges) to its underlying operating system for maintenance and troubleshooting purposes.
SSH in SwaggerHub On-Premise uses public key authentication. Before you can use SSH, you first need to add an authorized SSH user with a public key. AWS and Azure instances have a default SSH user created at launch time. SSH users can also be added via the SwaggerHub Admin Center.
Requirements
Network connectivity
SSH uses TCP port 22. Make sure your firewall allows TCP connections to your SwaggerHub VM on this port.
Important
If you use a load balancer with SSL termination and want to connect via SSH using the domain name, the load balancer must forward port 22 traffic to the SwaggerHub VM. If this is not possible (as in case of AWS application load balancers), you will need to connect directly to the IP address.
SSH key types and length
SwaggerHub On-Premise supports RSA, ECDSA, and ED25519 keys. RSA keys are the most common ones. ED25519 keys are more secure but may be not supported by older SSH clients.
DSA keys are not supported.
There are no restrictions on the minimum length of SSH keys.
SSH clients
To connect to a server via SSH, you need an SSH client.
macOS and Linux have a built-in SSH client,
ssh.Windows 10 users can install Windows Subsystem for Linux (WSL), which includes an SSH client. Recent Windows 10 versions also include an OpenSSH client that can be installed as an optional feature.
On earlier Windows versions, you can use SSH clients included in the following packages:
Git for Windows (provides a bash shell that can run
ssh)
Generate an SSH key pair
To connect, you will need an SSH key pair (public and private keys). If you do not have existing keys, you generate them by using the ssh-keygen command or PuTTYgen:
To check if you have existing SSH keys, look in the .ssh folder (~/.ssh/ on macOS and Linux, C:\Users\<username>\.ssh\ on Windows). Typical key names are id_rsa for a private key and id_rsa.pub for a public key.
Default SSH user
AWS, Azure
SwaggerHub On-Premise instances launched from AWS Marketplace and Azure Marketplace have a default SSH user created at launch time.
In AWS, the SSH username is
ubuntu.In Azure, you specify the SSH username yourself.
The default SSH user uses the key pair provided at launch time.
VMware, VirtualBox
VMware and VirtualBox instances do not have a default SSH user. You need to add an SSH user and key manually in the Admin Center (see below).
Add SSH users
You can add new SSH users via the Admin Center. Each user should have their own SSH key. The steps below assume you already have an SSH key pair.
Open the Admin Center.
On the left, select Settings > Privacy.
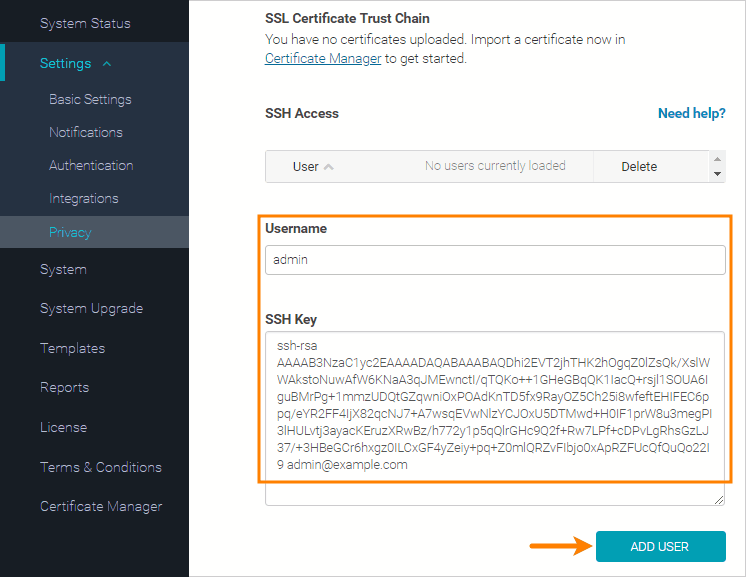
Enter the Username of an SSH user to create.
SSH users are separate from SwaggerHub application users and do not consume license seats. SSH user names may coincide with SwaggerHub application user names.
Note
The swaggerhub username is reserved and cannot be created.
Paste your public SSH key into the SSH Key field. Public keys look similar to this:
ssh-rsa AAAA...
Paste the key value exactly as it was generated. Do not insert extra spaces or line breaks.

Important: Click Add User.
If you want to add more SSH users, repeat the steps.
The created users can now connect to your SwaggerHub instance using SSH. The changes are effective immediately, there is no need to restart SwaggerHub.
Connect to SwaggerHub On-Premise using SSH
After you have created a shell user and added your SSH key, you can connect to your SwaggerHub instance using SSH:
ssh [email protected]
or if your private key is stored in a non-default location:
ssh -i /path/to/private/key [email protected]
In the command above, replace user with the SSH user you previously created and swaggerhub.yourcompany.com with your SwaggerHub domain name or IP address. If you run SwaggerHub on VirtualBox in NAT mode, also add the -p 2222 argument where 2222 is the host port mapped to VM port 22.
If you specified a passphrase when generating your SSH key pair, you will be prompted to enter that passphrase during the login process.
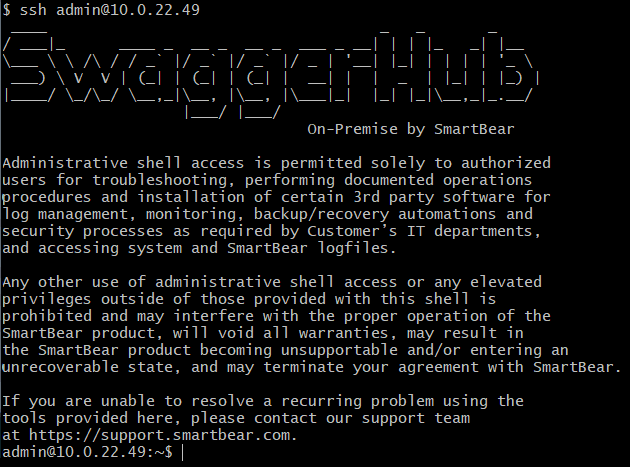
Once logged in, you will see:
 |
If the welcome message does not appear, run the command with the -vvv argument to output debugging information, and, also, see the Troubleshooting tips.
Replace an SSH key for a user
If you or another SSH user generated a new SSH key pair, you should remove the old public key from SwaggerHub and replace it with the new one. Public SSH keys of authorized users are stored in the ~/.ssh/authorized_keys file. To replace a user’s SSH key, you can:
Connect to the VM using SSH and replace the key in the
~/.ssh/authorized_keysfile manually.-- or --
Delete the user of this SSH key from the SSH Access list (see below) and create the user anew. (Note that this will clean the user’s home directory, which might not be desirable.)
Delete an SSH user
Open the Admin Center.
Select Settings > Privacy on the left.
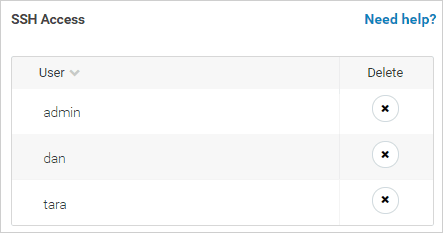
In the SSH Access list, click
 next to the SSH user you want to delete, and confirm the deletion.
Note
SSH users are separate from SwaggerHub application users, so deleting SSH users does not affect existing SwaggerHub users and license seats.
Deleting an SSH user also deletes the associated SSH key and the user’s home directory (~/home/username/). If this user is currently logged in using SSH, they will be automatically logged out before the user is deleted.
Disable SSH
Deleting all SSH users from the SSH Access list effectively disables SSH access. This will also delete the associated SSH keys from SwaggerHub.
Troubleshooting
If you have issues connecting to your SwaggerHub instance via SSH:
Make sure your firewall allows connections to the SwaggerHub VM on TCP port 22 from your IP address.
Run
sshwith the-vvvargument to see verbose output while connecting.If you connect to the domain name and the domain name points to a load balancer, make sure the load balancer is configured to forward the port 22 traffic to the SwaggerHub VM. Otherwise, connect directly to the IP address instead.
Note
AWS application load balancers (ALB) do not support port 22 forwarding.
Try connecting to the IP address instead of the domain name.
If you run SwaggerHub on VirtualBox in NAT mode, run
sshwith the-p <port>argument where<port>is the host port (typically 2222) mapped to VM port 22.Make sure the username is in the SSH Access list. When you add an SSH user and key to SwaggerHub, remember to click the Add User button.