Vortex Job Execution Events
Zephyr’s Vortex provides our users with the ability to get retrieve the test cases, schedule, and execute the test cases according to the automation report created. During this process, there are certain scenarios that can be set up to allow you to utilize Vortex to its' full potential. When setting up your Vortex job, you can set it up so that Zephyr will automatically attaching files to your test execution results or the test cases that were added, scheduled and execute can automatically be mapped to existing requirements in Zephyr or imported Jira requirements that are in Zephyr. These can be applied to all jUnit XML results files when setting up and running your Vortex job.
When running Vortex jobs, we’ve also included an attachment to all test executions that includes the data from the jUnit XML report. This is included as evidence to provide users with a way to report that the test case was executed properly.
Previously, this was only included for test cases that were executed and set as “Failed”. We now will include this evidence attachment even for “Passed” test case executions.
Attach Files for Automation Executions using jUnit XML results file
For our users using jUnit XML results for their automation executions, we’ve added generic methods that allow you to upload files as attachments for individual test case executions.
We accept all file attachments ranging from image files, word documents, PDF’s, HTML files, etc.
Adding any type of file format as an attachment to a test case execution is done by utilizing the <attachment> tag within your jUnit XML results file.
1. Simply edit your jUnit XML file and add the attachment to the individual test case.
You can have the option to add a single attachment or multiple attachments to a single test case.
Add a single attachment using the <attachment> tag and be sure that if you want to have multiple attachments, keep them nested in an <attachments> tag.
View the examples below to see how to edit your jUnit XML file to include attachments for your test cases.
In the example snippet below, the general idea is there but you would be replacing the contents in the attachment tag(s).
Adding a single attachment:
<!--Adding a single attachment using the attachment tag-->
...
<testcase classname="JUnitXmlReporter.constructor" name="should default consolidate to true" time="0">
  <attachments>
    <attachment>C:\Automation\Results\xyz.png</attachment>
  </attachments>
</testcase>
...
Adding multiple attachments:
<!--Adding multiple attachments using the attachment tag-->
...
<testcase classname="JUnitXmlReporter.constructor" name="should default consolidate to true" time="0">
  <attachments>
    <attachment>C:\Automation\Results\xyz.html</attachment>
    <attachment>C:\Automation\Results\xyz.pdf</attachment>
    <attachment>C:\Automation\Results\xyz.xlsx</attachment>
  </attachments>
</testcase>
...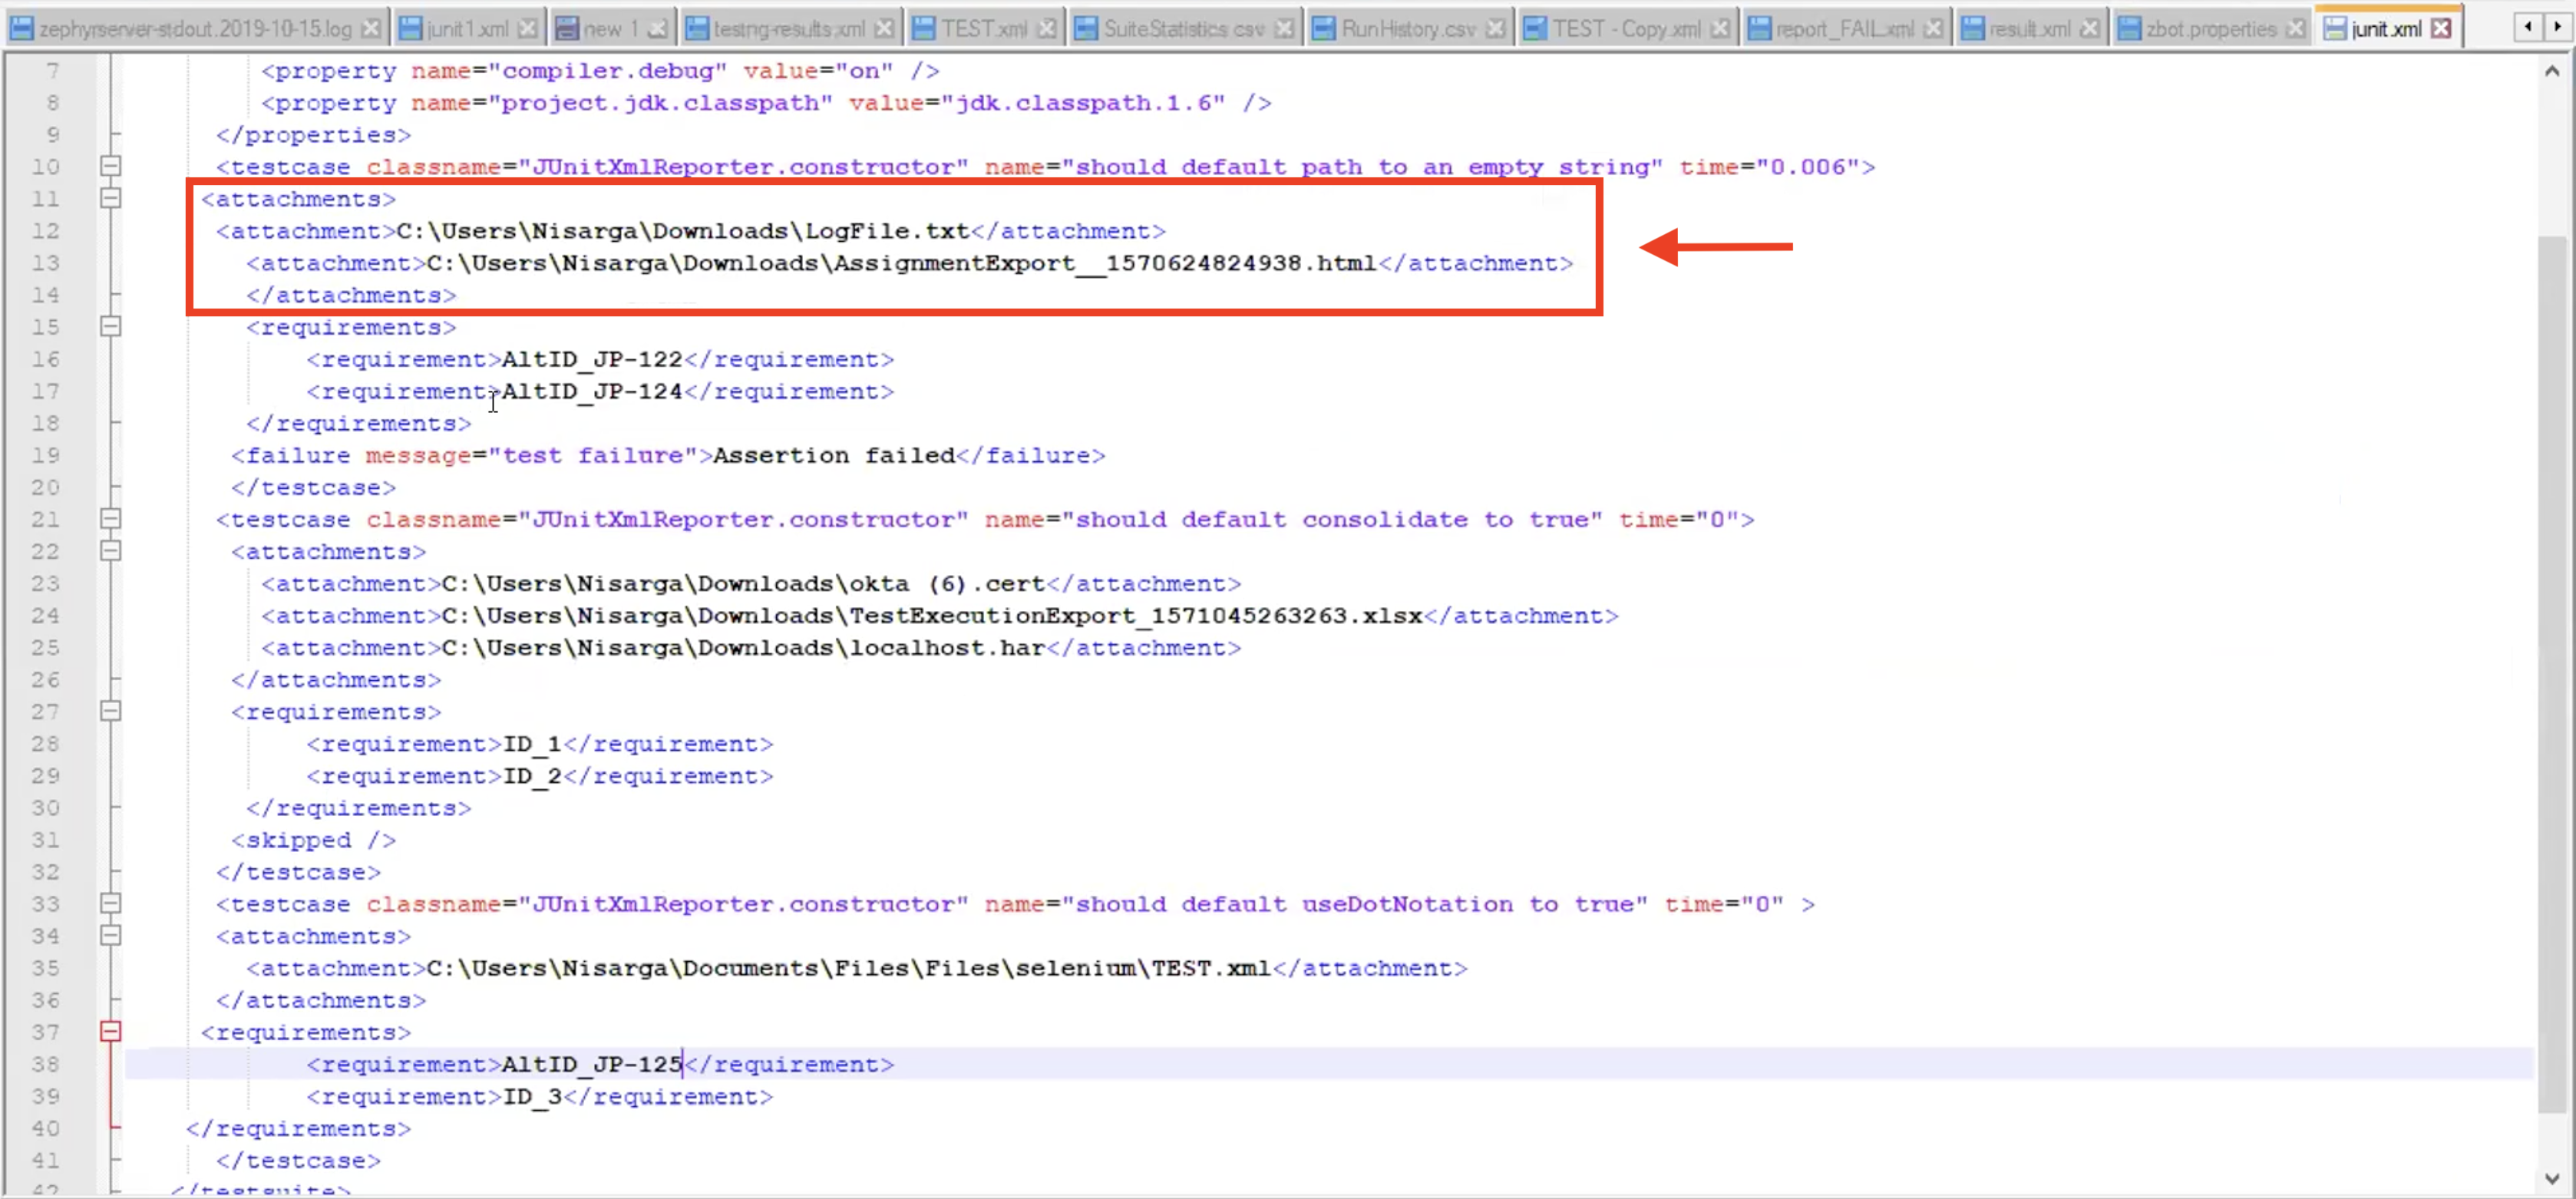 |
2. Once you’ve edited your jUnit XML results file and uploaded it to Zephyr Vortex job, execute the Vortex job using the same jUnit XML file (the one with your attachments).
 |
3. Navigate to your test execution of the test case to verify that the attachment has been included.
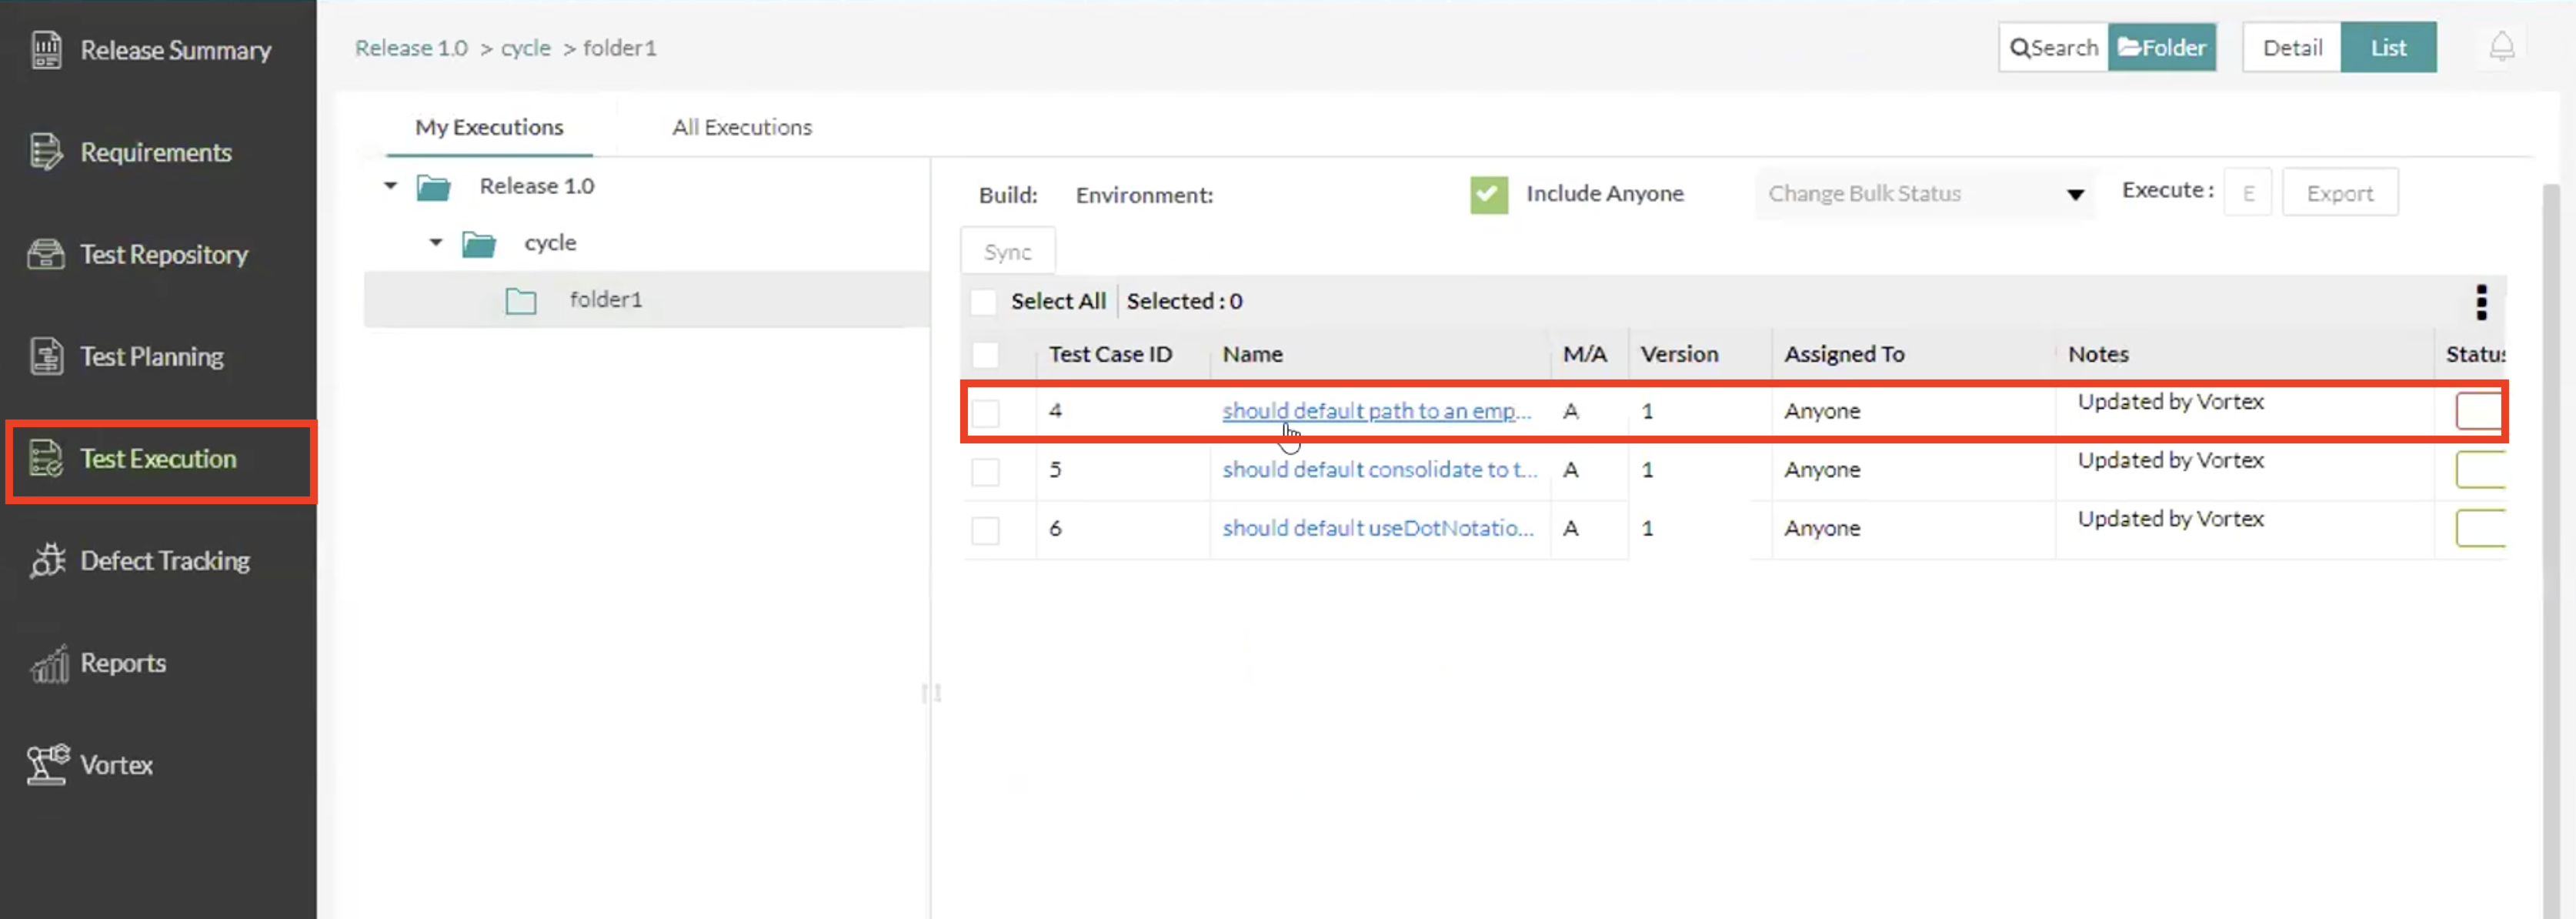 |
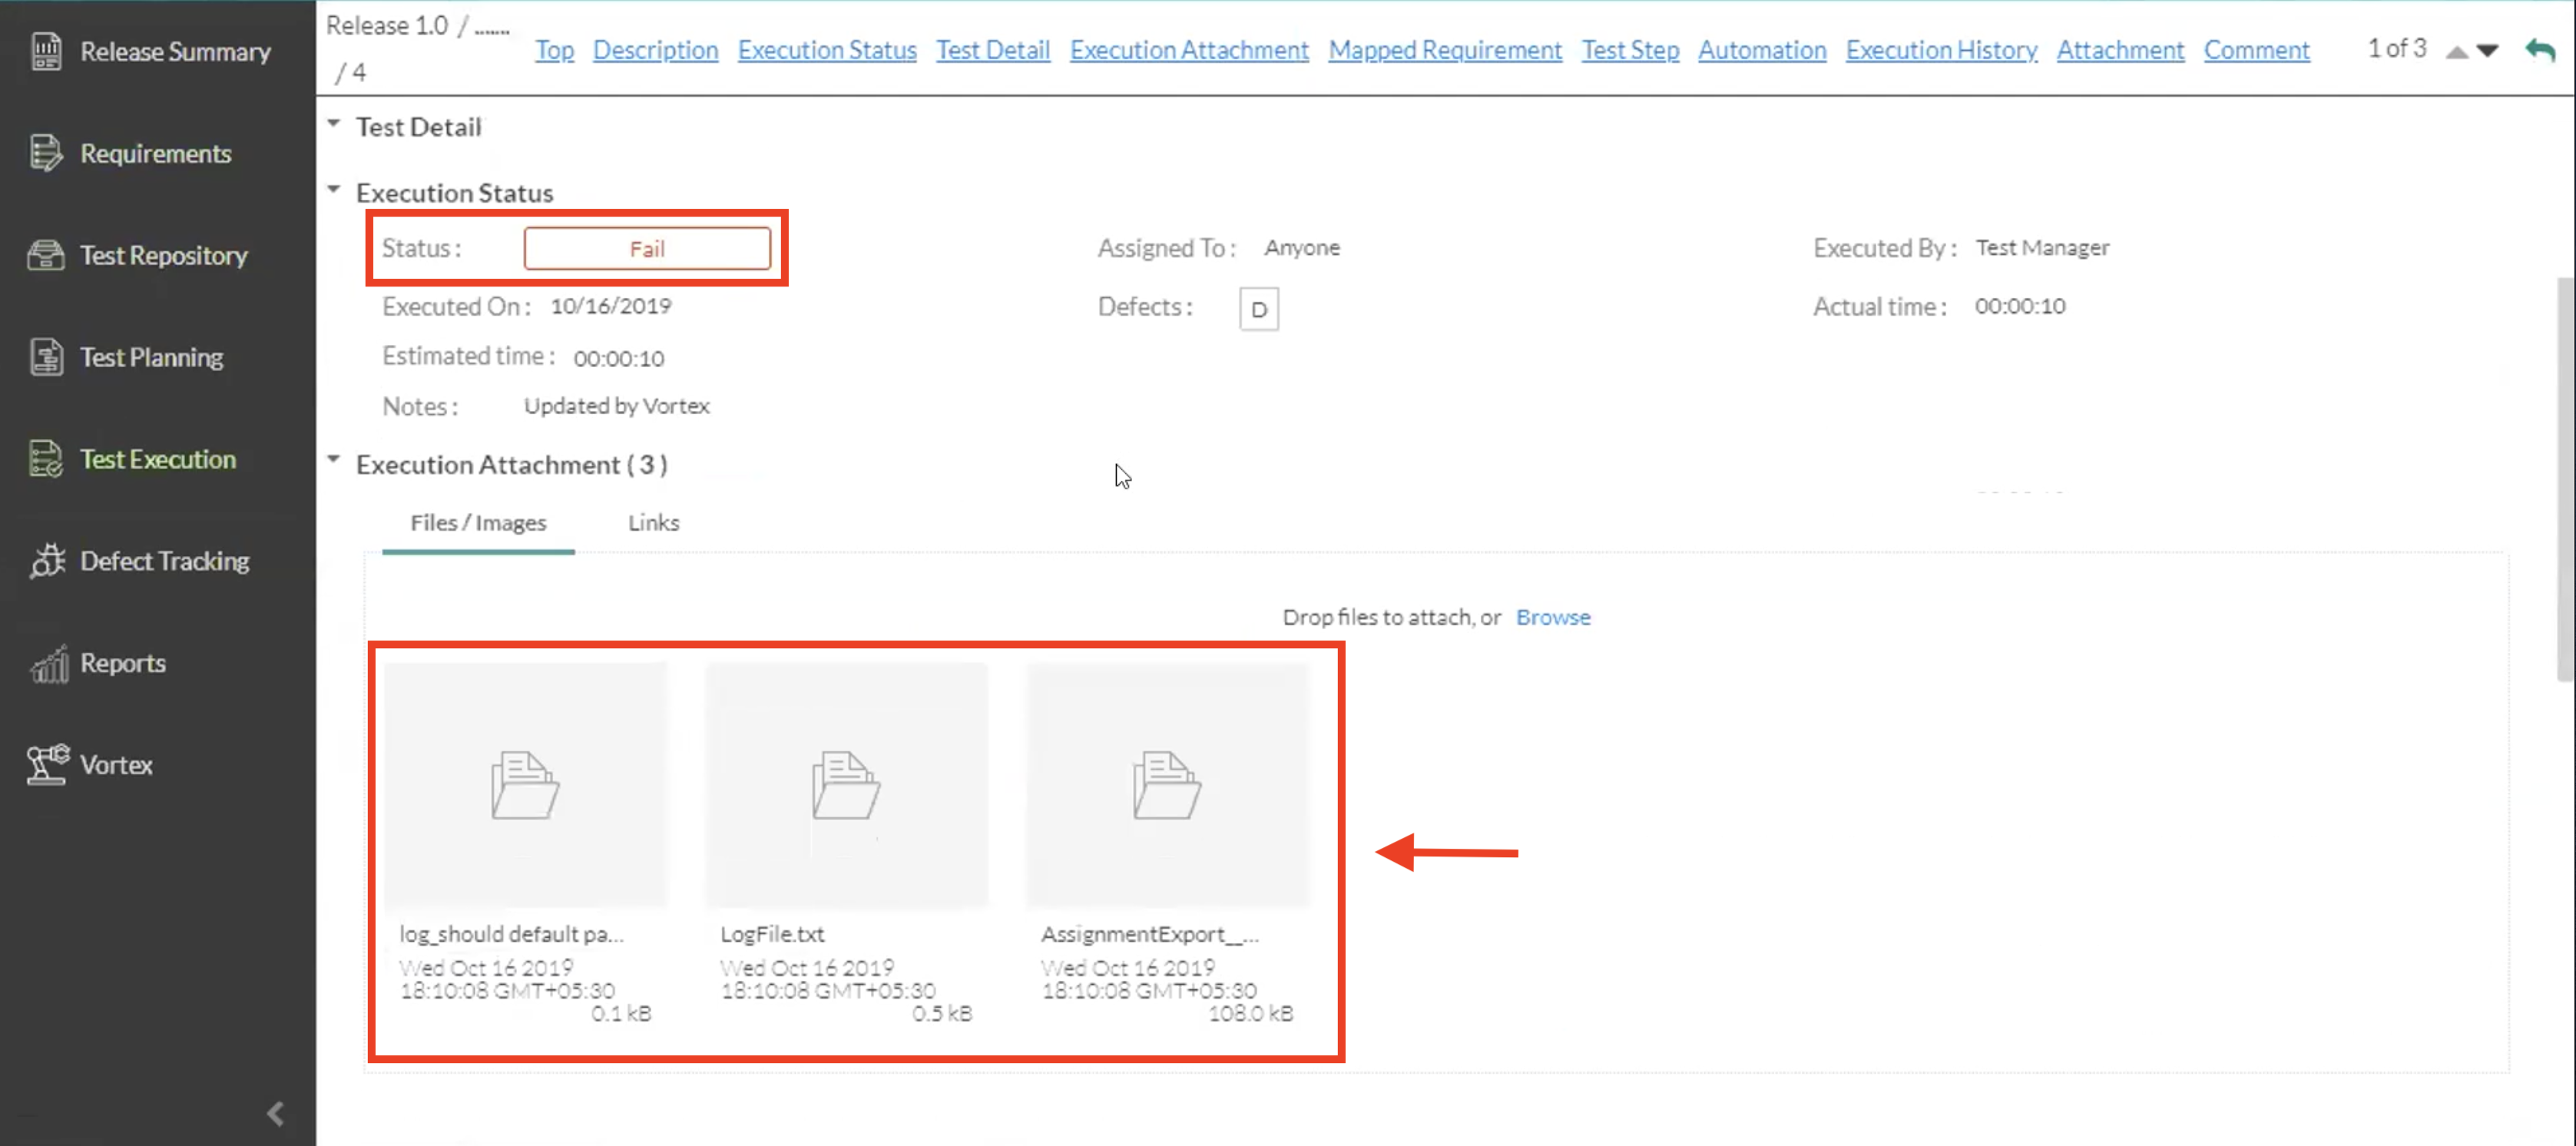
4. Notice and verify that the attachments we’ve added in the XML file is included in our test case execution now. All files attachment will be under the Execution attachment section.
Note: There is a third file that is in the attachment section that was not included in our XML file. This file is the evidence file that is attached to every test case execution to provide users with a way to report that the test case was executed properly.
Previously, this was only included for test cases that were executed and set as “Failed”.
 |
Automatic Execution Evidence Attachment
Zephyr now includes this evidence attachment even for “Passed” test case executions. The evidence attachment is included for both “Failed and “Passed test case executions from now on.
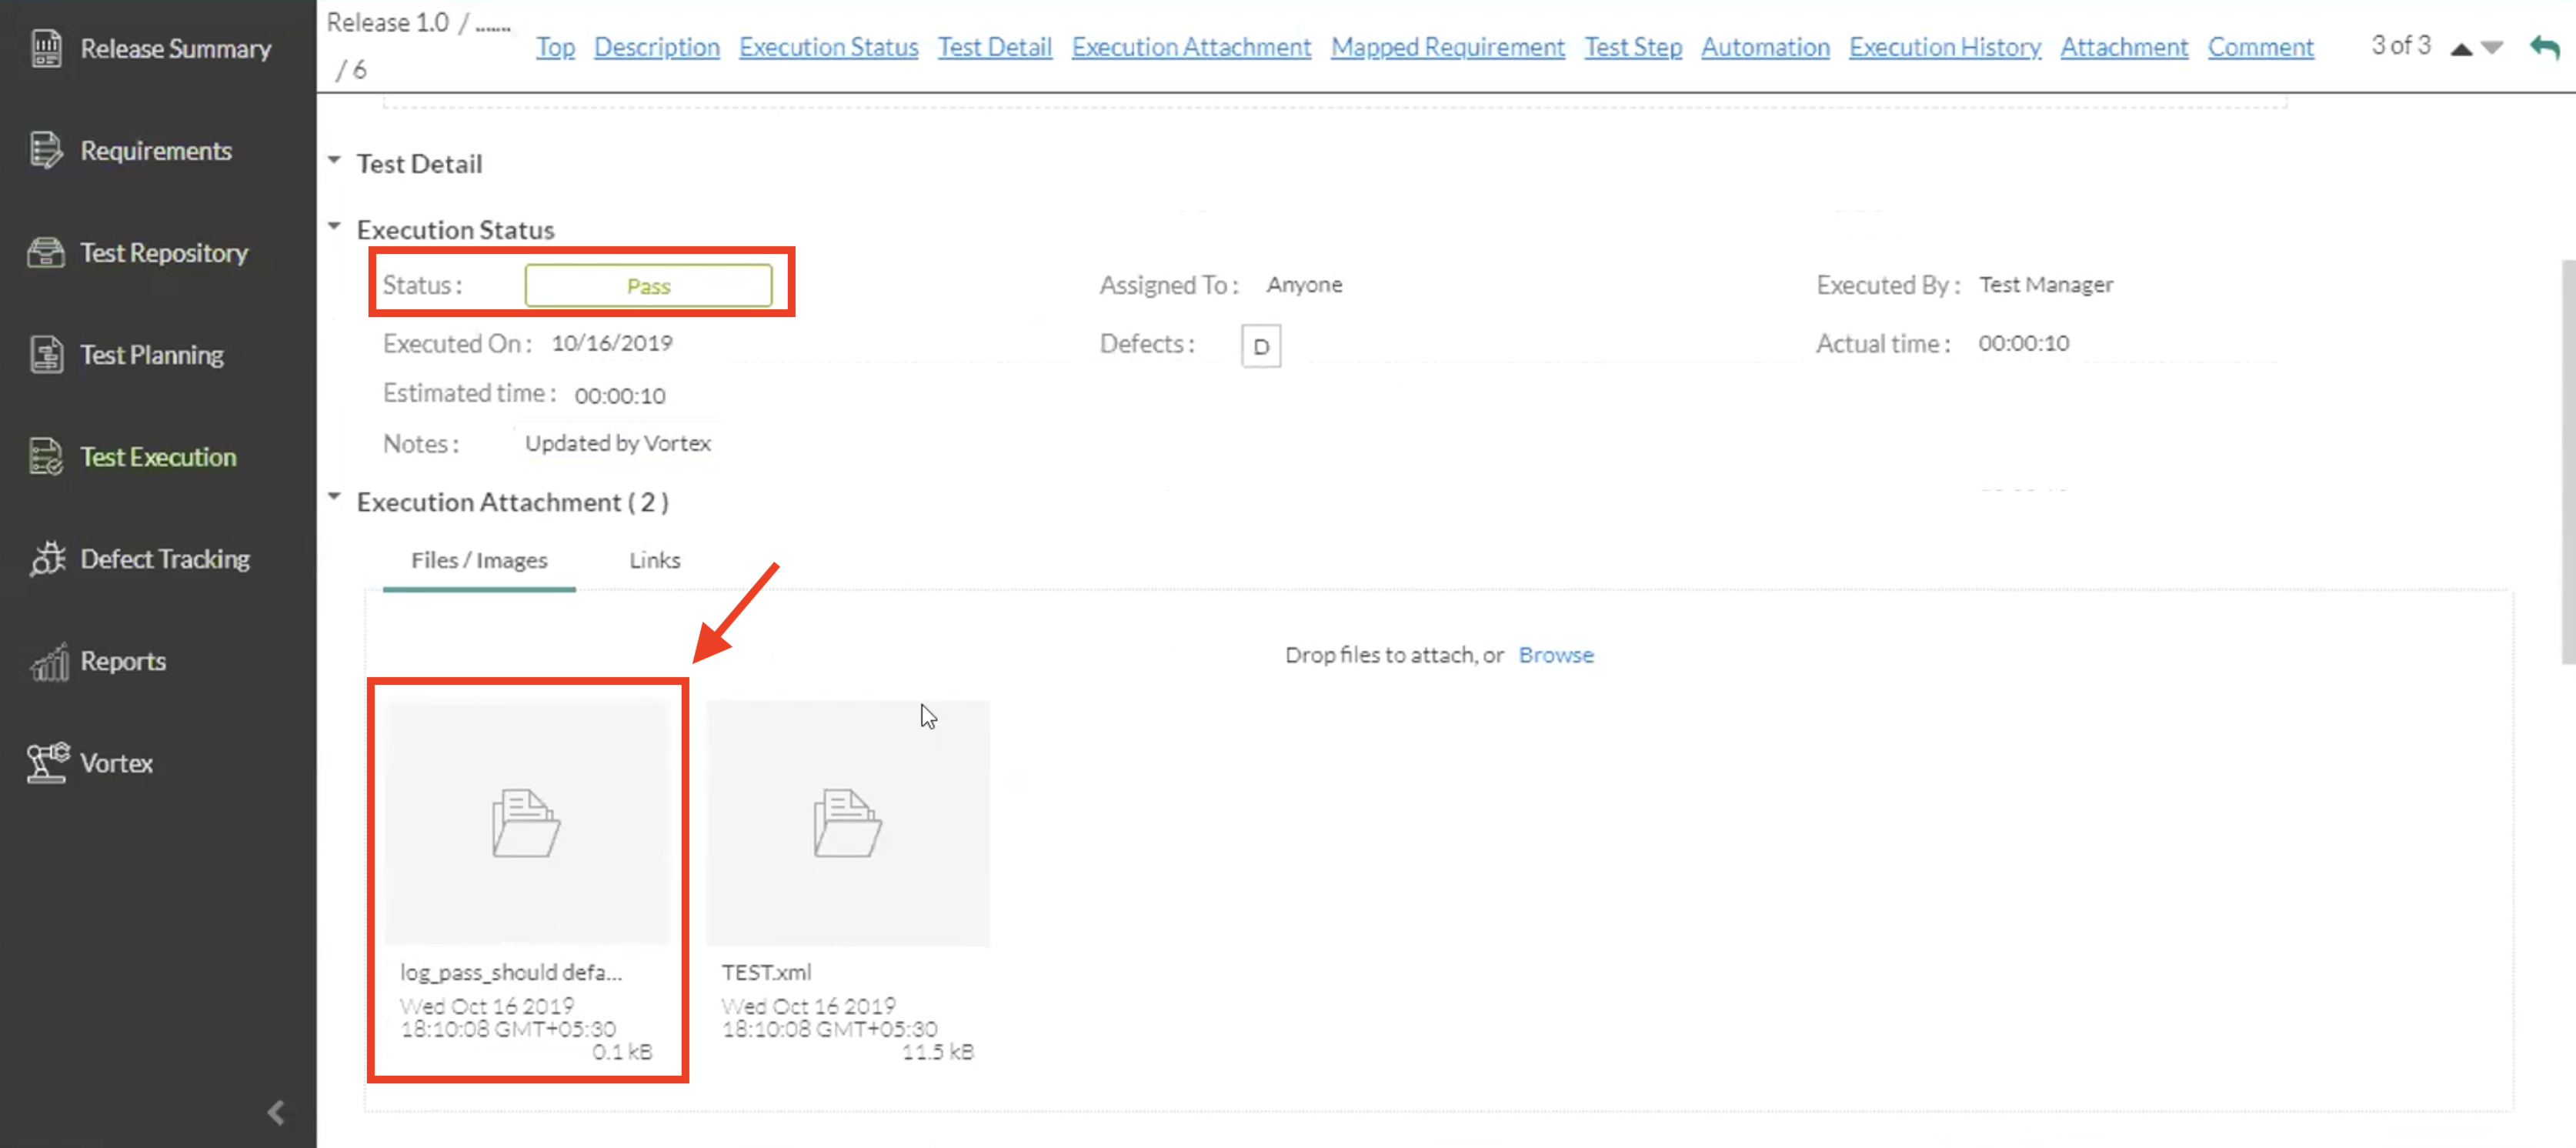 |
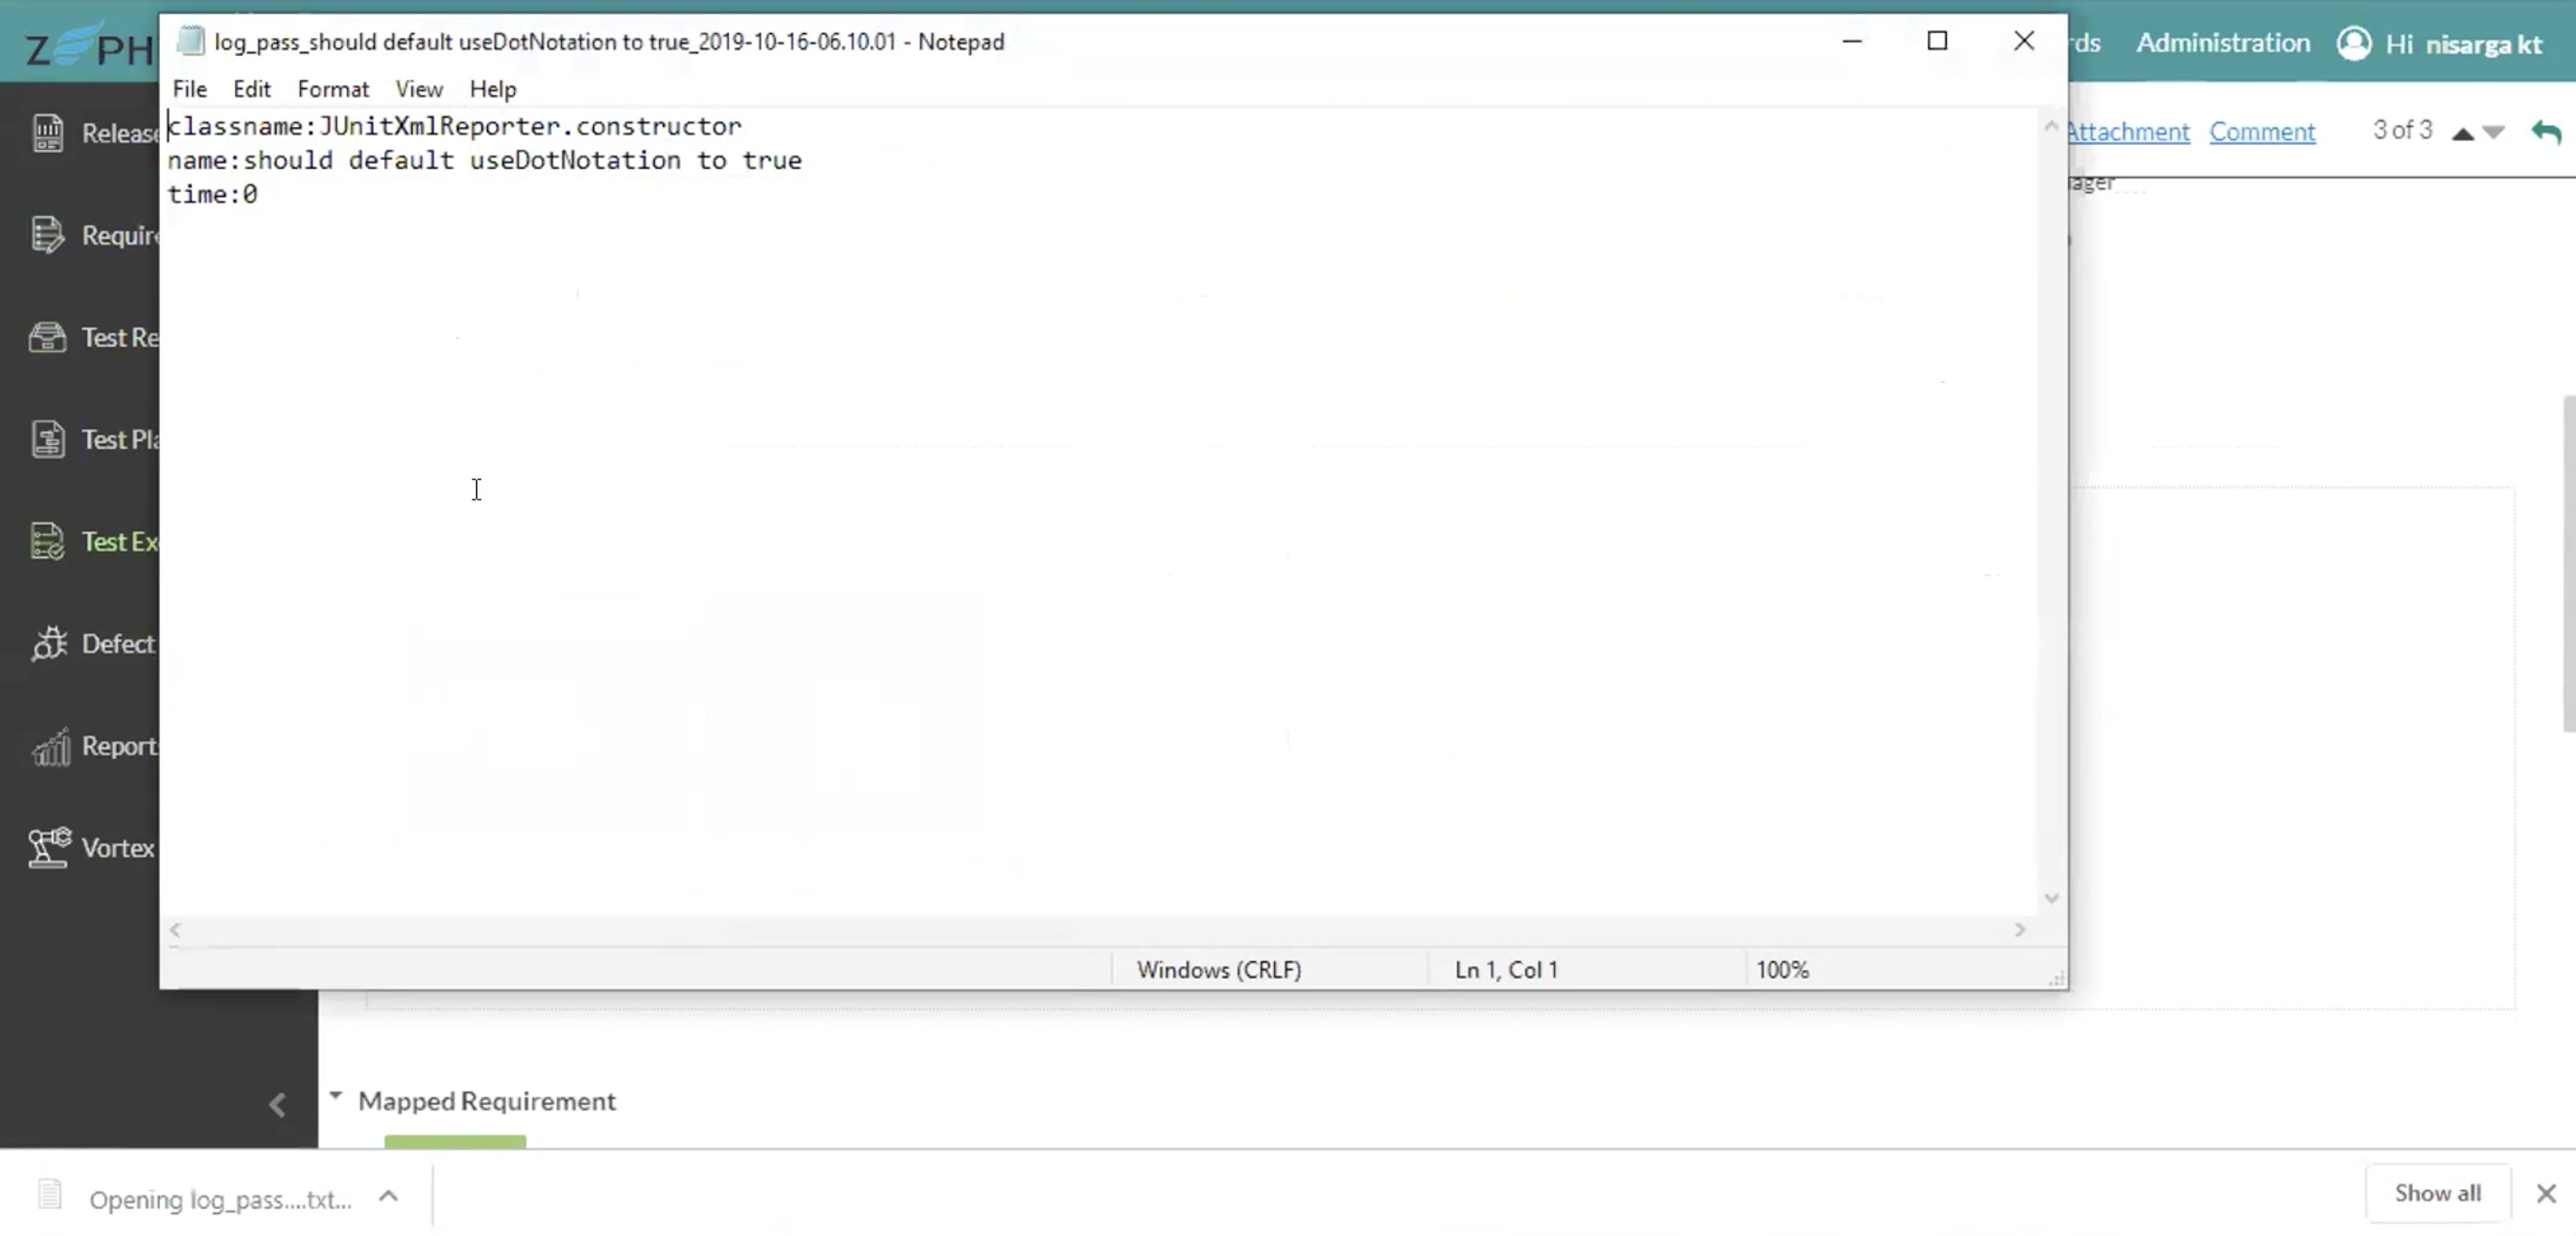
This evidence file includes all the information regarding the test case execution that was defined in the XML file. If you click the file, download and open it, you’ll see that it includes the corresponding information for the test case execution that was define originally in the XML file. This is here to ensure users that the test case execution was run properly.
 |
Map Test Cases to Requirements Automatically using jUnit XML results file
Zephyr provides our users with the ability to automatically map their test cases to either their Zephyr requirements or their imported Jira requirements when they execute their Vortex job.
Adding the mapping for your test cases to requirements is done by utilizing the <requirement> tag within your jUnit XML results file. When you add the requirements in the XML file and execute the Vortex job using the same XML file, Zephyr will parse your XML file and automatically link your test cases to the corresponding requirements that you’ve defined for the test case in the XML file.
This automatic mapping for test case to requirement will only occur if the requirement exists within Zephyr.
1. Simply edit your jUnit XML file and add the requirements to want to be mapped to the individual test case.
You can have the option to add a single requirement or multiple attachments to a single test case.
Add a single requirement using the <requirement> tag and be sure that if you want to have multiple requirements, keep them nested in an <requirements> tag.
There are two types of requirement IDs. These IDs are not interchangeable. We highly recommend you use the proper IDs for the proper requirements mapping.
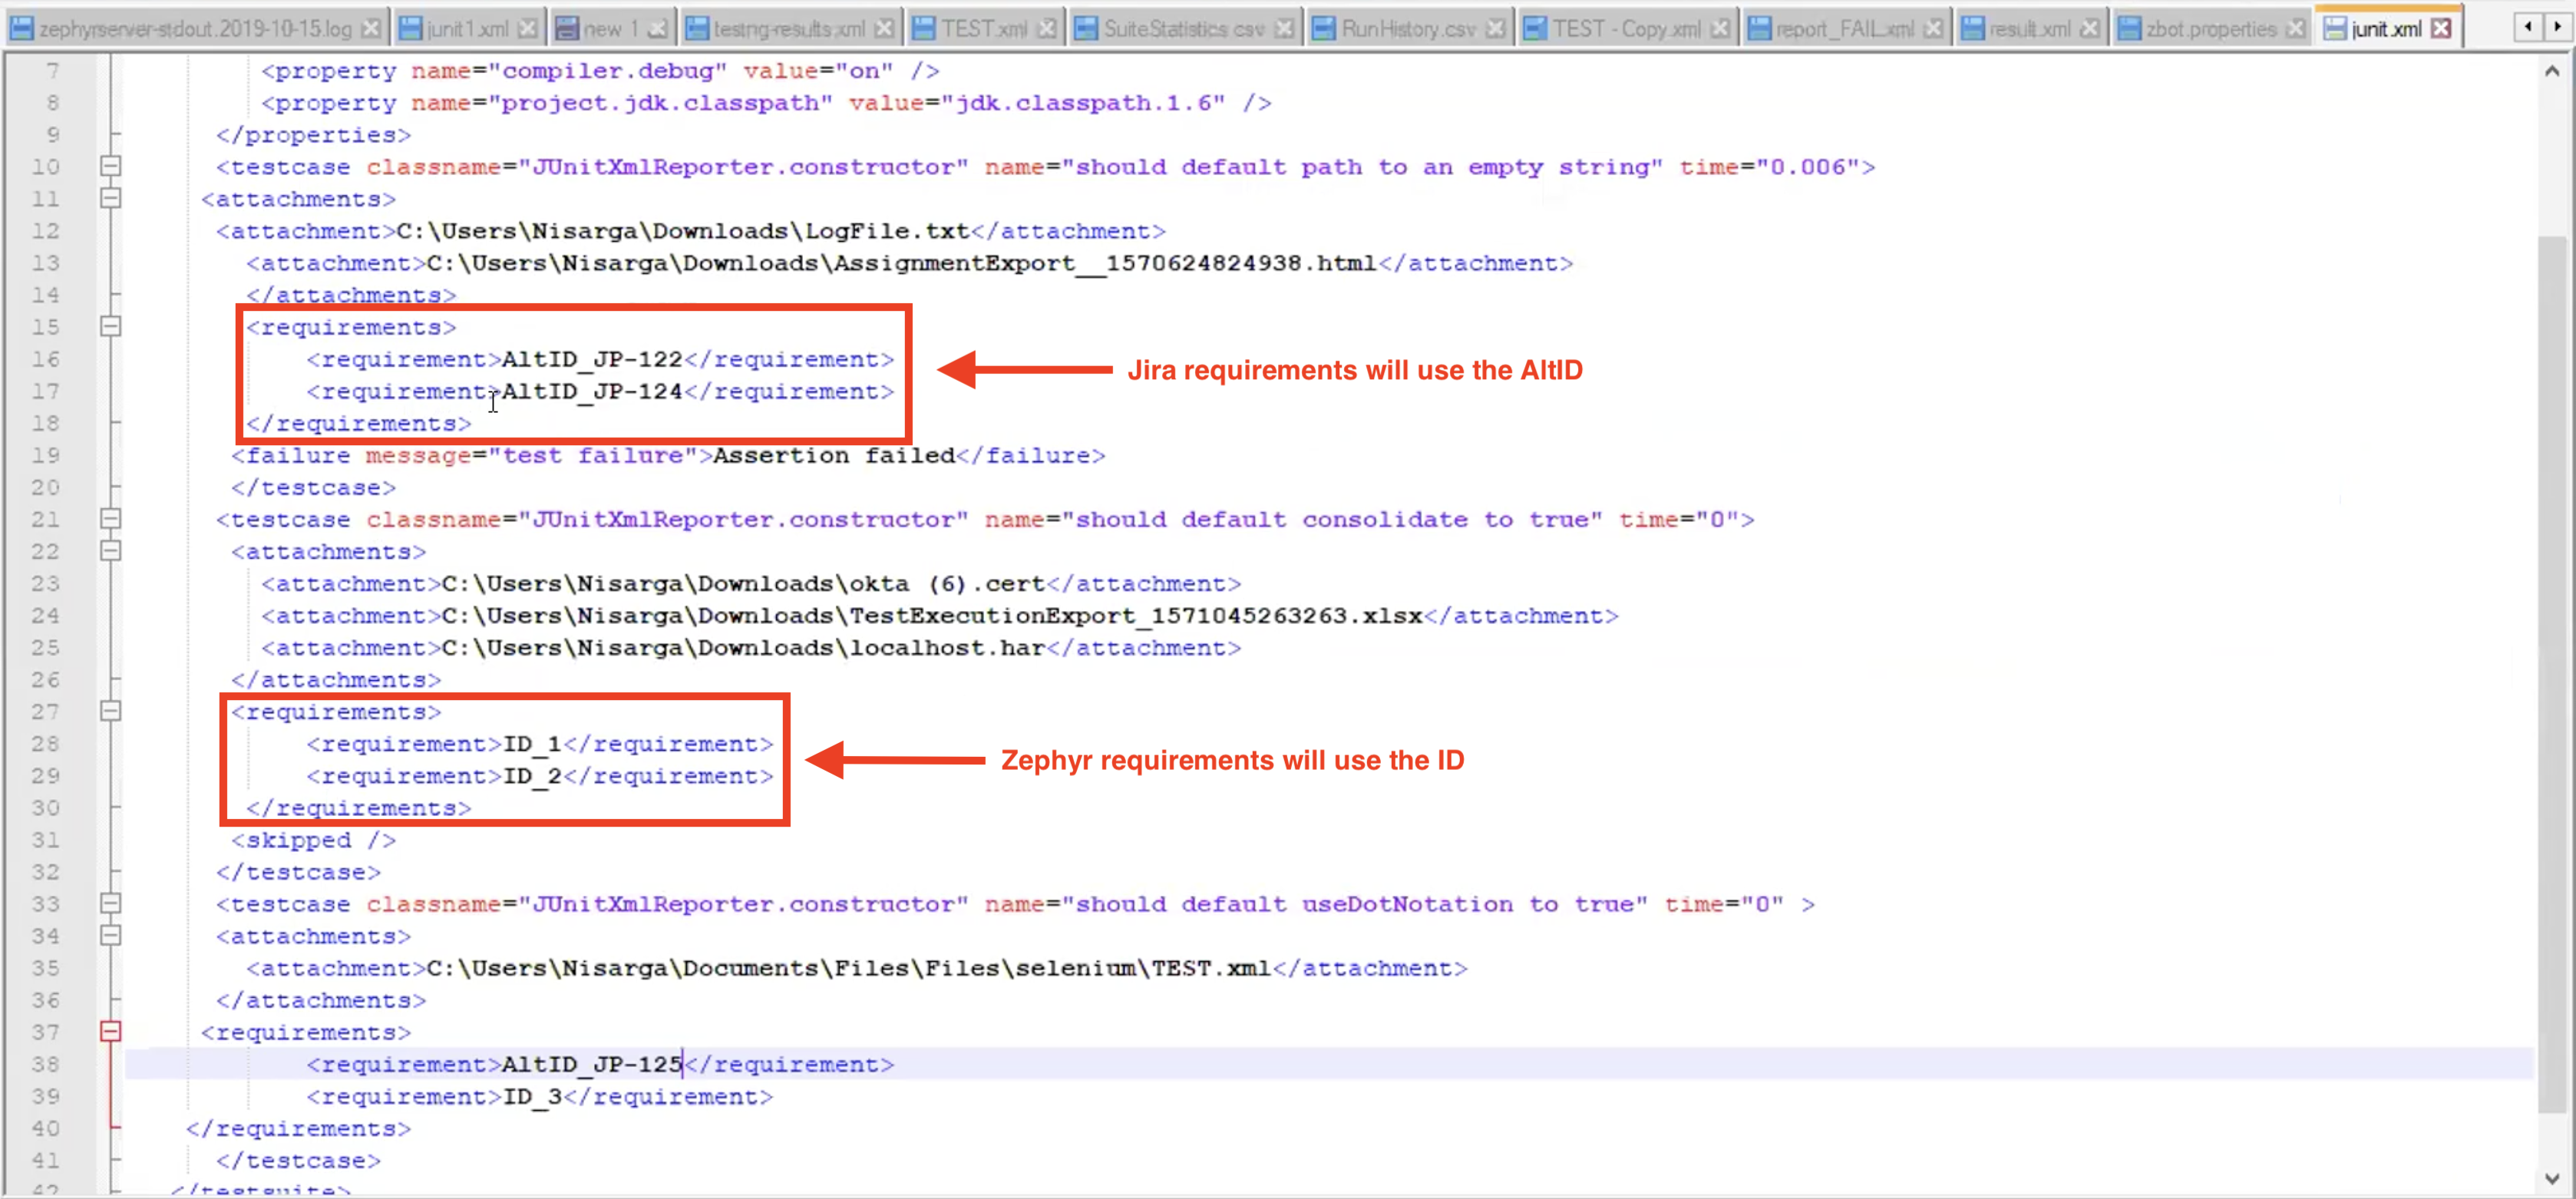
ID: This is the requirement ID for internal Zephyr requirements. If you’re trying to have Zephyr automatically map the test case to an internal Zephyr requirement, use this ID inside the requirement tag.
AltID: This is the requirement ID for Jira requirements. If you’re trying to have Zephyr automatically map the test case to an imported Jira requirement, use this AltID inside the requirement tag.
View the examples below to see how to edit your jUnit XML file to include your requirements for your test cases.
In the example snippet below, the general idea is there but you would be replacing the requirements ID in the requirement tag(s).
Adding a single requirement mapping:
The first example is for mapping to an internal Zephyr requirement using the ID in the requirement tag. The second example is for mapping to an imported Jira requirement using the AltID in the requirement tag.
<!--Adding a single requirement mapping for an INTERNAL ZEPHYR Requirement using the requirement tag-->
...
<testcase classname="JUnitXmlReporter.constructor" name="should default consolidate to true" time="0">
  <requirements>
    <requirement>ID_7559</requirement>
  </requirements>
</testcase>
...
-------------------------------------------------------------------------------------------------------
<!--Adding a single requirement mapping for an IMPORTED JIRA Requirement using the requirement tag-->
...
<testcase classname="JUnitXmlReporter.constructor" name="should default consolidate to true" time="0">
  <requirements>
    <requirement>AltID_Zephyr-12345</requirement>
  </requirements>
</testcase>
...
Adding multiple requirements mapping:
The first example is for mapping to an internal Zephyr requirement using the ID in the requirement tag. The second example is for mapping to an imported Jira requirement using the AltID in the requirement tag.
<!--Adding multiple requirements mapping for INTERNAL ZEPHYR Requirements using the requirement tag-->
...
<testcase classname="JUnitXmlReporter.constructor" name="should default consolidate to true" time="0">
  <requirements>
    <requirement>ID_7559</requirement>
    <requirement>ID_7600</requirement>
    <requirement>ID_7700</requirement>
  </requirements>
</testcase>
...
-------------------------------------------------------------------------------------------------------
<!--Adding multiple requirements mapping for IMPORTED JIRA Requirements using the requirement tag-->
...
<testcase classname="JUnitXmlReporter.constructor" name="should default consolidate to true" time="0">
  <requirements>
    <requirement>AltID_Zephyr-12345</requirement>
    <requirement>AltID_Zephyr-54321</requirement>
    <requirement>AltID_Zephyr-13579</requirement>
  </requirements>
</testcase>
...
Take note of the example below.
We will map test cases to both imported Jira requirements using the AltID and to internal Zephyr requirements using the ID
 |
2. Once you’ve edited your jUnit XML results file and uploaded it to Zephyr Vortex job, execute the Vortex job using the same jUnit XML file (the one with your requirements added).
Zephyr will parse your XML file and automatically link your test cases to the corresponding requirements that you’ve defined for the test case in the XML file.
 |
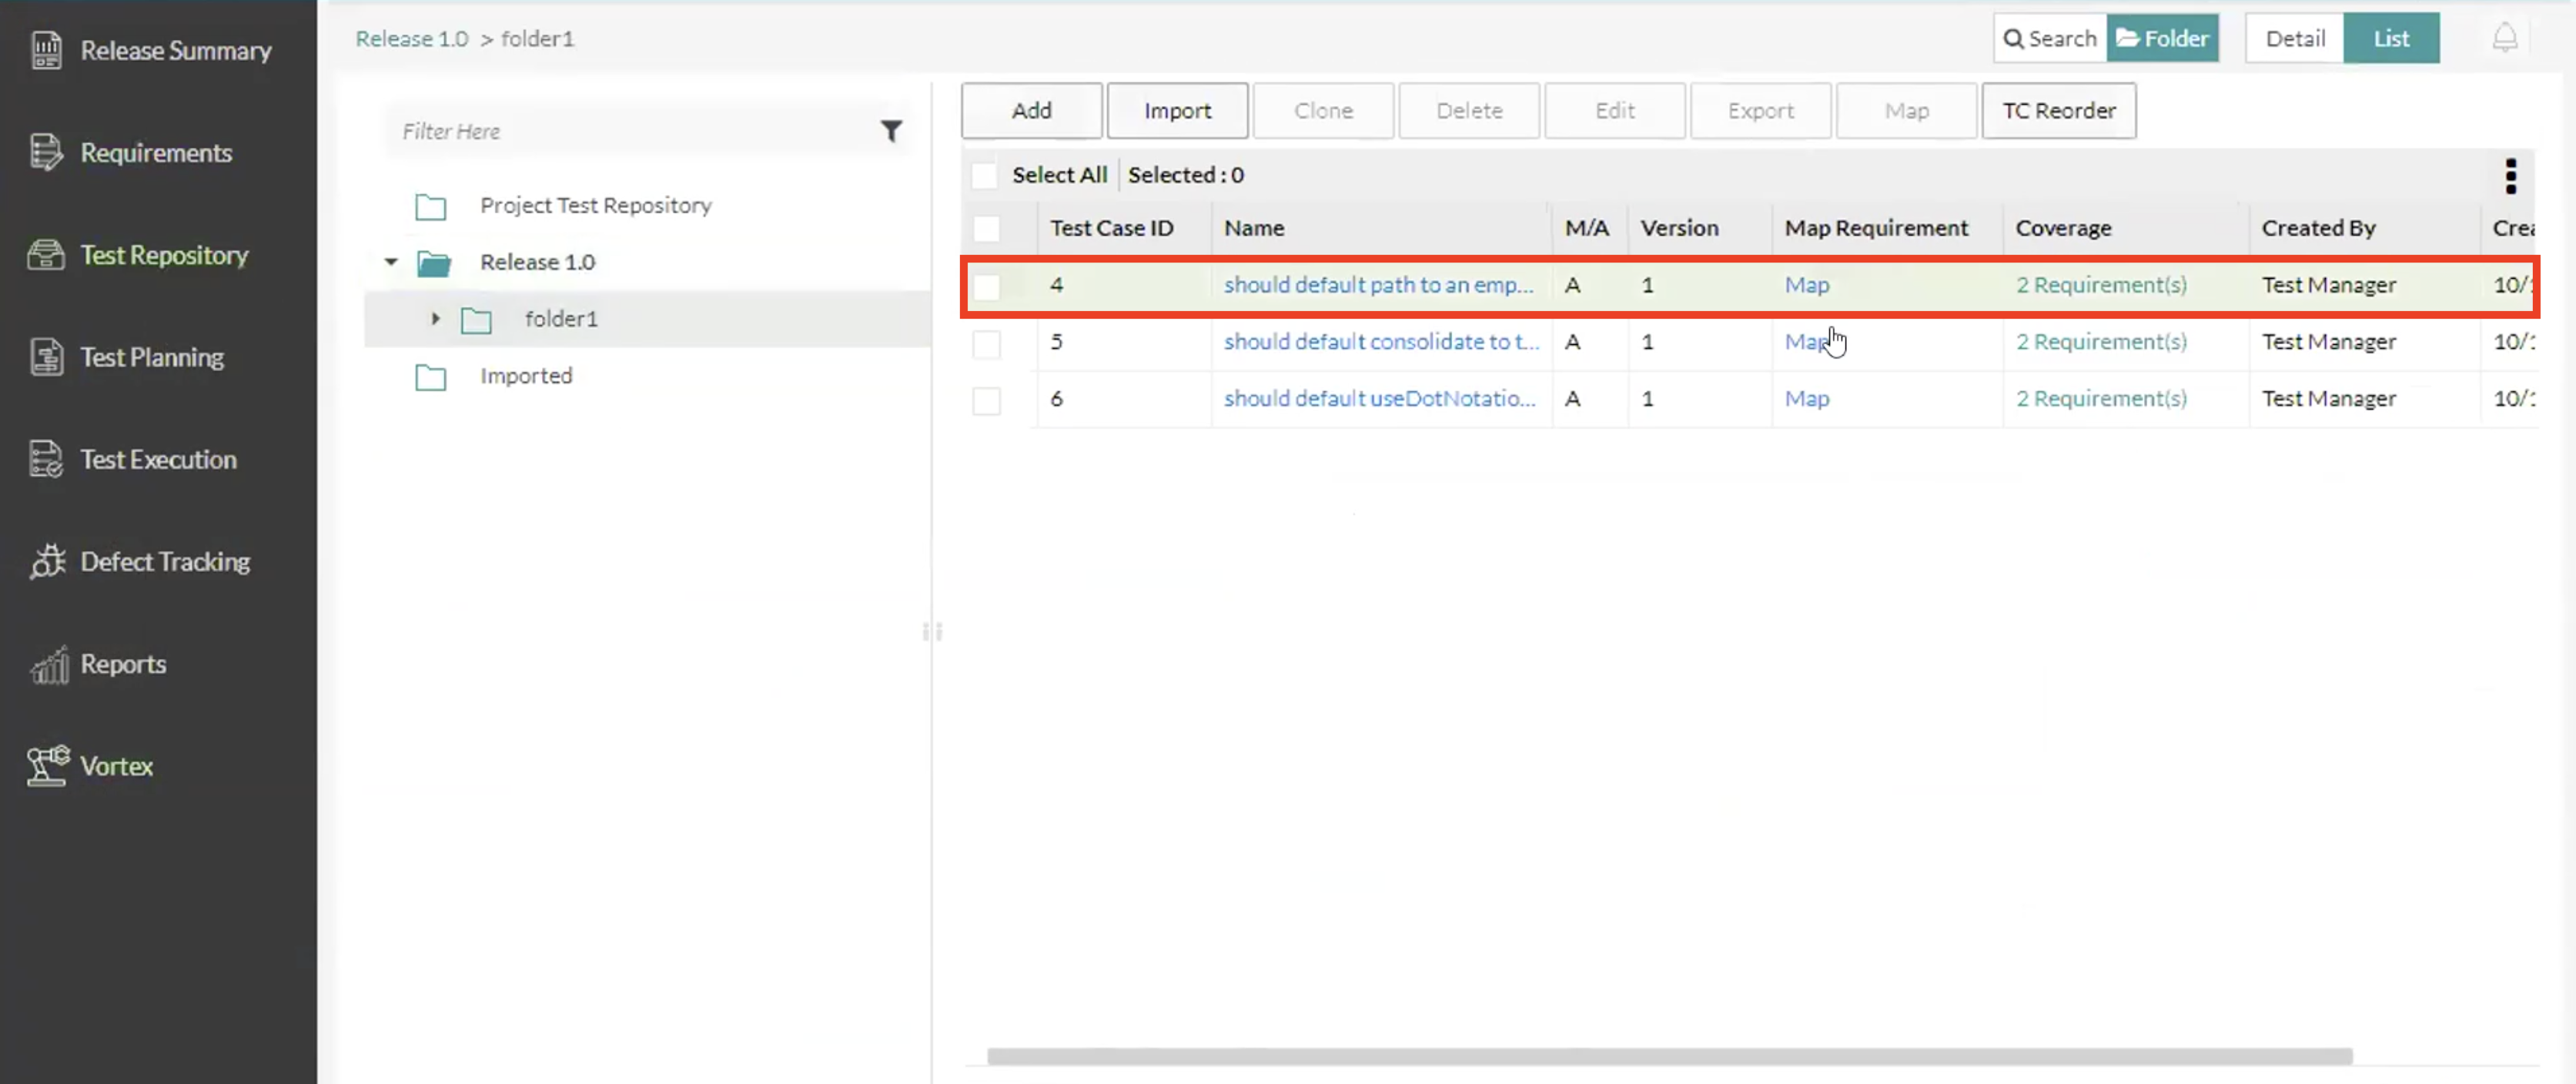
3. Navigate to your test cases to verify that the test cases were mapped correctly to the corresponding requirements listed in the XML file.
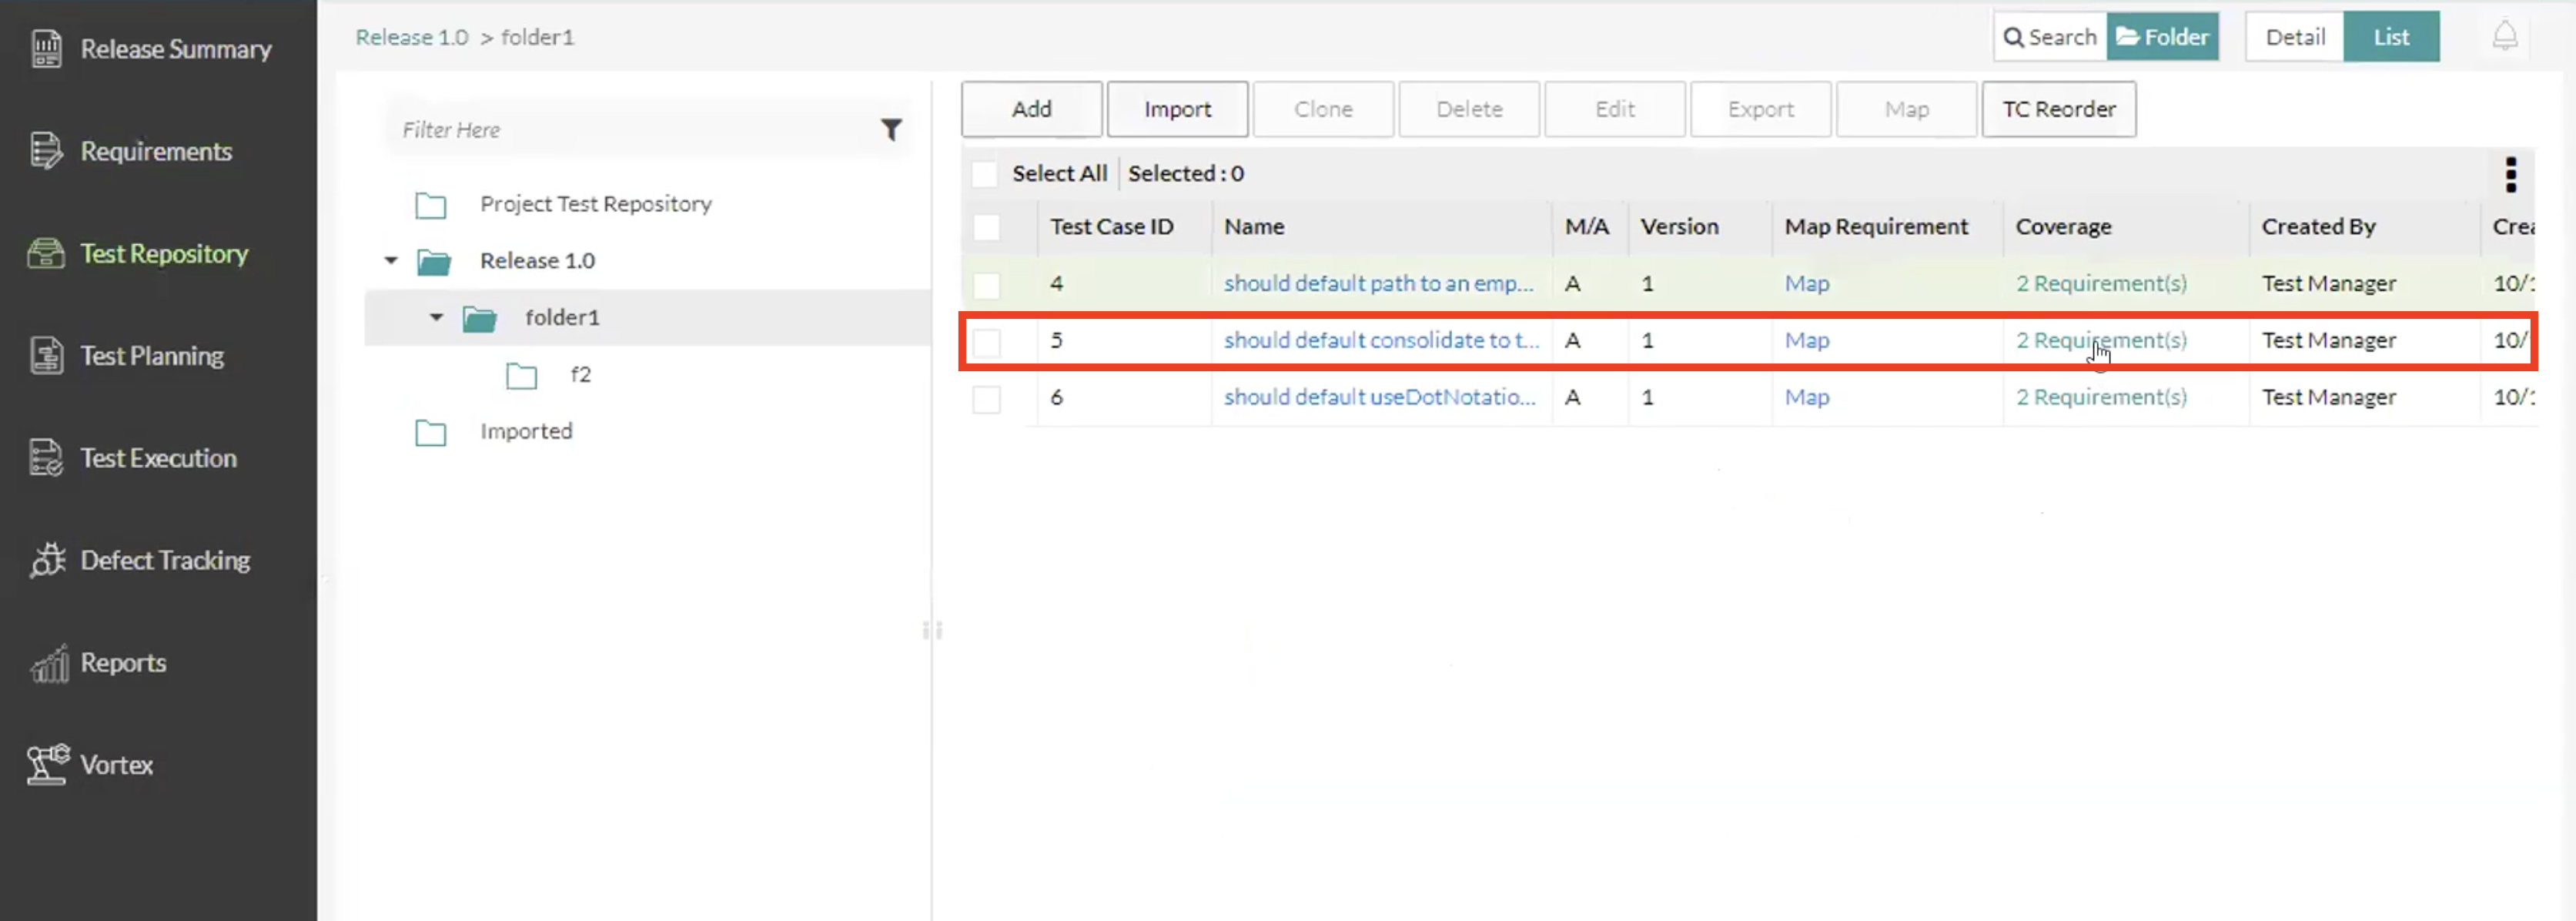
Go to the Test Repository, search for the test that was mapped and click on the test case (we can already see under the Coverage column that it is mapped to 2 requirements which is what we defined in the XML file).
 |
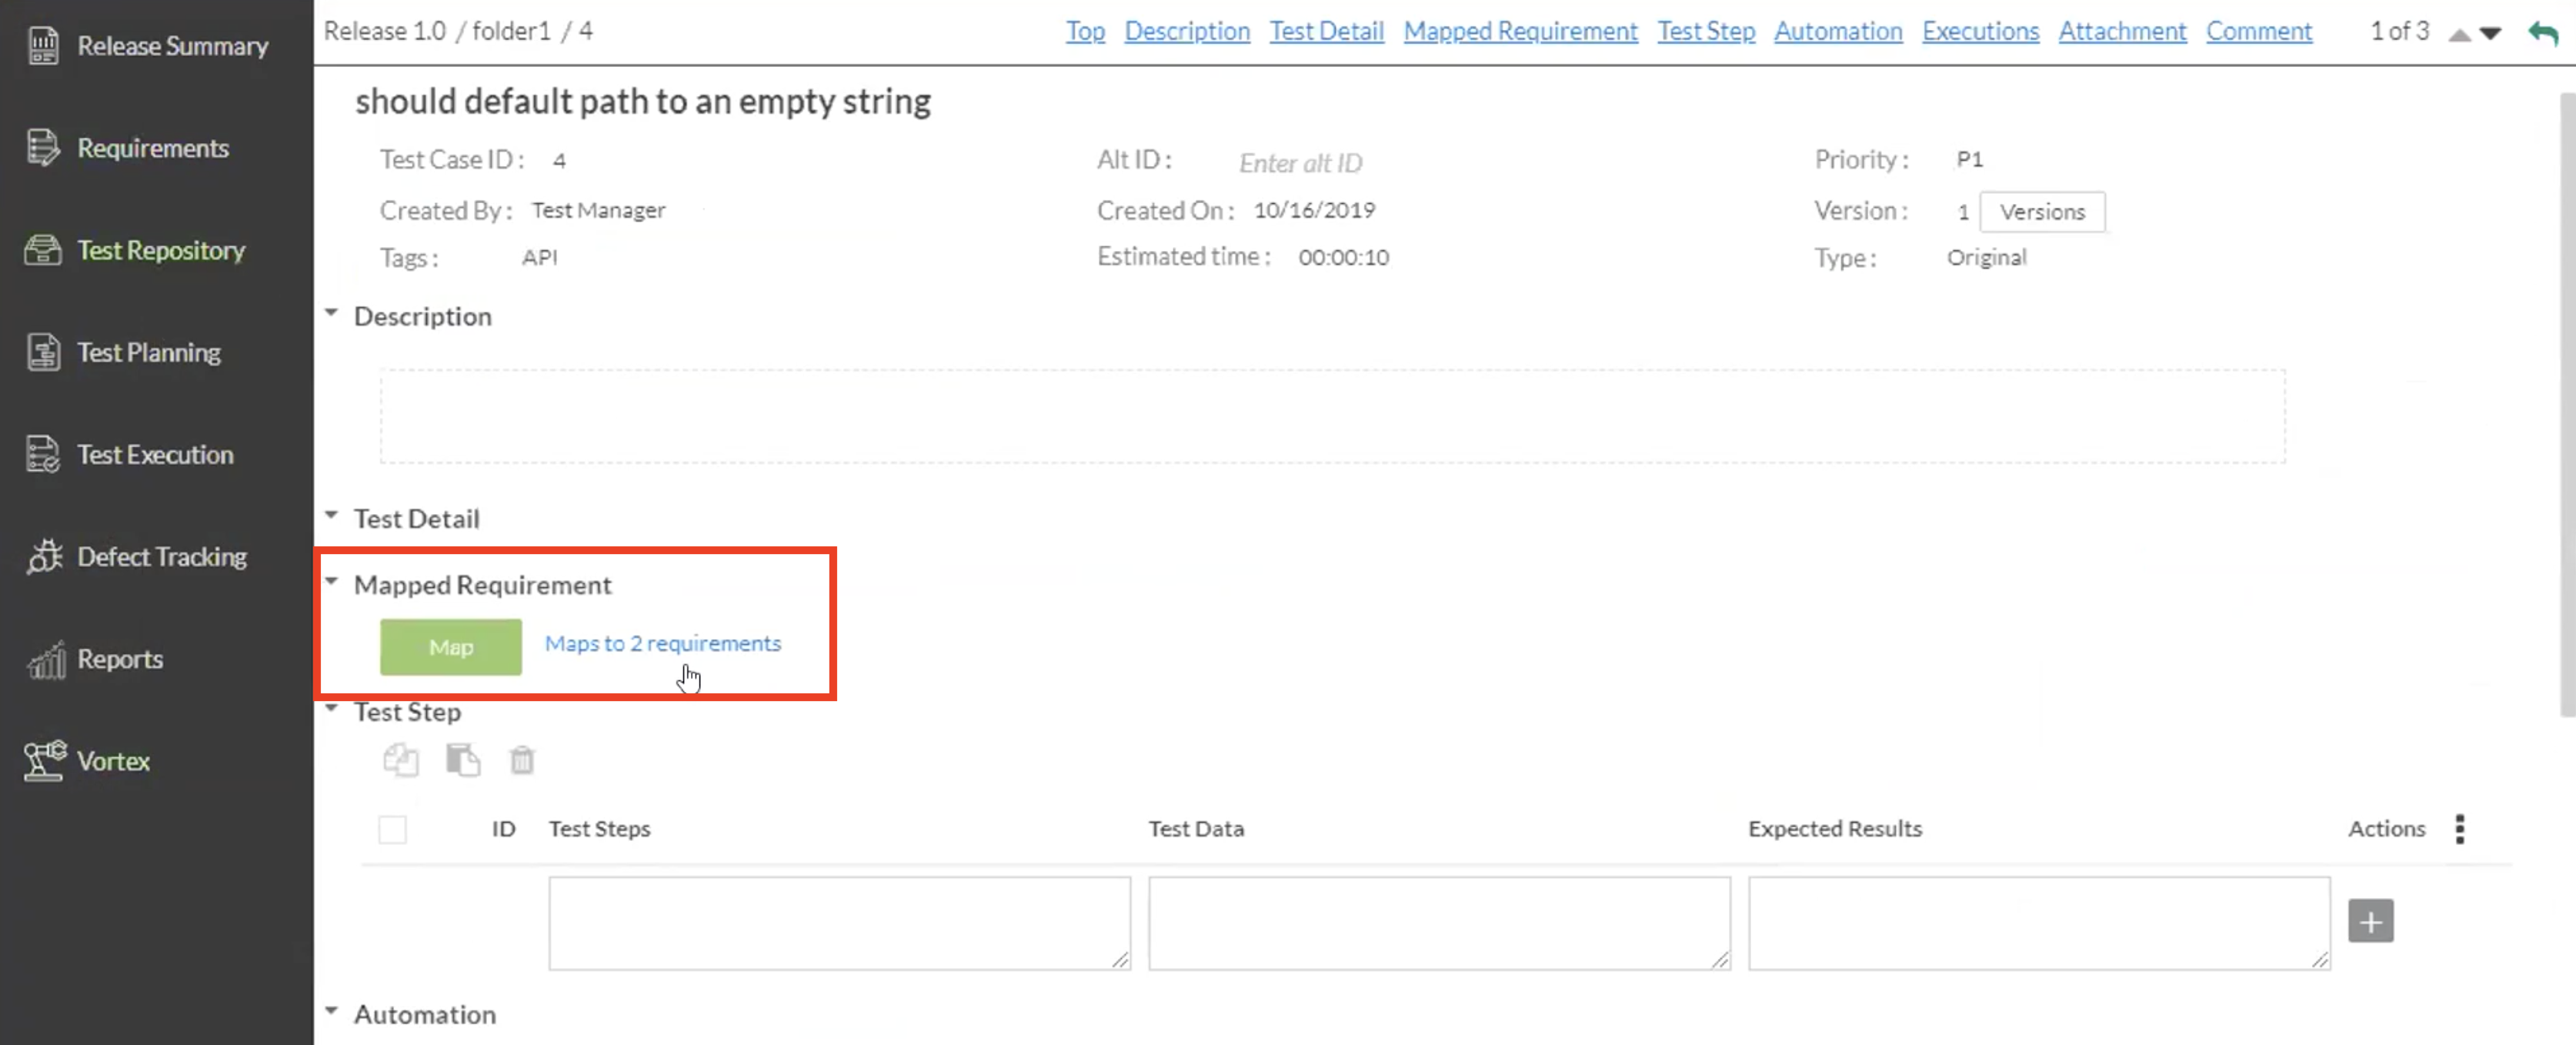
4. First we’ll check the test case that was automatically mapped to the imported Jira requirements.
Once you’ve clicked into the test case, click the link in the Mapped Requirement section to view the mapped requirements.
 |
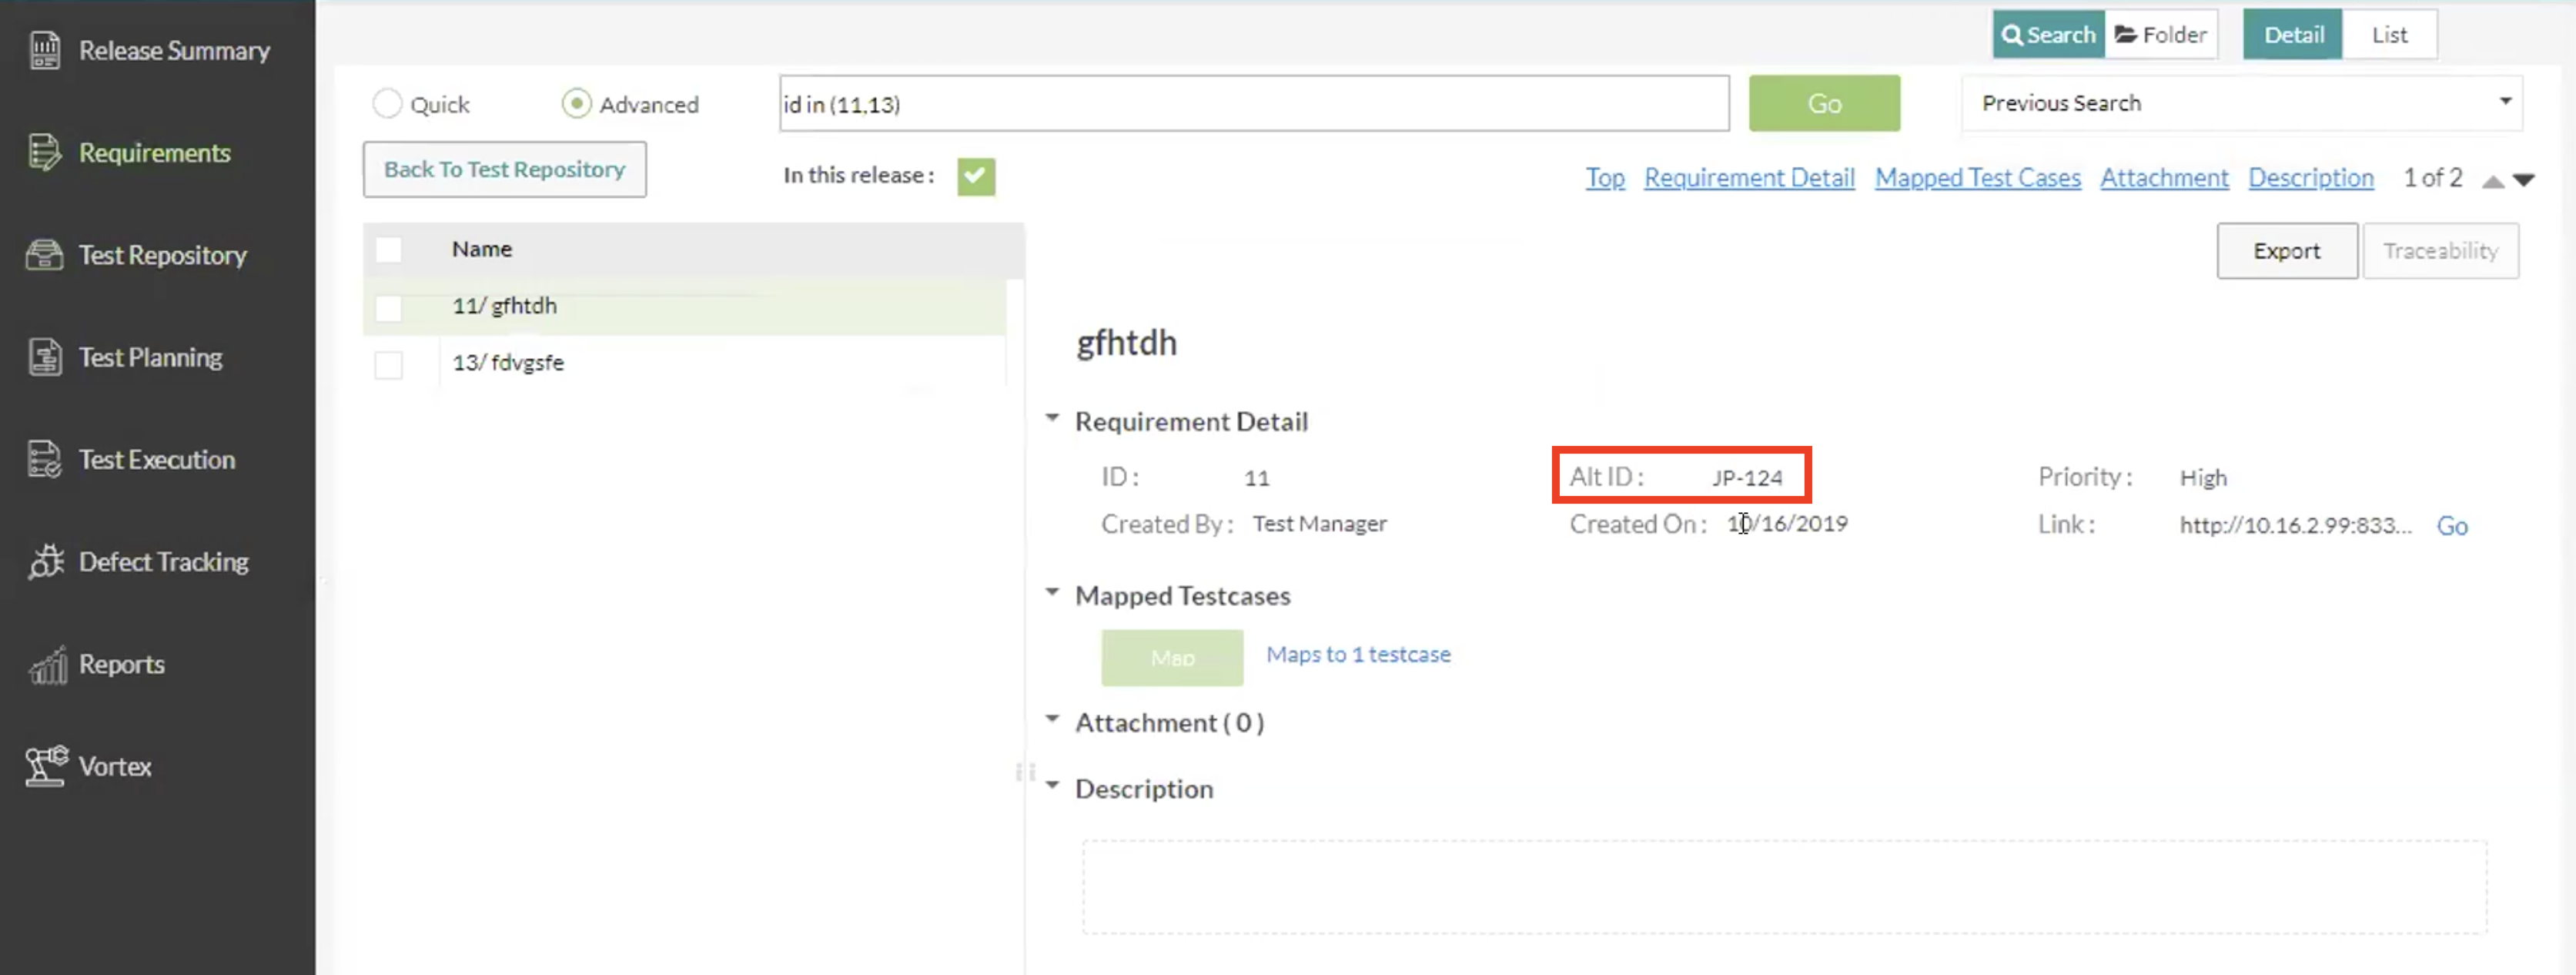
5. Here, we can see that the test case was automatically mapped to the Jira Requirement.
We can tell that this was the test case that was automatically mapped to the Jira requirement because it mapped them using the Alt ID.
 |
6. Now let’s go verify that the test case that was automatically mapped to the internal Zephyr requirements.
Go back to the Test Repository, search for the test that was mapped and click on the requirements under the Coverage column (we already see under the Coverage column that it is mapped to 2 requirements which is what we defined in the XML file).
 |
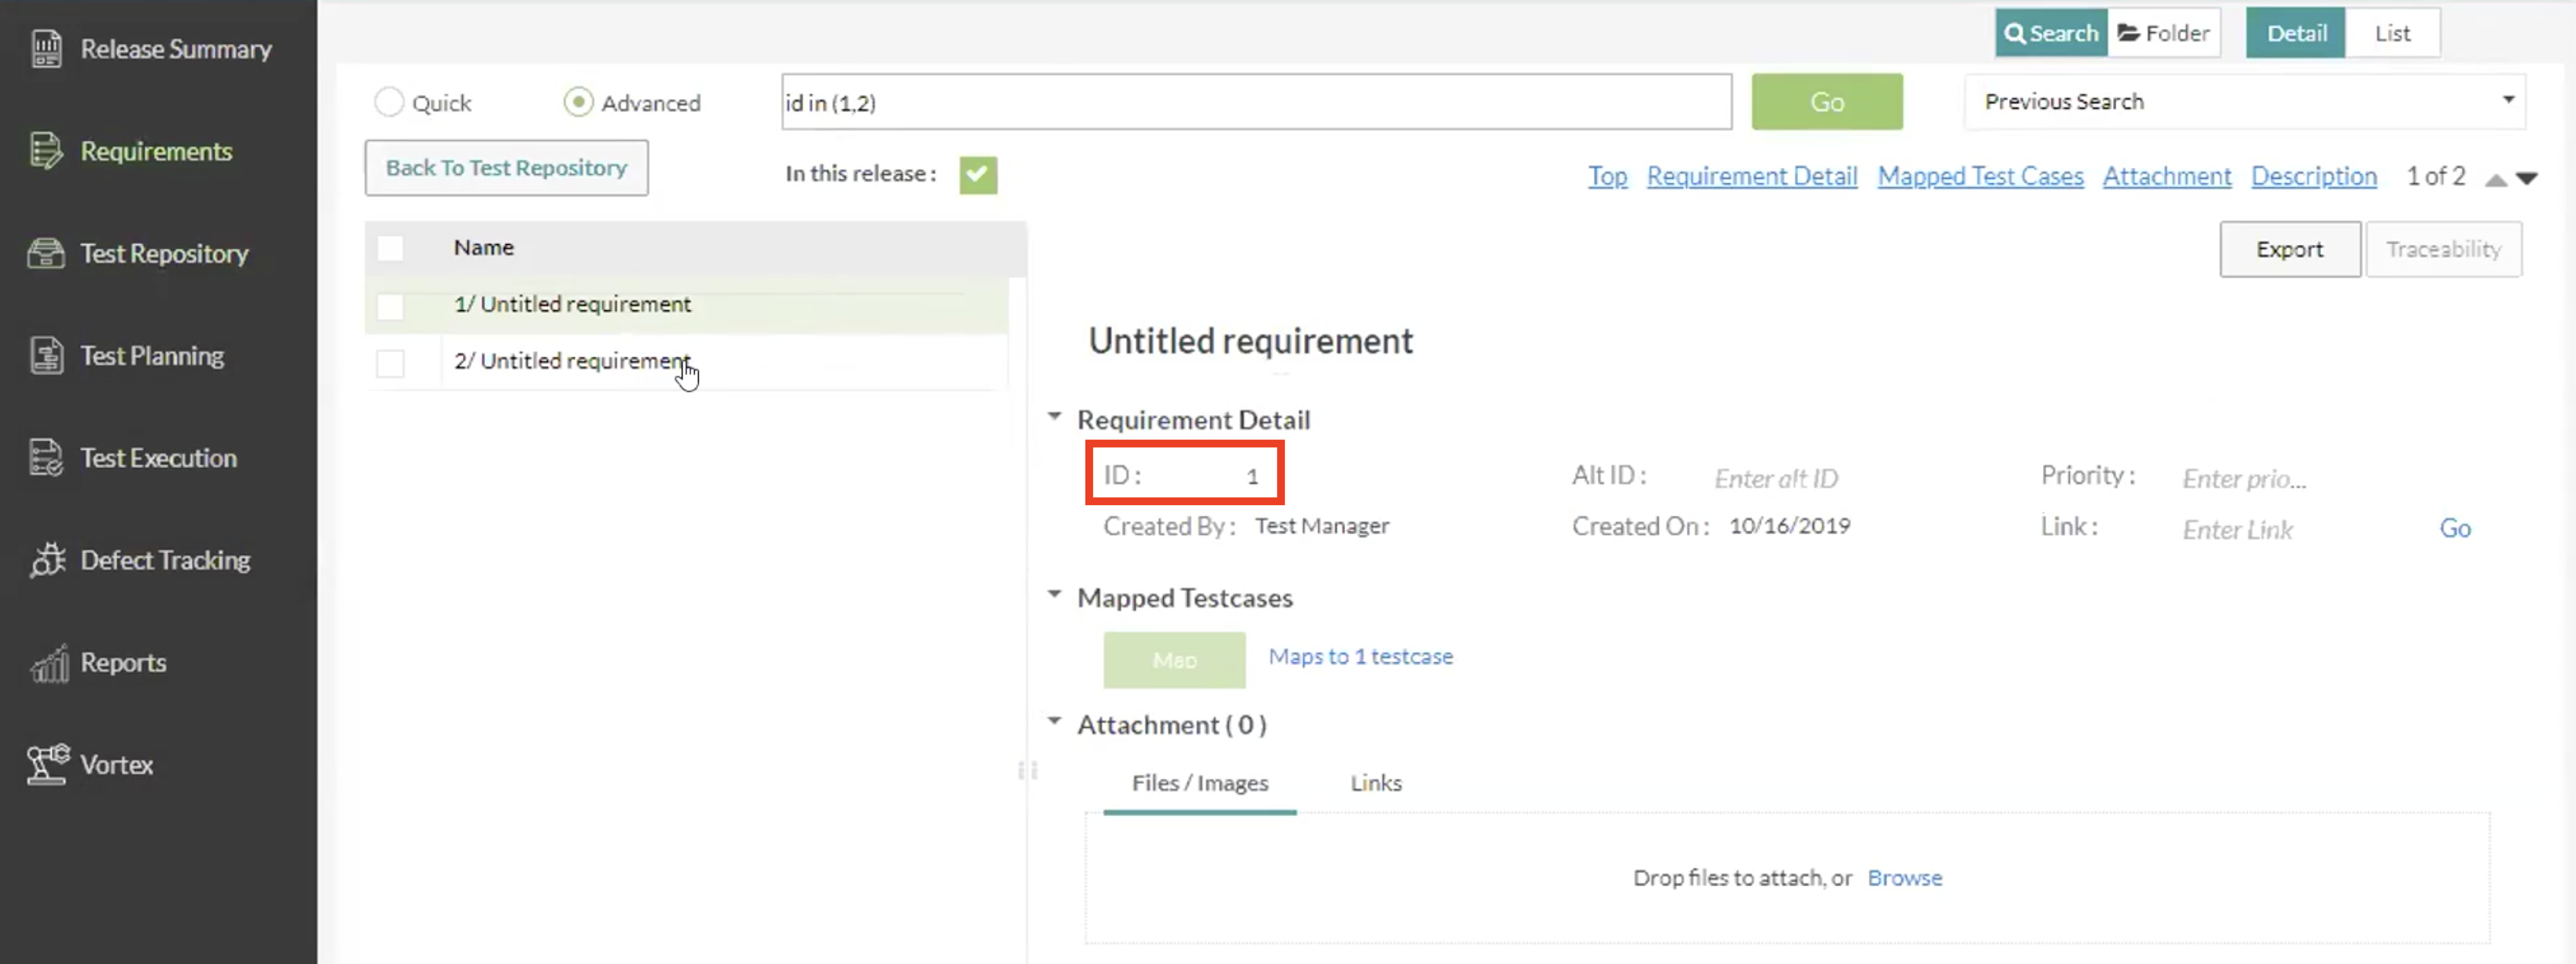
7. Here, we can see that the test case was automatically mapped to the internal Zephyr requirement.
We can tell that this was the test case that was automatically mapped to the internal Zephyr requirement because it mapped them using the requirement ID.
 |
From the examples above, Zephyr now provides the ability to automatically map your test cases from your jUnit XML results file to requirements that you define in the XML file. The parsing happens automatically as long as 2 requirements are met.
The user must define the requirement in the XML file using the <requirement> tag.
The requirement tag needs to include either the ID (for internal Zephyr requirements) or the AltID for (Jira requirements).
The requirement that is defined in the XML file must currently exist in your Zephyr application. If the requirement doesn’t exist in your Zephyr system, then Zephyr cannot automatically map your test case to your requirement.