Import Requirements via Excel Spreadsheets
Notes
Only requirements in Excel formats XLS and XLSX are supported.
Only the first tab is imported.
Special formatting is not supported (merged cells, formulas, etc.).
If importing in bulk, all source files should be located on the same machine where Zephyr is installed or on mapped or network drives. If the source files are located on the same machine where Zephyr is installed, then the import process should be run only from a desktop launched on the server machine. If the files are located on mapped or network drives, make sure you have specified the path correctly.
Individual files can be imported from a user's local machine.
Each row must contain data of a single requirement. Three discriminators are supported to demarcate requirements: ID change, requirement name change, and a blank line between requirements.
We recommend that you break large files into smaller ones with no more than 5000 rows for fast importing.
Import steps
You import requirements in four steps:
Prepare an Excel file.
Map spreadsheet columns to Zephyr fields.
Create a job that will import the data.
Run the job.
Prepare an Excel file
You can prepare an Excel file to be imported in two ways:
Create an Excel file and populate it manually.
Export data from a test management tool to an Excel file.
Important
The name of the Excel file will be part of the name of the folder that will contain the imported requirements.
Regardless of the way you created the file, please keep in mind the following when populating or editing your spreadsheet:
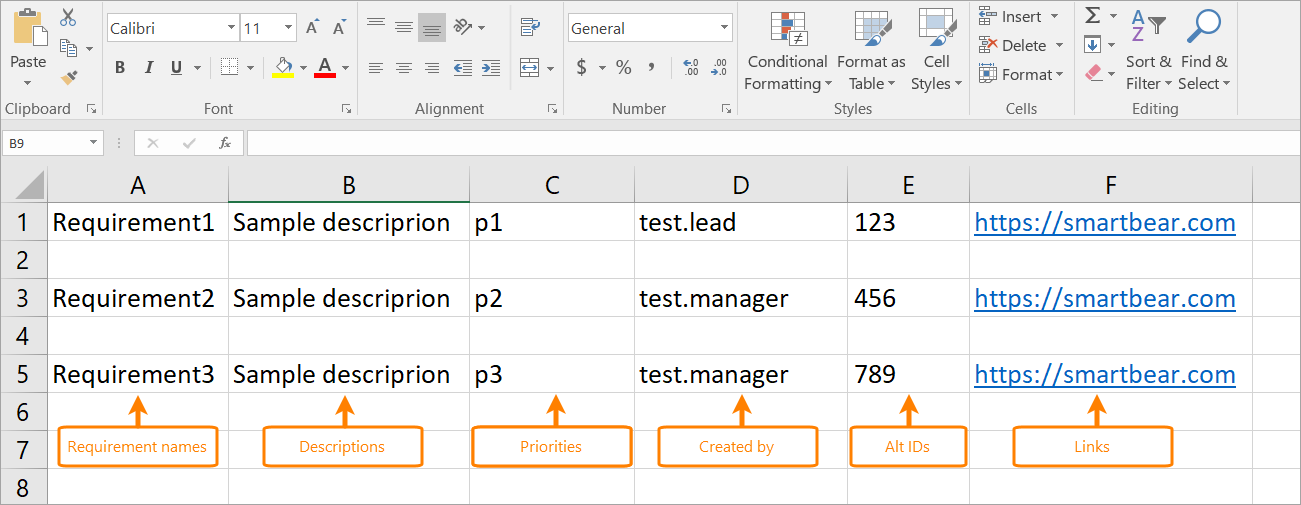
Each spreadsheet column must correspond to a requirement field in Zephyr, so, you need to decide to which field each column will correspond. For example, the A column may contain the names of requirements, the B column may contain descriptions, and so on.
To avoid confusion, we recommend that you standardize the procedure of creating such Excel files at your organization.
The sample spreadsheet below contains three requirements with a set of parameters that will be shown in the corresponding fields in Zephyr:
 |
Below is the list of Zephyr fields you can specify values for when populating an Excel spreadsheet:
Field | Description |
|---|---|
Name (required) | The name of the requirement. |
Description | Addition information about the requirement. |
Alt ID | The ID the requirement has in Jira. |
Priority | The requirement priority. |
URL | Any URL related to the requirement. |
Created by | The name of the user who created the requirement. |
Map spreadsheet columns to Zephyr fields
Once your Excel file is ready, you can start importing it:
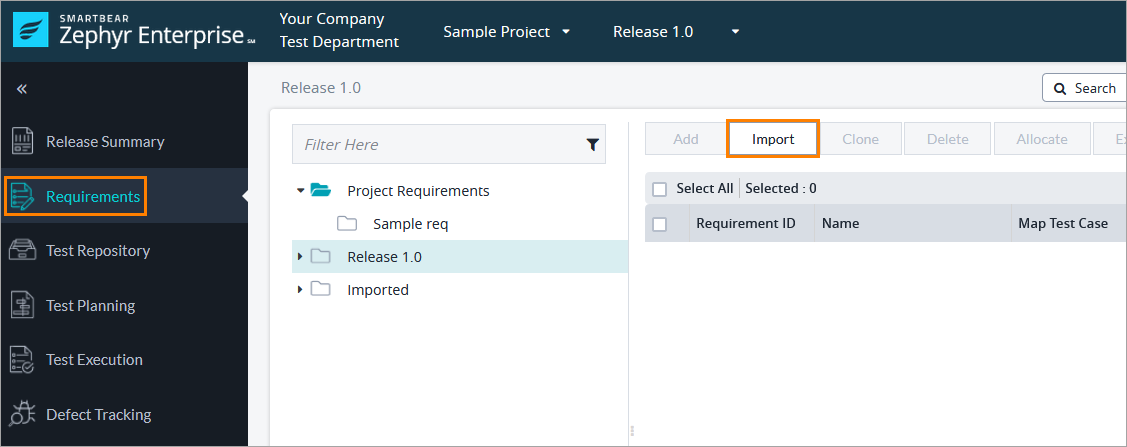
1. Click Requirements in the menu on the left, and then click Import above the list of requirements:
 |
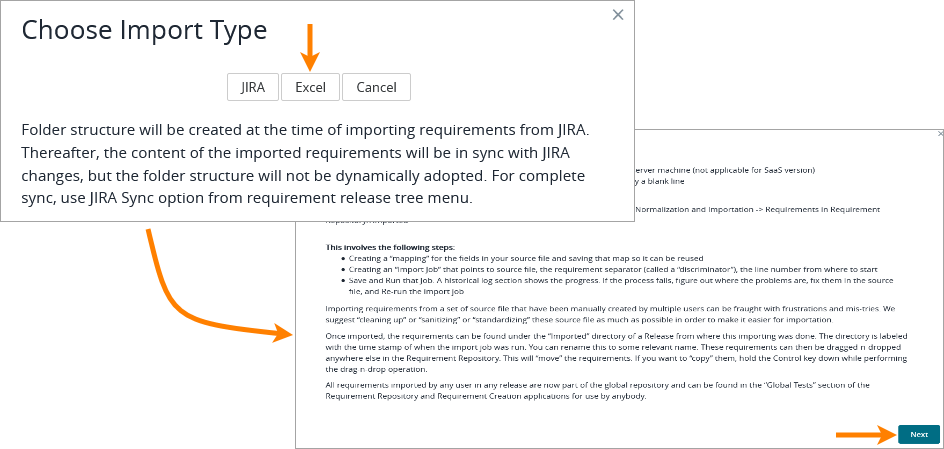
2. In the subsequent dialog, select Excel, and then click Next:
 |
3. Click Add New Map in the Import Requirements dialog to create an Excel map:
 |
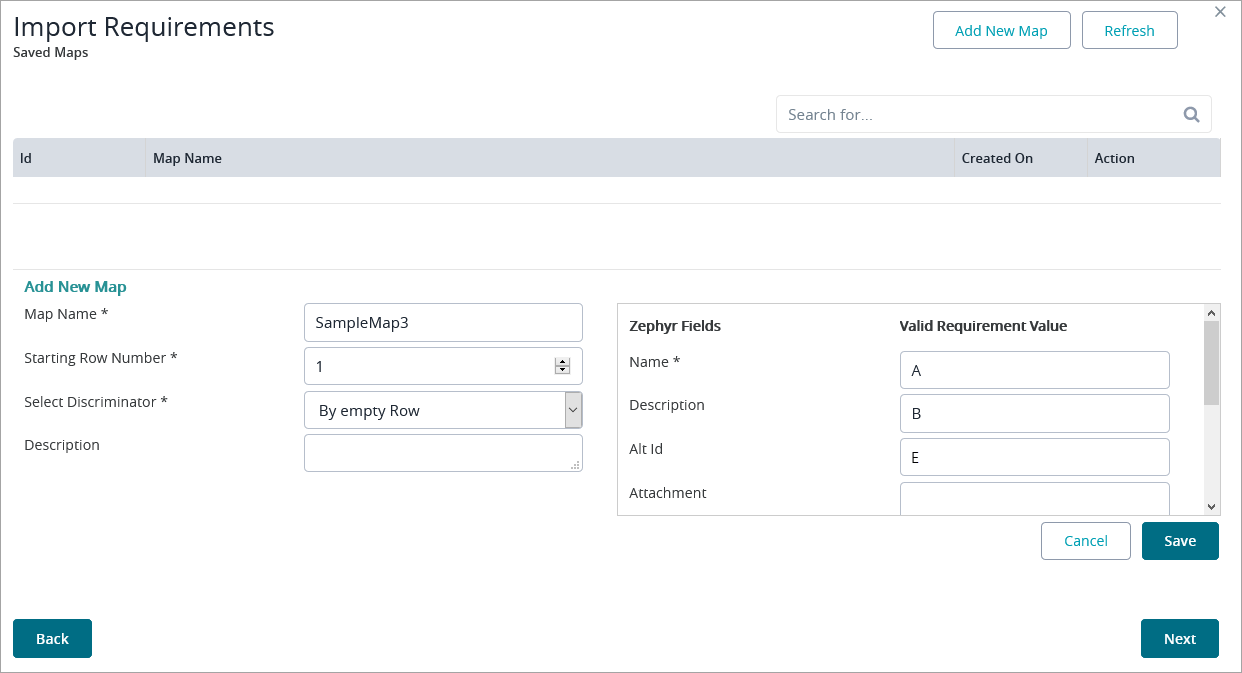
4. In the Add New Map section, populate all the required fields (the ones marked with an asterisk):
 |
A list of fields available in the dialog:
Field name | Description |
|---|---|
Map Name | The name of your Excel map. |
Starting Row Number | The number of the row to start importing from. For example, there might be some header rows that need to be ignored. |
Select Discriminator | Discriminators allow Zephyr to distinguish between multiple requirements in an Excel file. Possible values:
|
Description | Additional information about your Excel map. |
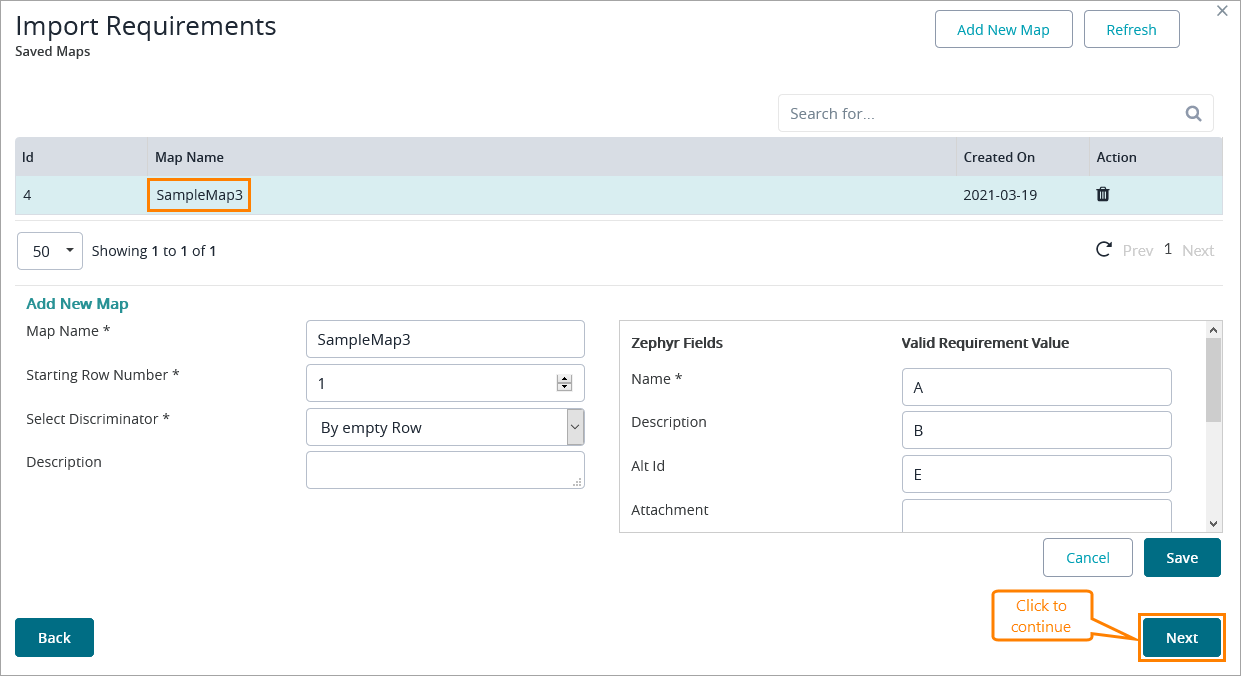
The dialog also contains a list of Zephyr fields with empty fields next to them. In these fields, you specify column letters of the Excel file. To map a field to an Excel column, just enter the corresponding column letter in the empty field (see the image above).
Important
Although there is the Attachment field, you cannot import attachments. Just leave the field blank.
After populating the fields, click Save. Zephyr will show the created map on the Import Requirements page. Click Next:
 |
Create a job that will import the data
Now you need to create a job that will import your requirements. To do that:
1. Click Add New Job in the top-right corner:
 |
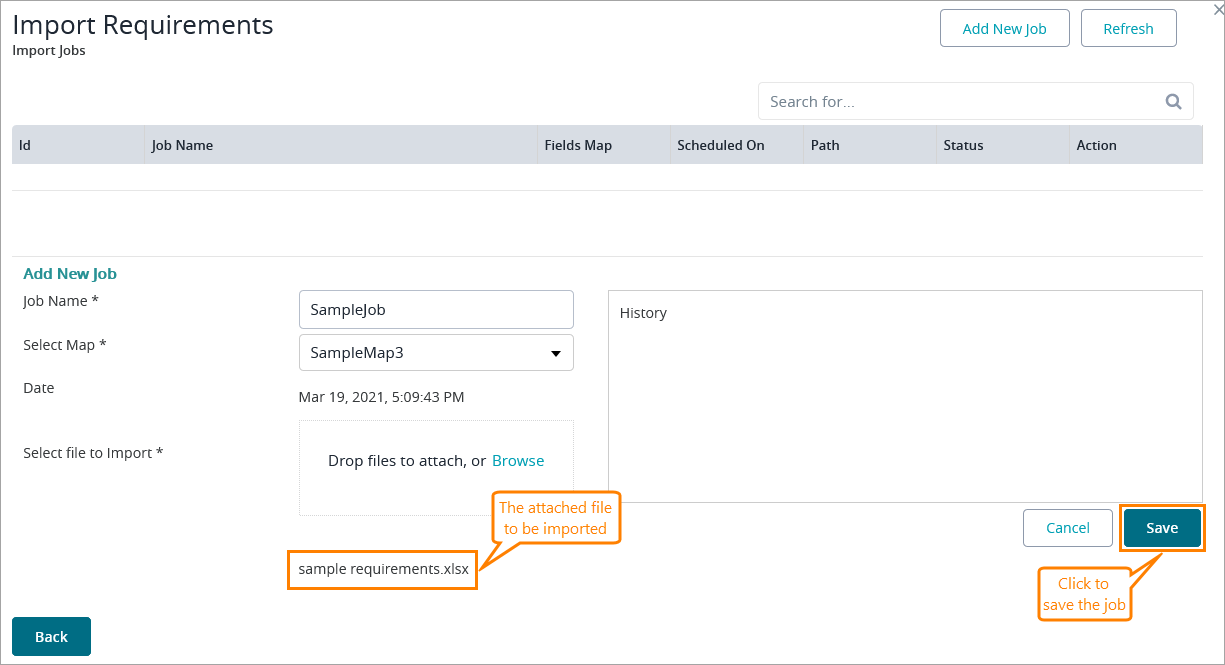
2. Populate all the required fields in the Add New Job section and attach the Excel file to be imported:
 |
A list of fields available in the dialog:
Field name | Description |
|---|---|
Job Name (required) | The name of your job. |
Select Map (required) | The name of the mapping scheme you created earlier when mapping spreadsheet columns to Zephyr fields. |
Select file to import (required) | The file whose data you want to import is attached here. |
History | The job run history. Populated automatically after the job run. |
3. Click Save. Zephyr will show the created job:
 |
Each job has two actions - Run and Delete:
Clicking the Play icon runs the job that will import the data.
Clicking the Trash icon deletes the job.
Run the job
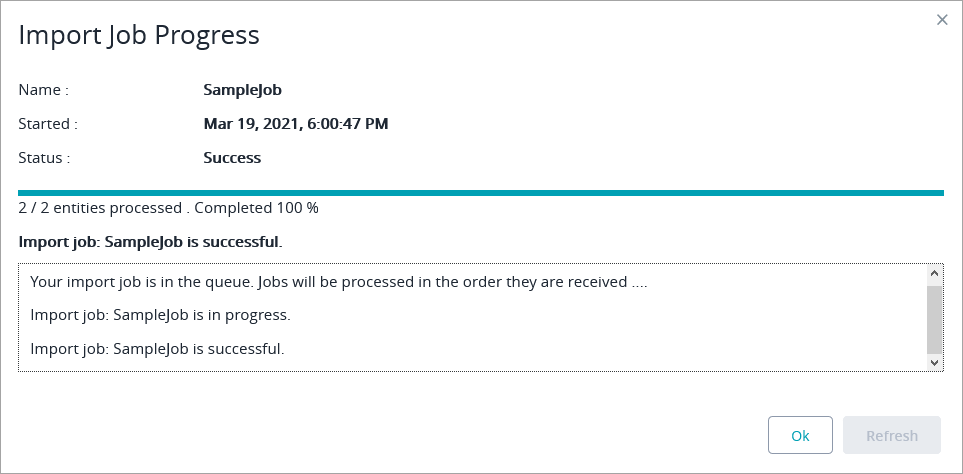
You can now run the job to import the requirements. To do that, click the Play icon. After the job run is over, Zephyr will show the details of the run:
 |
View imported requirements
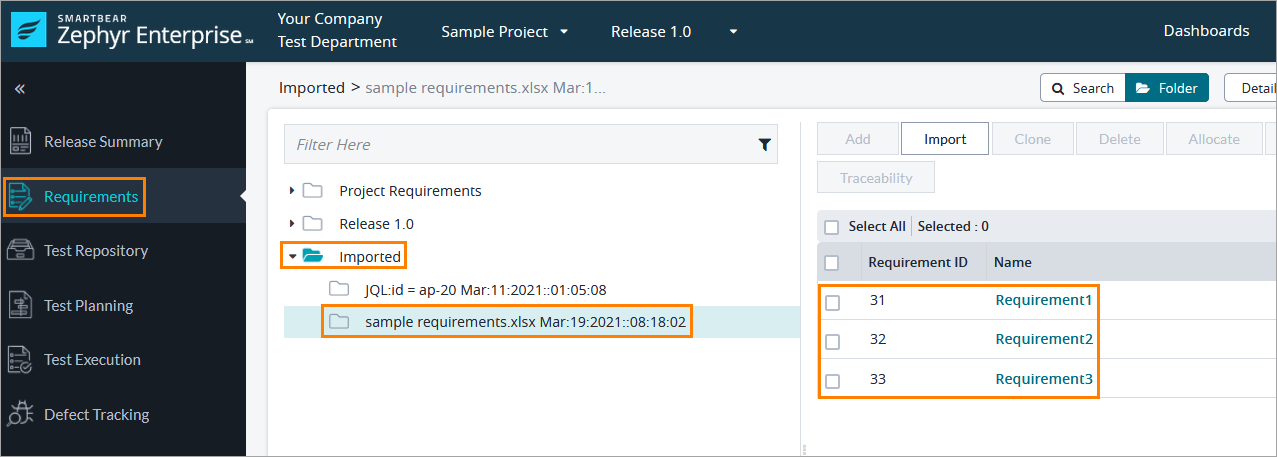
Now, to view the imported requirements, go back to the Requirements page, click Imported in the tree of requirements, and select the folder with the name of your Excel file. The requirements will be in the table on the right:
 |
You can rename the imported folder, move it to another place, or just drag and drop the imported requirements to any folder in the tree.
Important
Best Practices
Due to the varied nature of the source Excel files and potential inherent format inconsistencies, do not import too many requirements to ensure greater importing success. When confident of the results, import larger groups of requirements.
There might be issues when importing requirements if the Excel files were created manually by multiple users. We suggest standardizing the source files as much as possible to guarantee smooth importing.