Cypress
Cypress Support
Cypress is a framework for automated testing that runs on Windows and macOS. This JavaScript-based tool was designed for testing web applications. Unlike Selenium, it operates directly in the browser and enables you to set up, write, run, and debug tests.
In this section

Server-side execution
In server-side execution, you select the device group with the targeted OS type for the test run with all the devices in the selected group. Test results and all related artifacts (logs, screenshots, video recordings, etc.) are stored and visible in the BitBar Cloud dashboard. This provides a much easier and more robust way to start, manage, and review tests. All test assets are stored and testing is performed in one place.
Supported Browsers
With a Cypress framework, you can run automated tests across the real browsers that your customers use to catch issues before release. You can also troubleshoot issues reported by your customers, and verify the real-world user experience. For more information on supported browsers' versions, look here.
Running Cypress Tests
Before you run the test, make sure to create a ZIP package by following these steps:
Specify ZIP Content and Entry Point Script: Ensure that the ZIP file contains, along with tests, the following files in the root directory:
macOS:
run-test.shWindows:
run-test.ps1
Tip
For a dual setup to work for both macOS and Windows, you can include both scripts in the ZIP.
Indicate Cypress Paths for Screenshots, Results, and Videos: BitBar expects Cypress screenshots, results, and videos to be stored at the default Cypress paths, viewed from the root directory:
Screenshots:
./cypress/screenshots(learn more about configuring screenshots)Videos:
./cypress/videos(learn more about configuring videos)Results:
./cypress/results
Set up
TEST-all.xmlGeneration for Test Result Presentation with junit-report-merger: To display test results effectively in the UI, create aTEST-all.xmlfile at the root directory of your tests. This file should be a merge of JUnit reports from different specs. Currently, BitBar supports only JUnit reporters for this purpose. Use Cypress's recommended junit-report-merger tool for merging reports. Specify the reporter either in your Cypress configuration or in a command line when running Cypress.Example 1. Setting upTEST-all.xmlgeneration with junit-report-merger:npm install junit-report-merger --save-dev ./node_modules/.bin/jrm ./TEST-all.xml "cypress/results/*.xml"
Specify Browsers for Testing: If you wish to run tests on specific browsers, you will need to use the Launch by a path approach. The paths for different browsers are:
macOS:
/opt/nodes/node-chrome-<version>/browser/Chrome.app/Contents/MacOS/Google Chrome/opt/nodes/node-firefox-<version>/browser/Firefox.app/Contents/MacOS/firefox/opt/nodes/node-safari-<version>/browser/Safari.app/Contents/MacOS/SafariWindows:
C:\nodes\node-chrome-<version>\browser\chrome.exe
Craft a Lean ZIP Package: When creating the ZIP package, ensure efficiency by excluding unnecessary and heavy files such as
node_modules. Additionally, prevent the inclusion of existing results by removing them first. A helpful approach is executingrm -rf cypress/screenshots cypress/results cypress/videosbefore zipping, ensuring a streamlined package ready for efficient testing.Example 2. Creating a ZIP package:zip -r rwa.zip backend codecov.yml cypress cypress.config.js cypress.d.ts data package.json public run-test.sh sandbox.config.json scripts src tsconfig.json tsconfig.tsnode.json yarn.lock run-test.ps1 .env .yarnrczip -r kitchensink.zip app cypress cypress.config.js package-lock.json package.json scripts serve.json run-test.sh run-test.ps1
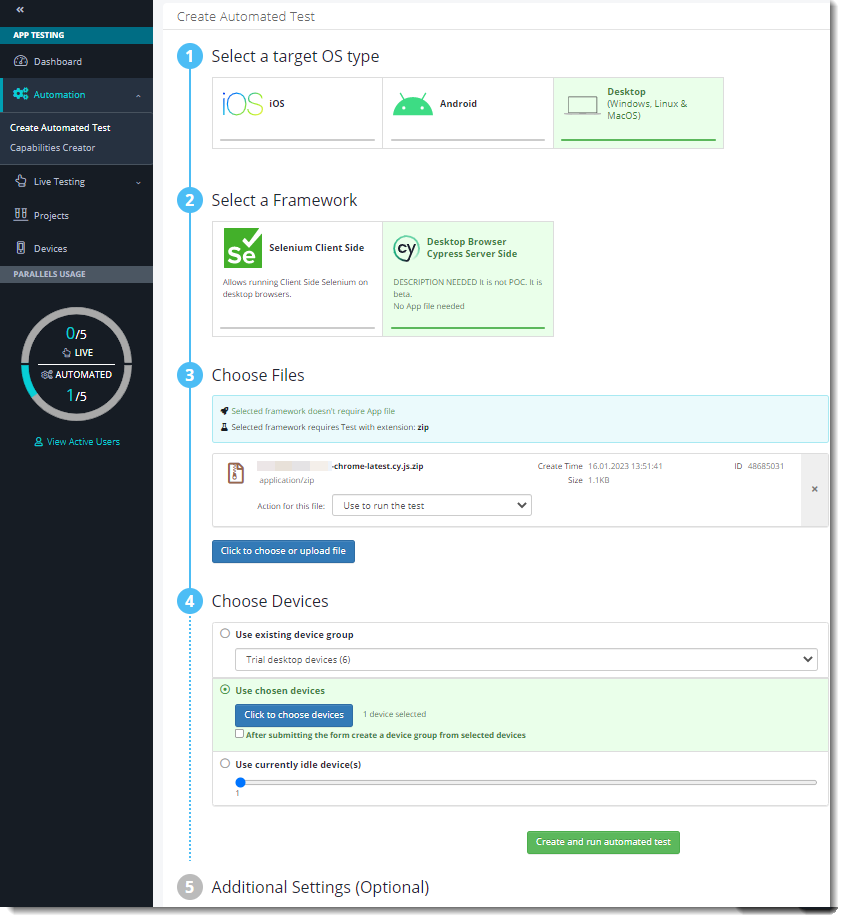
To create an automated test using Cypress, follow these steps:
From the dashboard, navigate to Create Automated Test > Desktop (Windows, Linux & macOS).
Note
The process does not currently offer support for Linux.
Select Desktop Browser Cypress Server Side.
Choose or upload a zipped package that includes your test files alongside an entry point script, which initiates the test execution process.
Choose a device from:
Use existing device group
Use chosen devices
Use currently idle device(s)
Create and run the automated test.
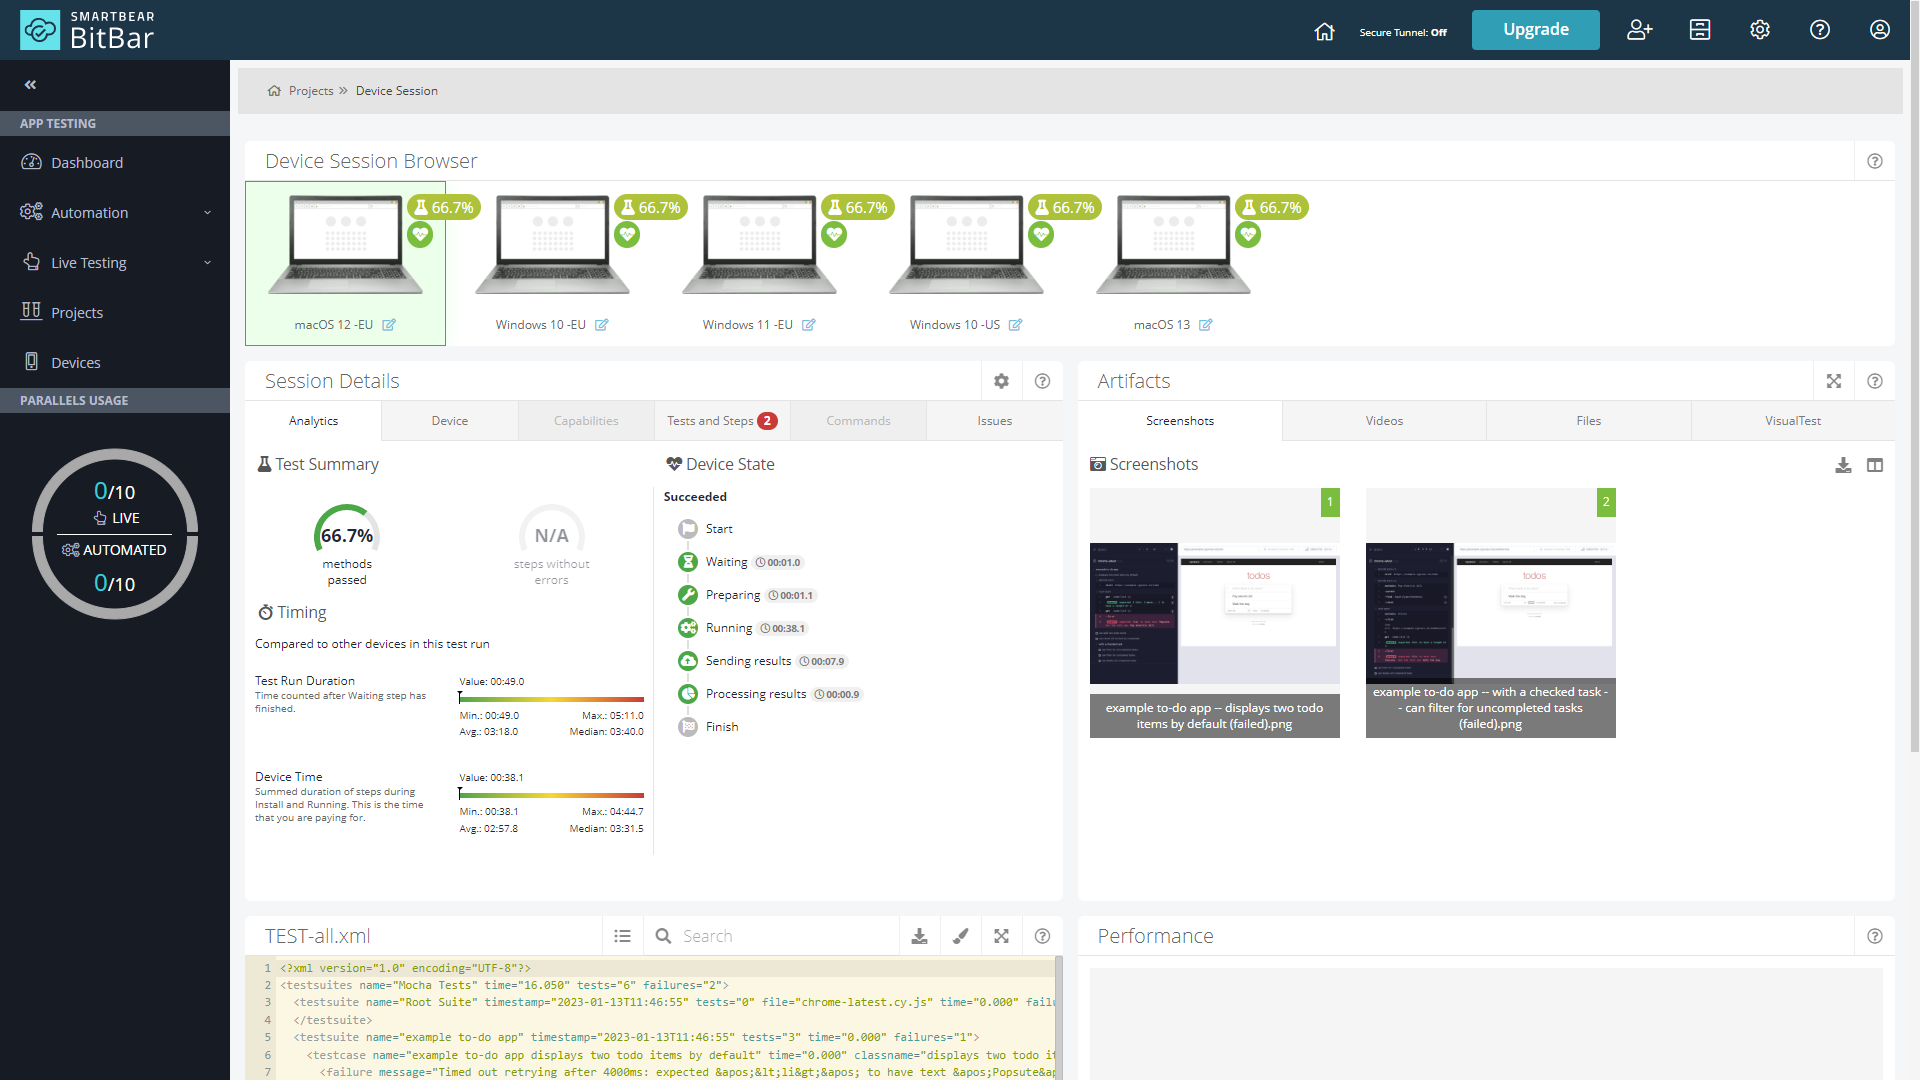
To check the result of your test, go to the Projects section on the navigation pane and choose the one that interests you. Click the project, select a Test Run, and Go to results. The Device Session provides information on:
Device Session Browser
Session Details:
Analytics
Device
Tests and Steps
Issues
Artifacts:
Screenshots
Videos
Files
TEST-all.xmlCreate and run the automated test.
Cypress Supported Browsers
Here, you can find all the browsers and versions that BitBar supports for the Cypress framework.
Operating System | Browser | Version |
|---|---|---|
macOS 12 | Firefox Safari Chrome | 125, 124, 123, 122, 121, 120 15 124, 123, 122, 121, 120, 119 |
macOS 13 | Firefox Safari Chrome | 125, 124, 123, 122, 121, 120 16 124, 123, 122, 121, 120, 119 |
Windows 10 | Firefox Internet Explorer Chrome Microsoft Edge | 125, 124, 123, 122, 121, 120 11 125 BETA, 124, 123, 122, 121, 120, 119 124, 123, 122, 121, 120, 119 |
Windows 11 | Firefox Chrome Microsoft Edge | 125, 124, 123, 122, 121, 120 125 BETA, 124, 123, 122, 121, 120, 119 124, 123, 122, 121, 120, 119 |