Preparing for Testing
Test planning checklist
Plan your testing process before you start testing:
Define the test goal
Decide which application functionality you want to test. The clearer the goal and the simpler the test, the better. Large tests that deal with various aspects of the application’s behavior are difficult to create and maintain. We recommend that you create a simple test that will test only certain functionality of your application.
Plan testing steps
Decide which actions the test will perform. The testing steps depend on the test purpose and the nature of the application under test. Testing steps may include actions that prepare the application for the test (that is, they put the application to some initial state), or that enter some data in the application.
Plan checking actions
Usually, the actions a user performs over an application cause some changes in the application. These can be visual changes (new values in forms, new windows or dialogs are displayed), or changes in the application's data (new objects, database entries, new or deleted files). You should decide what criteria should be used to check whether a test has passed or failed.
Log the results
Make sure to save the full test results to a file or track the latest test run data. See Analyzing Results for details.
App requirements
The maximum app size that a user can upload is 4096 MB.
Create iOS app package
Regardless of whether testing is performed with XCTest or XCUITest, the application under test needs to be built and imported to BitBar Testing Cloud. The below steps present how to create the appropriate Ad Hoc Distribution IPA build.
Create test IPA
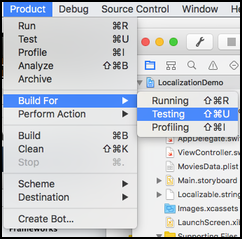
Open your project in Xcode. In the Xcode Product menu, select , and then select .

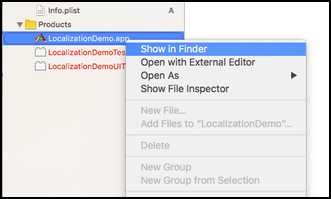
The application still needs to be packaged into an IPA zip. For this, the location of the app is needed. In Xcode, select the built .app file, right-click it, and select Show it in Finder.

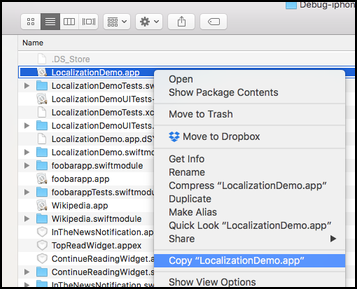
In Finder, right-click the .app file and copy its location for later use. This location does not change from build to build so this step needs to be performed only once.

The IPA package needed for XCTest in BitBar Testing is a zip package and its creation can be automated and made part of a CI integration. Open a terminal and create the IPA.
$ mkdir /tmp/Payload
$ cd /tmp/Payload
$ cp -r /Users/username/Desktop/Build/Products/Debug-iphoneos/LocalizationDemo.app . # app path can be pasted
$ cd ..
$ zip --symlinks -qr "LocalizationDemo.ipa" Payload
$ ls -lrt LocalizationDemo.ipa
-rw-r--r-- 1 username staff 0 Dec 16 12:42 LocalizationDemo.ipa
Note on signing iOS apps
We re-sign iOS applications so that they could run on BitBar Cloud. By doing so, we remove support for the following capabilities:
Access WiFi Information
App Attest
App Groups
Apple Pay Payment Processing
Associated Domains
AutoFill Credential Provider
ClassKit
Communication Notifications
Custom Network Protocol
Data Protection
Extended Virtual Address Space
Family Controls
FileProvider TestingMode
Fonts
Game Center
Group Activities
HealthKit
HealthKit Estimate Recalibration
HLS Interstitial Previews
HomeKit
Hotspot
iCloud
In-App Purchase
Increased Memory Limit
Inter-App Audio
Low Latency HLS
Mac Catalyst (Existing Apps Only)
Maps
MDM Managed Associated Domains
Multipath
Network Extensions
NFC Tag Reading
Personal VPN
Push Notifications
Sign In with Apple
SiriKit
System Extension
Time Sensitive Notifications
User Management
Wallet
Wireless Accessory Configuration
The removed capabilities are replaced with the following ones:
Data Protection
iCloud
Inter-App Audio
Maps
NetworkExtensions
SiriKit
Wallet
We can also handle the process in other way. We can omit re-signing within BitBar Private Cloud setups or with dedicated devices in BitBar Public Cloud. This way, you have the possibility to use your own distribution certificate.
If you are interested in one of these solutions, contact us.
Symbolication
Symbolication is the process of translating iOS application crash logs to a human-readable file using the dSYM file. dSYM or “debug symbols file” is a file generated when building the application when the setting in Xcode is set to . Without the dSYM file, any crash logs generated by a failing application will be unreadable by end users. If the dSYM file is part of the uploaded application package, then BitBar automatically processes the crash logs for the following frameworks: iOS XCUITEST, iOS Appium Client Side, iOS Appium Server Side.
The crash report is collected from the iOS device, it is symbolicated and sent to BitBar Cloud - where it is made available via UI or API as a file named symbolicated.crash.
Good to know
Armv7
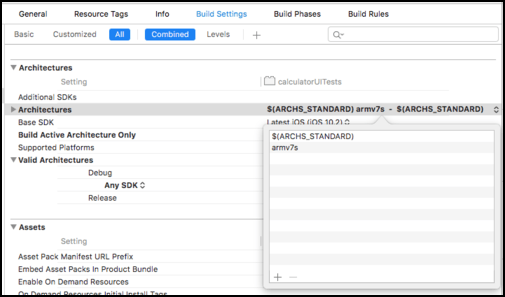
If building for iPhone 5 or iPhone 5C (having the Armv7 32-bit processor) devices, then an additional step is needed before creating the build. Starting from Xcode7 onwards, armv7s is no more part of the default$(ARCHS_STANDARD) and so should be added as target build architecture.
 |
iOS 9.3.5
By default, Xcode sets the iOS target version to the latest available iOS version for new projects. For testing against devices running previous iOS versions, the app and the tests need to be built for these separately.
For example, the project-level Deployment Target can be set to 9.3.
 |
Then, the same needs to be done for the app target (Calculator in these example screenshots)
 |
and still for the tests (CalculatorUITests).
 |