Warning
Atlassian has deprecated Jira Site Import as a migration method by November of 2023. The Zephyr Migration Tool will be discontinued at the same time as it requires JSI.
Please notice that we are already not supporting this migration method.
However, we are keeping it online for partners and customers that want to leverage its Open Source code to build their own migration scripts.
Zephyr Migration Tool by SmartBear is a solution for migrating Zephyr Squad data from Jira Server to Jira Cloud. It is one of two possible migration approaches. You can use it if the other approach – Jira Cloud Migration Assistant is not available to you for some reason. This approach is project-by-project based.
Continue reading if you need more details or prefer written instructions.
Zephyr Migration Tool migrates one or multiple projects at a time. That is why we recommend using it if you have a few projects in your Jira instance.
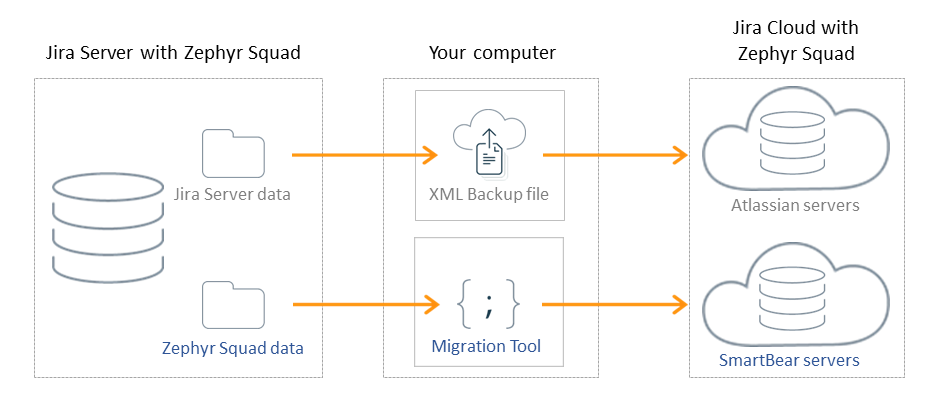
The key point of the migration process from Server to Cloud is that Jira Server and Jira Cloud store the application data in different ways:
The Jira Server database stores both Jira and application data.
The Jira Cloud database stores Jira data only. The application data is stored on the servers of the application provider.
So, the data migration of the Jira data is performed differently from Zephyr Squad data migration:
The Jira XML backup transfers your local Jira Server data to the Atlassian servers.
Zephyr Migration Tool transfers Zephyr Squad data from your local Jira Server instance to SmartBear servers.
This migration guide is split into parts:
Import the Jira data into Jira Cloud using the Jira Server XML backup file.
Migrate the Zephyr Squad data via Zephyr Migration Tool.
Important
The XML backup will overwrite all the data in your Jira Cloud. For full XML backup instruction, refer to the Atlassian documentation.
Data that is not migrated:
Zephyr Squad custom fields used at the Test Steps and Test Execution levels.
Execution history in the execution details section. It is used to track the transitions of an execution.
Test Steps history in the Test Details section. It is used to track the transitions of test steps.
The data should be migrated to a clear Jira Cloud instance because the backup will overwrite all the data in your Jira Cloud.
For the full Jira backup instructions, refer to the Atlassian documentation.
Before starting the migration process, ask your users not to use either Jira Server or Cloud so that no new data is created while the migration is in progress.
Use a computer that meets the following minimum system requirements:
64-bit operating system
4-core CPU
8 GB RAM
The computer must have access to:
Jira Server with Zephyr Squad Server
Jira Cloud
Zephyr Squad Cloud API endpoint:
https://prod-api.zephyr4jiracloud.com/connect
Install Java (version 1.8 is recommended) on that computer.
You must have the Jira System administrator permission in both Jira Server and Jira Cloud.
Export all Jira data by using the XML backup in Jira Server. Follow these steps:
Go to Administration > System.
Scroll down to the IMPORT AND EXPORT section and click Backup system.
Enter a name for your backup file in the File name field and click Backup.
As the compilation of a backup file is complete, the file will appear in the export folder of your Jira Server directory.
Important
The XML backup will overwrite all the data in your Jira Cloud, so we recommend using a clear Jira Cloud instance.
If you have Zephyr Squad Cloud installed in your Jira instance, uninstall it.
Create a backup file for your Jira Cloud instance before continuing.
This is a mandatory requirement for XML Jira migration. Refer to the Atlassian documentation for details.
Go to Administration > System.
Scroll down to the IMPORT AND EXPORT section and click Restore system.
Select how the user data will be processed, then click Import data.
When the backup file is checked, it is recommended to disable the Outgoing Mail feature due to the following post-migration validation.
Click Run import. This operation may take some time depending on the size of your backup file.
Verify that all Jira data has been successfully imported and all the created Jira entities (projects, issues, and so on) have the same IDs both in Jira Server and in Jira Cloud.
Refer to the Atlassian documentation for details.
To view and edit migrated issues, your Jira account must belong to all migrated user groups. For security reasons, Migration Tool does not add your Jira account to migrated user groups.
To do this:
Go to Settings > User management, then click Groups on the left.
Click Show details for the needed group.
Click Add group members to include your account to the group.
Repeat these steps to add your account to other groups. See Atlassian documentation for details.
Before installing Zephyr Squad in Cloud, you must edit the description of the Test Issue Type migrated with the Jira XML site import.
To edit the description,
In the Cloud instance, navigate to Jira Administration > Issues.
Select the Issue types from the menu and search for the Test.
Edit the existing description to: This JIRA Issue Type is used to create Zephyr Squad Tests.
Note
You must add the exact description provided, including the period at the end, to avoid errors.
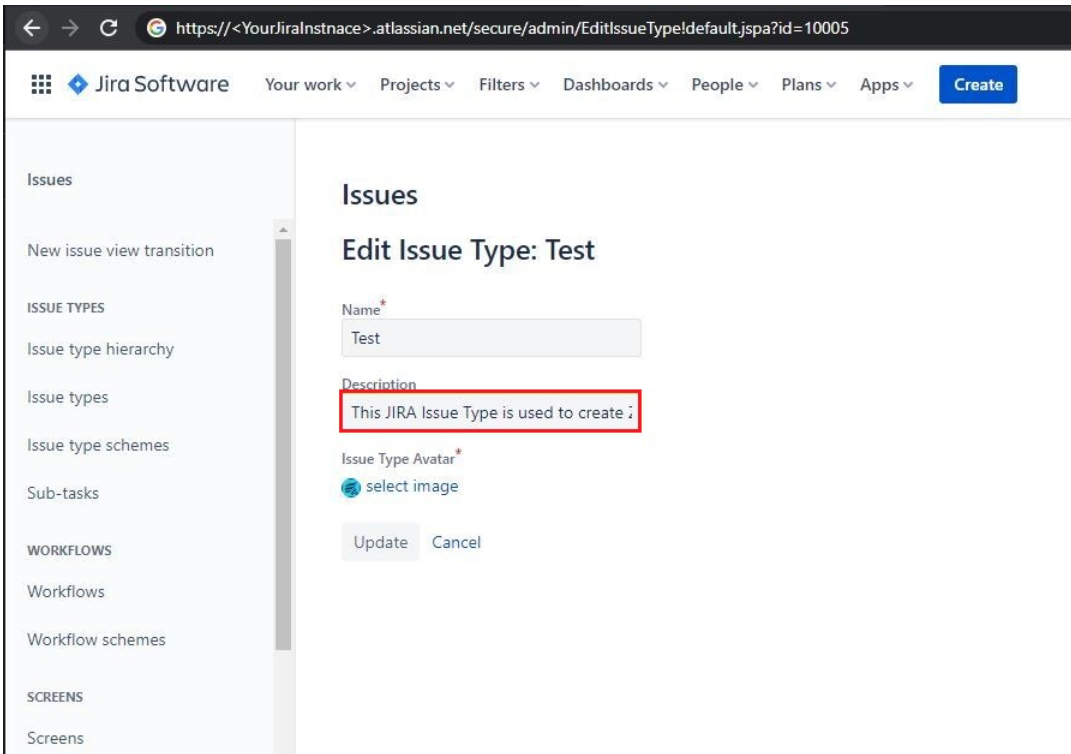
If you see the Zephyr Squad icon as a broken image, ignore it.
Click the Update button.
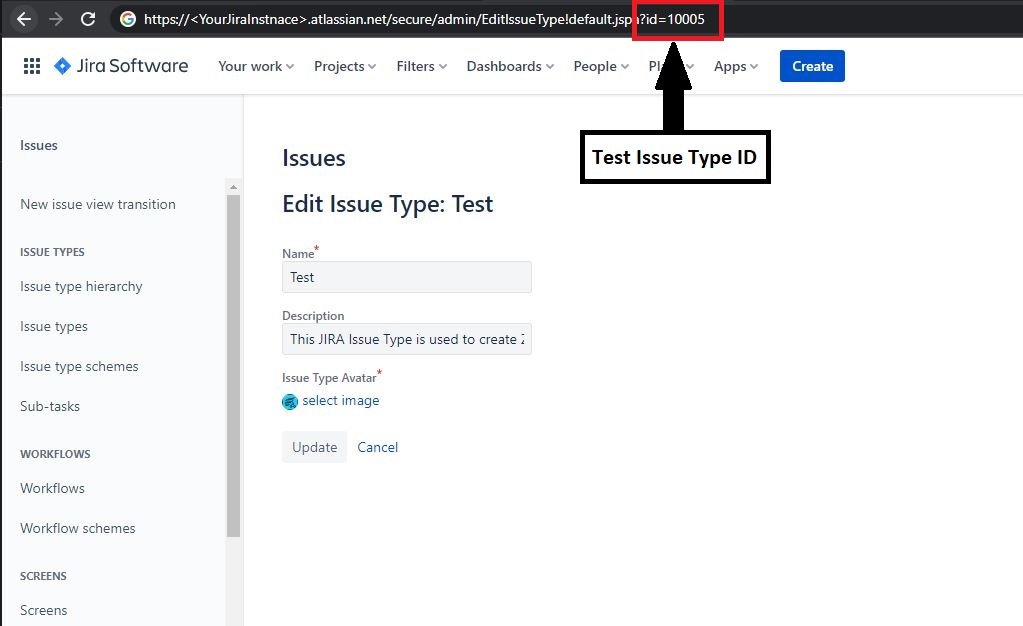
Note down the Issue Type ID. You can find it in the URL of the Jira Issue Type Edit Issue screen.
Navigate to Apps > Explore New Apps, search for Zephyr Squad, and then click Install.
After installation of Zephyr Squad, navigate to Zephyr Squad Cloud > General Information. Please confirm that the Test issue type ID corresponds to the Test issue type you just edited.
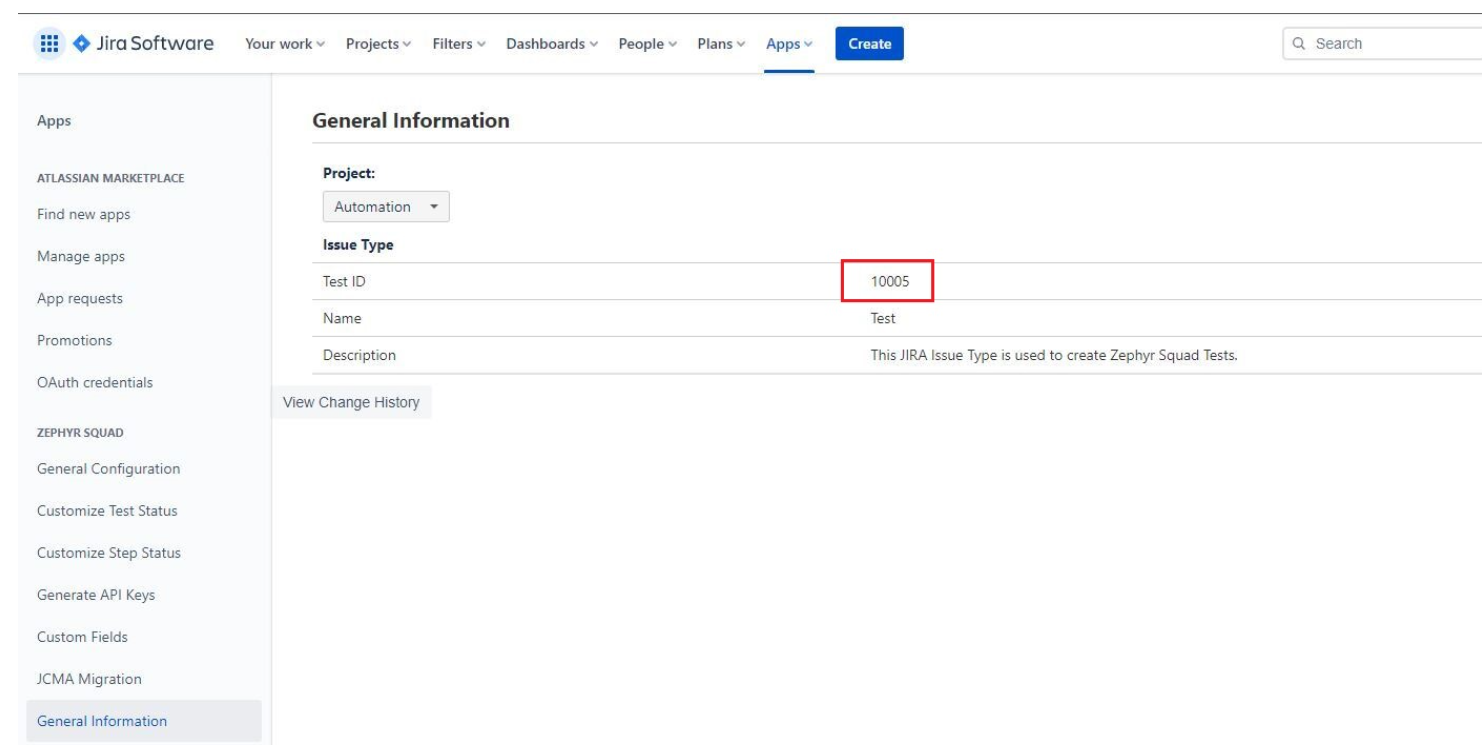
Navigate to Setting > Apps > Zephyr Squad > General Configuration.
Scroll down to the Re-Index section and re-index all your projects by selecting Project Metadata and clicking Re-Index:

Note
If All projects re-indexing fails, re-index every project separately.
Zephyr Migration Tool migrates one or multiple project per run. Refresh the page after the migration of the project is completed to process another project.
You can view the live log in the command-line window during the migration.
Download the 2.1.jar or 3.0.jarZephyr migration tool and unpack it to a folder. The archive contains two files:
application.properties
Zephyr_for_Jira-server-to-cloud-migration-2.1.jar or 3.0.jar
Note
Users testing the migration using the 2.1.jar can continue using it. For new users, it is recommended to use the 3.0.jar for migration.
Migration Tool uses parameters specified in the application.properties file by default.
Parameter | Description | |
|---|---|---|
server.port | The port where the utility will run. 8080 by default. | |
migrationFilePath | The path to a folder where Zephyr Migration Tool will store its temporary files. NoteThe folder must have read/write access and should be empty. | |
spring.thymeleaf.prefix | Do not change this value. | |
zfj.server.baseUrl | The URL of your Jira Server instance. For example: zfj.server.baseUrl=${serverBaseUrl:http://10.10.10.119:9900/} | |
zfj.server.username zfj.server.password | The username and the password you use to connect to your Jira Server instance. | |
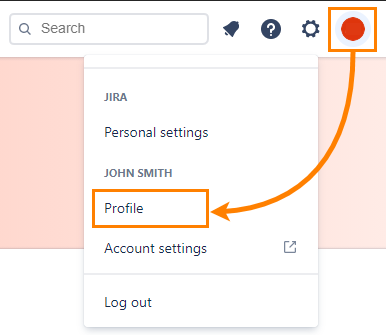
zfj.cloud.accountId | The ID of your account in the Jira Cloud instance. How to get the account ID?
| |
zfj.cloud.accessKey zfj.cloud.secretKey | The access key and the secret key used to log in to your Jira Cloud instance. | |
zfj.cloud.baseUrl | Do not change this value. | |
migrate.step.results.attachment | Keep the value | |
migrate.test.steps.attachment | Keep the value | |
migrate.update.step.results | Keep the value | |
migrate.execution.level.defect | Keep the value | |
migrate.folders | Keep the value | |
migrate.execution.level.defect | Keep the value |
Important
If you have already run the Zephyr Migration Tool during Test or UAT phase, ensure that you change the migrationFilePath defined in the application.properties, and point to a new directory. You must never use the same migrationFilePath used for Test/UAT phase in your Production migration.
Open the command-line prompt on your computer.
Change the working directory to the folder where Zephyr Migration Tool and the application.properties files are located. For example:
# On Windows
cd C:\Path\To\ZMTRun the following command (written in a single line):
For 2.1.jar
java -jar Zephyr_for_Jira-server-to-cloud-migration-2.1.jarFor 3.0.jar
java -jar Zephyr_for_Jira-server-to-cloud-migration-3.0.jarThe application service will start at the port specified in the application.properties file if not specified in the command.
Open your browser and enter
localhost:<port>/beginMigration, where<port>is the port you specified in the application.properties file. For example:http://localhost:8080/beginMigration
or
http://127.0.0.1:8080/beginMigration
On the subsequent page, enter project ID in the Enter Project Id field or upload a
.txtfile with project ID clicking Browse. Then, click Submit to start the migration process.Note
<listitem>For multiple project migration, you can specify multiple project IDs in the following two ways :
</listitem>enter project IDs separated by comma (,) in Please Enter Project ID.
upload a
.txtfile with the project IDs separated by comma(,) clicking Browse
Multiple project migration runs as per the sequence of the project IDs entered in the field or provided in the .txt file.
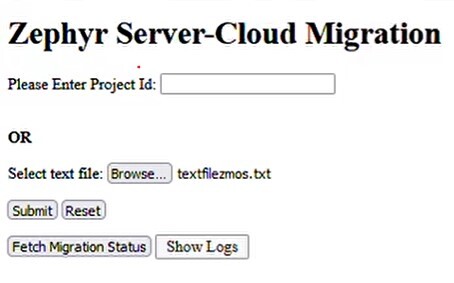
Click Fetch Migration Status. The migration status appears. You can check the progress of the project migration in the Status column.
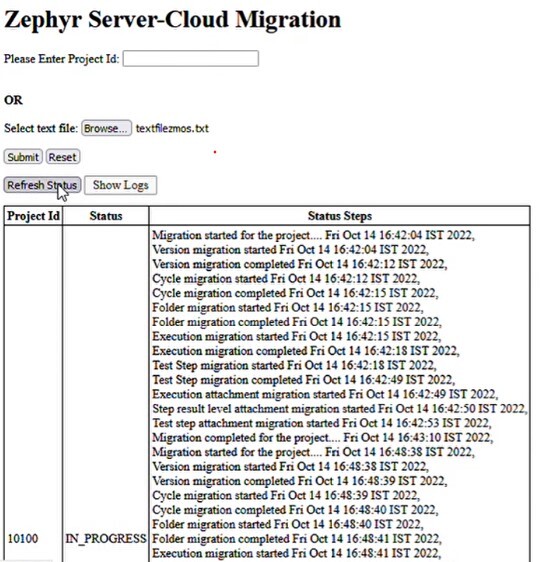
Once the migration is complete, the Status column shows status as SUCCESS.
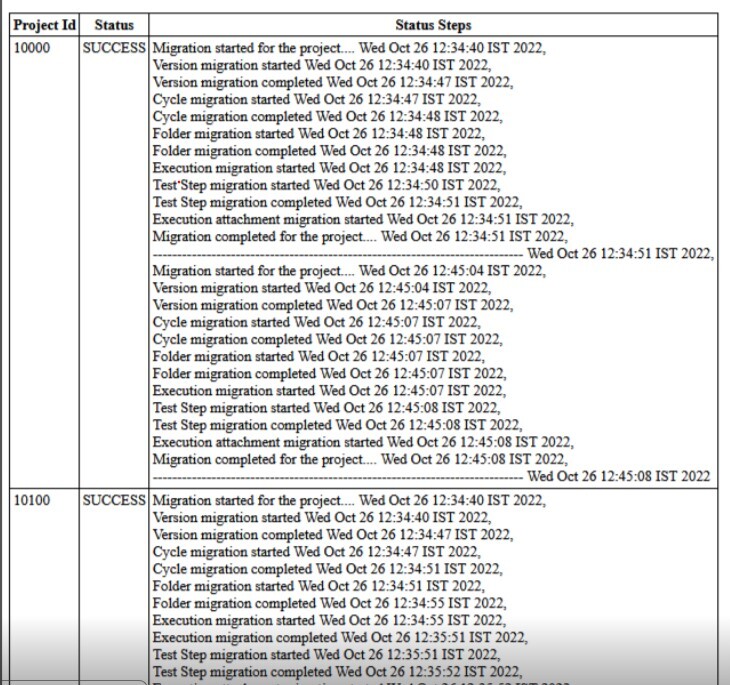
After the migration process completes, you can check the logs for each project. The overall migration status is displayed in the log. To check the logs,
Click Show Logs. The logs display in a new tab.
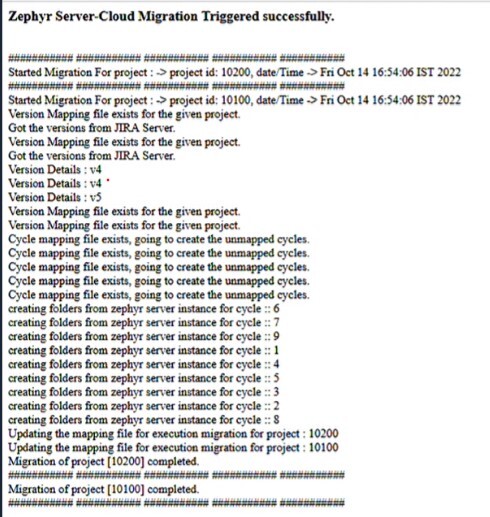
You must validate the migrated data in your Jira Cloud instance.
If there are no issues, you can start working with the migrated projects.
Should you have any questions, please visit our Support Portal where you can search for an answer in the Zephyr Squad Community or contact our Customer Care team.
