Migration via JCMA
Recommended Server versions
For optimal performance and compatibility, we strongly advise to update Zephyr Squad to the most recent Server version available. If your license is not active, kindly raise a ticket, and our Sales team will assist you.
Important Notice for customers that migrate from Server/DC to Cloud
In our continuous effort to make Zephyr Squad better and more efficient for our users, we upgraded the user experience of Zephyr Squad. If you install Zephyr Squad Cloud on a new site for the first time, you see by default the new user experience which is different than the Squad Server/DC experience.
However, to migrate data from Server/DataCenter to the Cloud, you need to switch back to the classic Squad experience in your Cloud instance.
To confirm that you have the correct Zephyr Squad experience, see if you can create one issue of type Test and the Zephyr Squad menu is available in the Manage Apps left menu.
To revert to the same experience as on Server/DC, you must switch to the legacy experience of Zephyr Squad.
The switch is possible in two ways:
Run a test migration. By the end of the process, you are automatically switched to the older experience.
Switch manually to Zephyr Squad old experience:
Go to General configuration > Cloud Migration in Server/DC app.
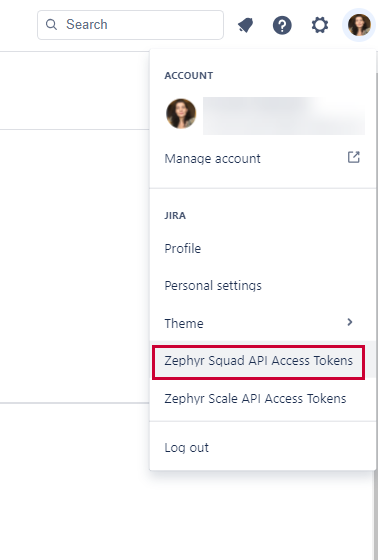
Add the API token. You can find and copy the token when you click on your Jira account profile and go to Zephyr Squad API Access Tokens:
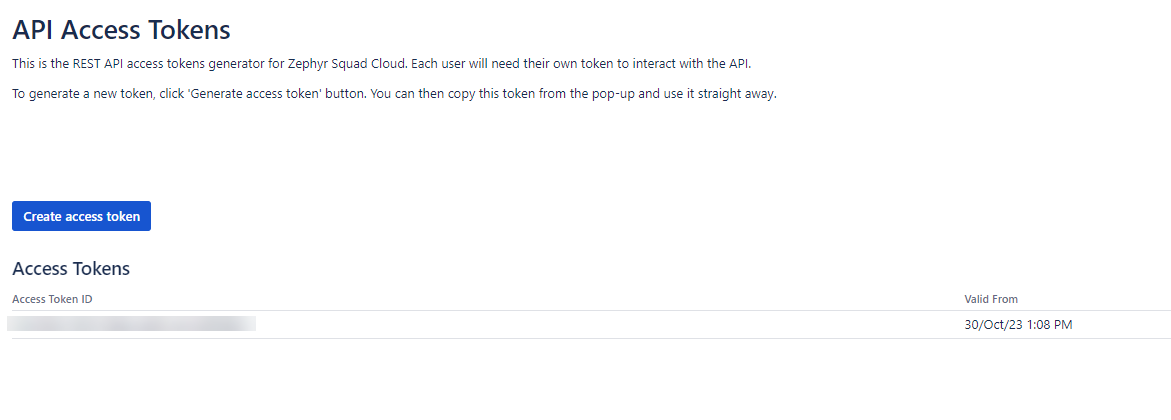
Click Create access token and Copy.
Go to General configuration > Cloud Migration and inform the Cloud instance URL and the API access token generated in number 2.

Click Submit to do the switch.
Pre-migration steps
In Jira Server
Note
In Jira Server 8.14, the migration assistant is installed by default.
Upgrade Zephyr Essential DC to the latest version.
Back up the data of your Zephyr Essential DC.
Install the Jira Cloud Migration Assistant plugin in your Jira Server instance.
To install the plugin manually:
In Jira Server, go to Settings > Manage apps.
Choose Find new apps in the sidebar.
Enter Jira Cloud Migration Assistant in the search bar.
Once the plugin is found, click Install:
Alternatively, you can install it from the Atlassian Marketplace.
In Jira Cloud
Create an XML backup of your empty Jira Cloud instance for future use if you need to reset it.
Install Zephyr Squad Cloud in your Jira Cloud instance.
If you have already been using Jira Cloud and it has projects with the same name or project key as Jira Server projects, delete those projects from Jira Cloud.
How to Pre-Migrate Attachments in JCMA
You can now pre-migrate attachments in the Jira Cloud Migration Assistant (JCMA). This reduces migration time by allowing you to move attachments separately before migrating all project data.
When you set up a migration plan, you can choose to move all project data or just the attachments. This guide will show you how to pre-migrate attachments for Zephyr Squad.
Steps to Pre-Migrate Attachments
Enable the Feature Flag
Before you start, you need to enable a feature flag for pre-migrating attachments.
Go to this URL:
<jira_base_url>secure/SiteDarkFeatures!default.jspaEnable the flag:
com.atlassian.jira.migration.app.data.preload.feature
Set Up Your Migration Plan
In JCMA, select Projects as your migration option.
Choose Attachments only.
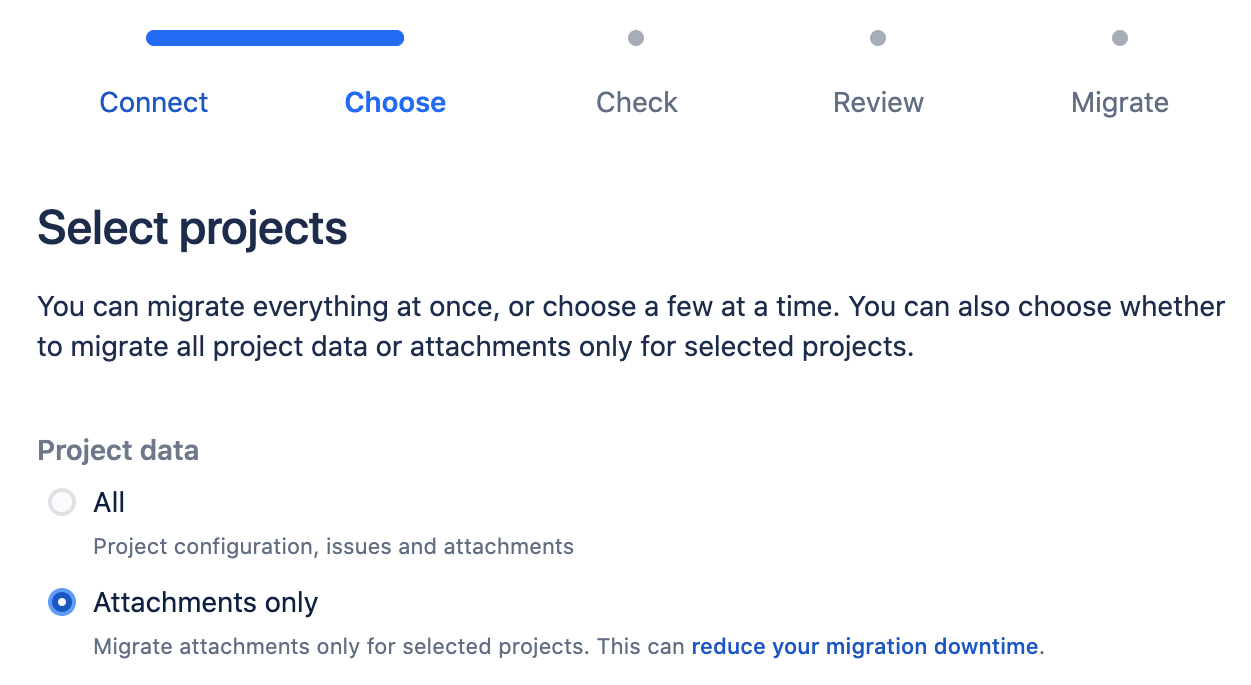
This will migrate attachments for the selected projects, including those from both active and archived issues.
Migrate Zephyr Squad Attachments
For Zephyr Squad, this will include attachments for test steps, test executions, and test step results. Even though Jira doesn't display the progress of app attachments, Zephyr Squad attachments are migrated. You can check the progress in the Zephyr Squad migration logs.
Run the Migration
Review the migration plan.
Start the migration.
When the migration is complete, go to the JCMA Migration page in Cloud to verify the status. Migration plans using the "Attachments only" option will have "attachments" in the plan name.
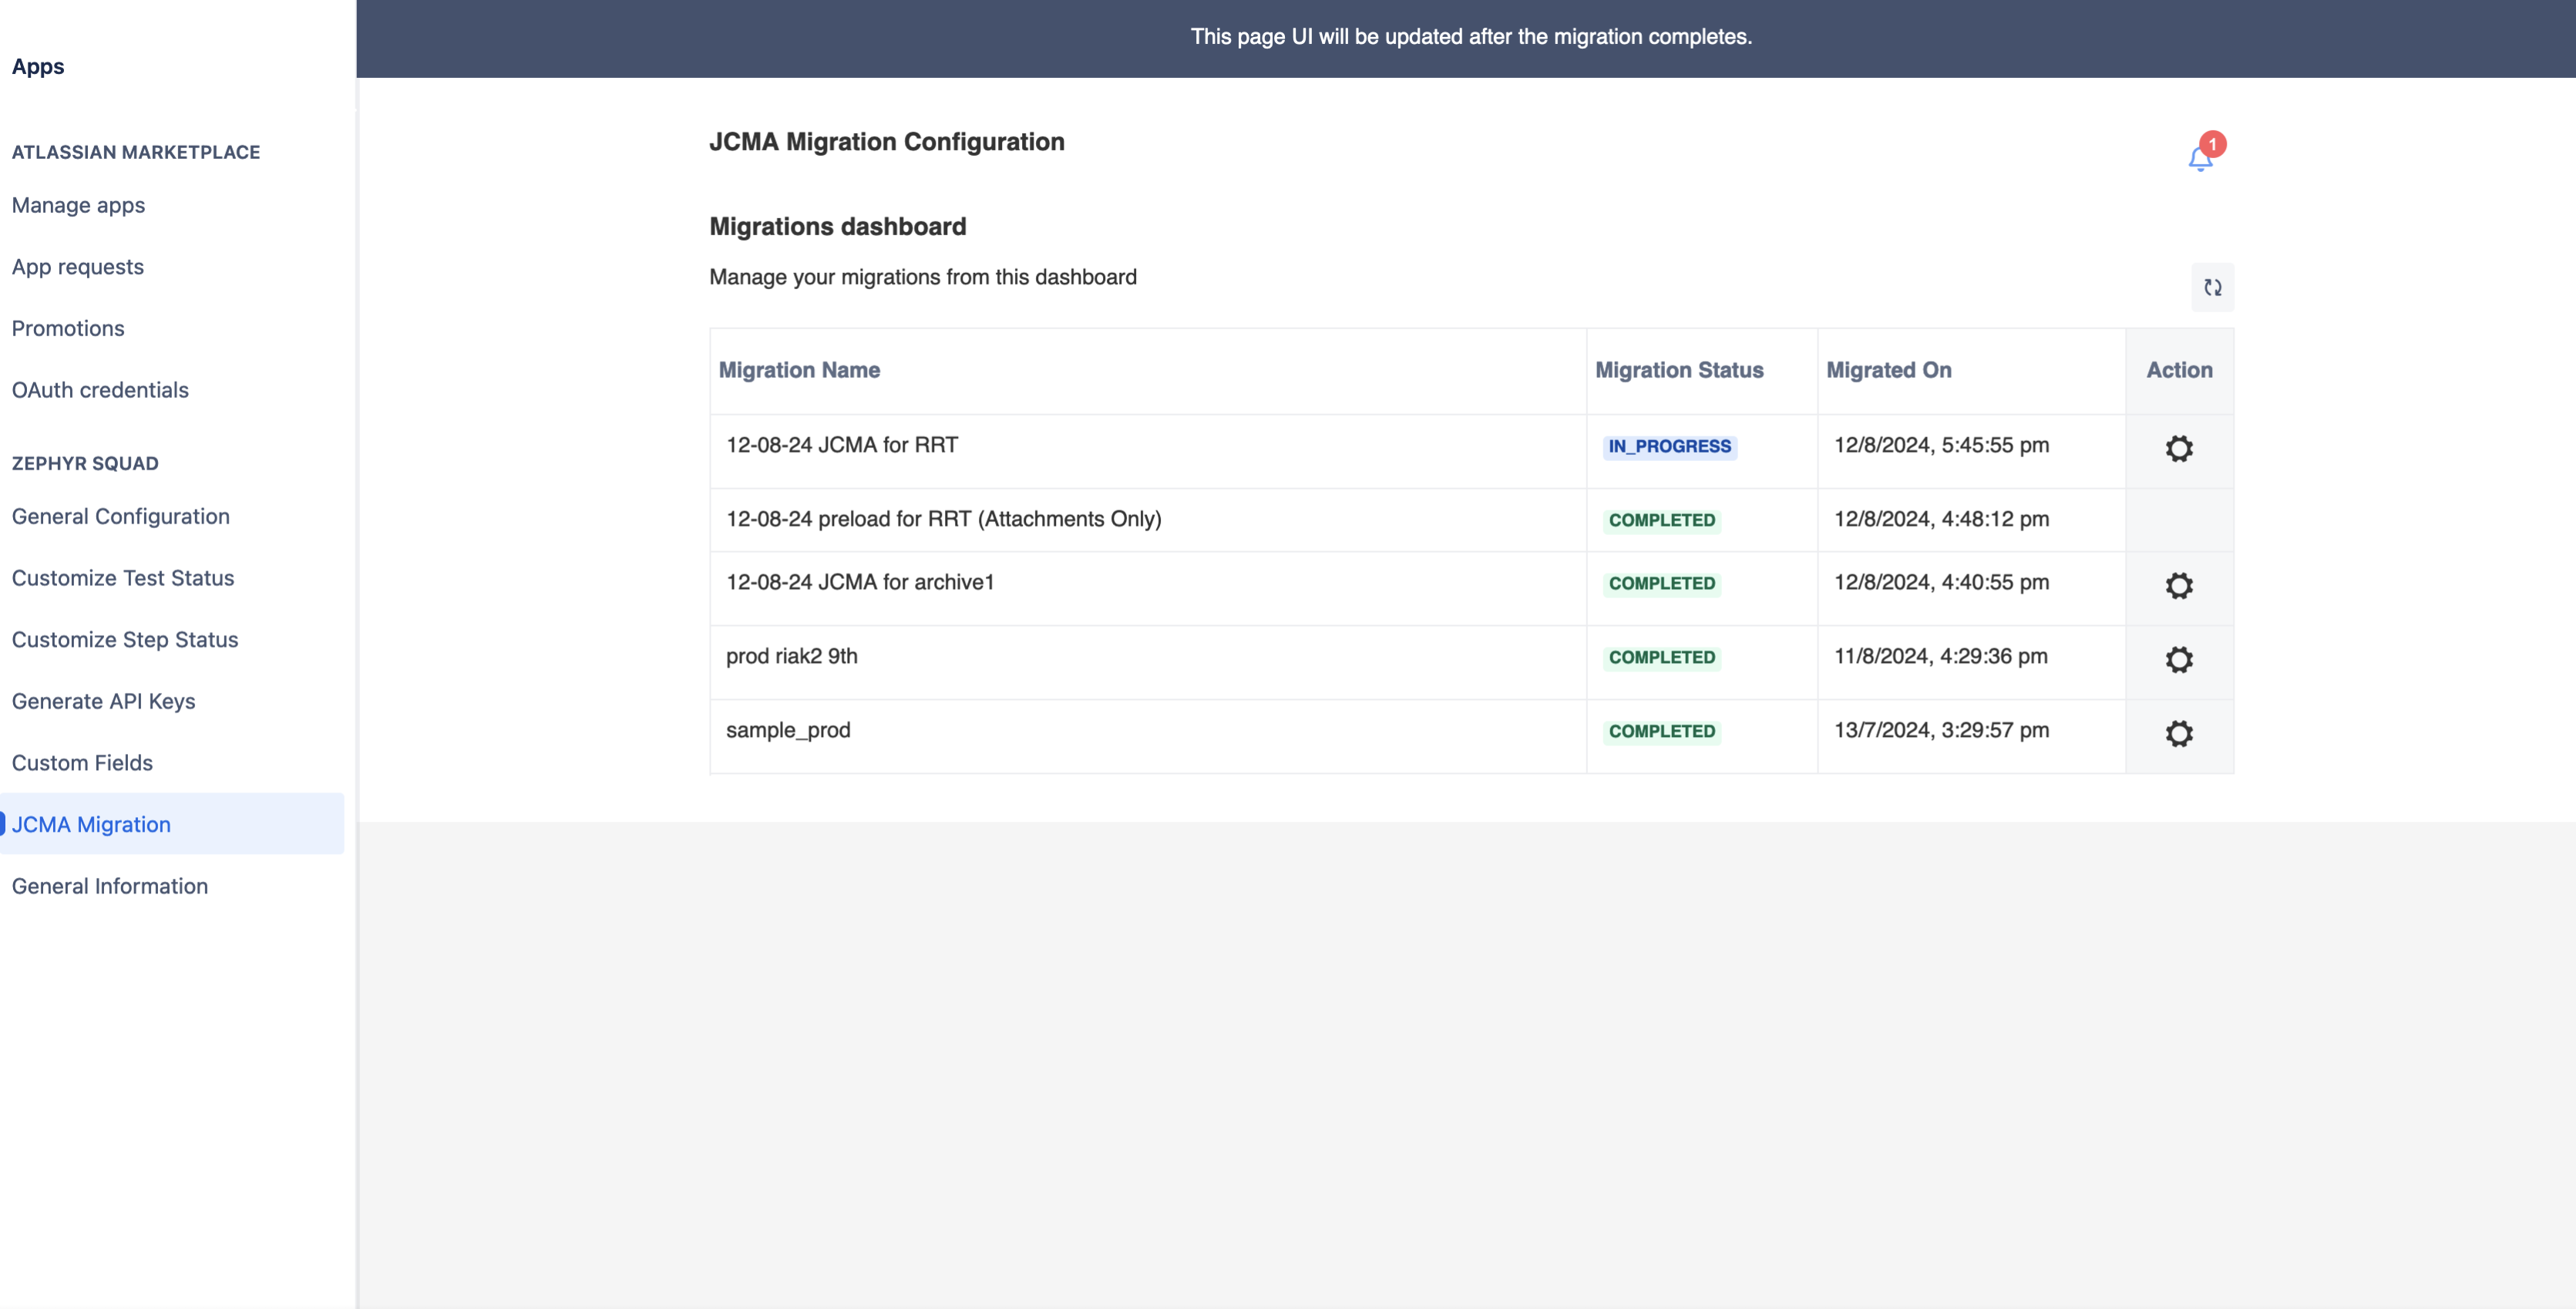
How JCMA Handles Attachments in Future Migrations
When you later migrate all project data, JCMA will detect previously migrated attachments. It will skip them, reducing downtime. New attachments will still be migrated, and links to deleted attachments will be removed.
Supported Versions
To use the attachments pre-migration feature, make sure your Zephyr Squad versions are up to date:
Zephyr Essential DC/DC: 8.5.3 / 9.6.3
By following these steps, you can reduce the time it takes to migrate your Jira projects to Cloud.
Migration steps
You can create multiple migration plans with different sets of Jira projects. To migrate Zephyr data, you must select the Zephyr Squad app together with the relevant Jira projects in the same migration plan, otherwise, the Zephyr Squad data will not be migrated (the migration will be stuck at 0%).
To start migrating your projects, users, and groups, navigate to Settings > System > Migrate to cloud in your Jira Server instance and follow the steps described in the Atlassian Jira documentation:
Use the Jira Cloud Migration Assistant to migrate
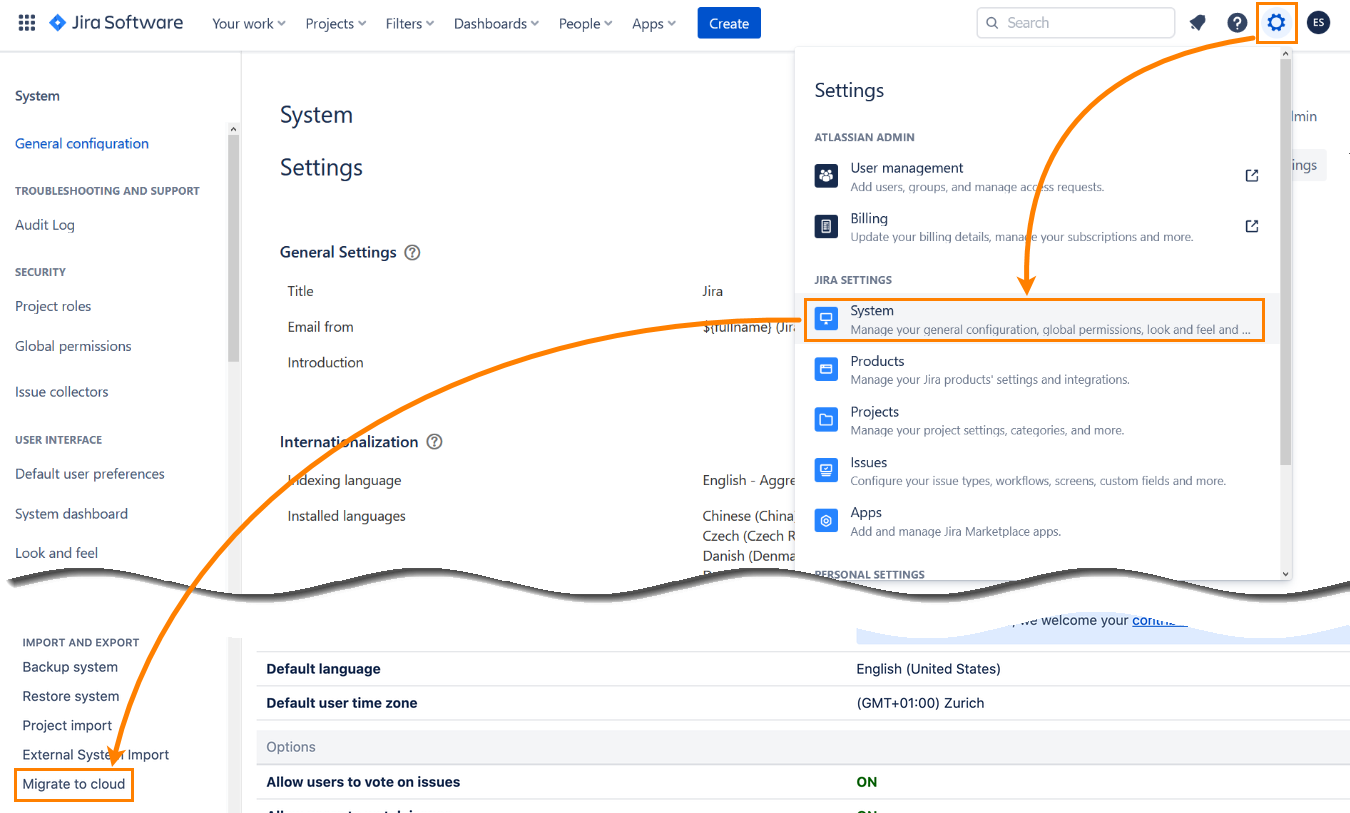
Make sure to wait until the migration completes (the status must be Complete):
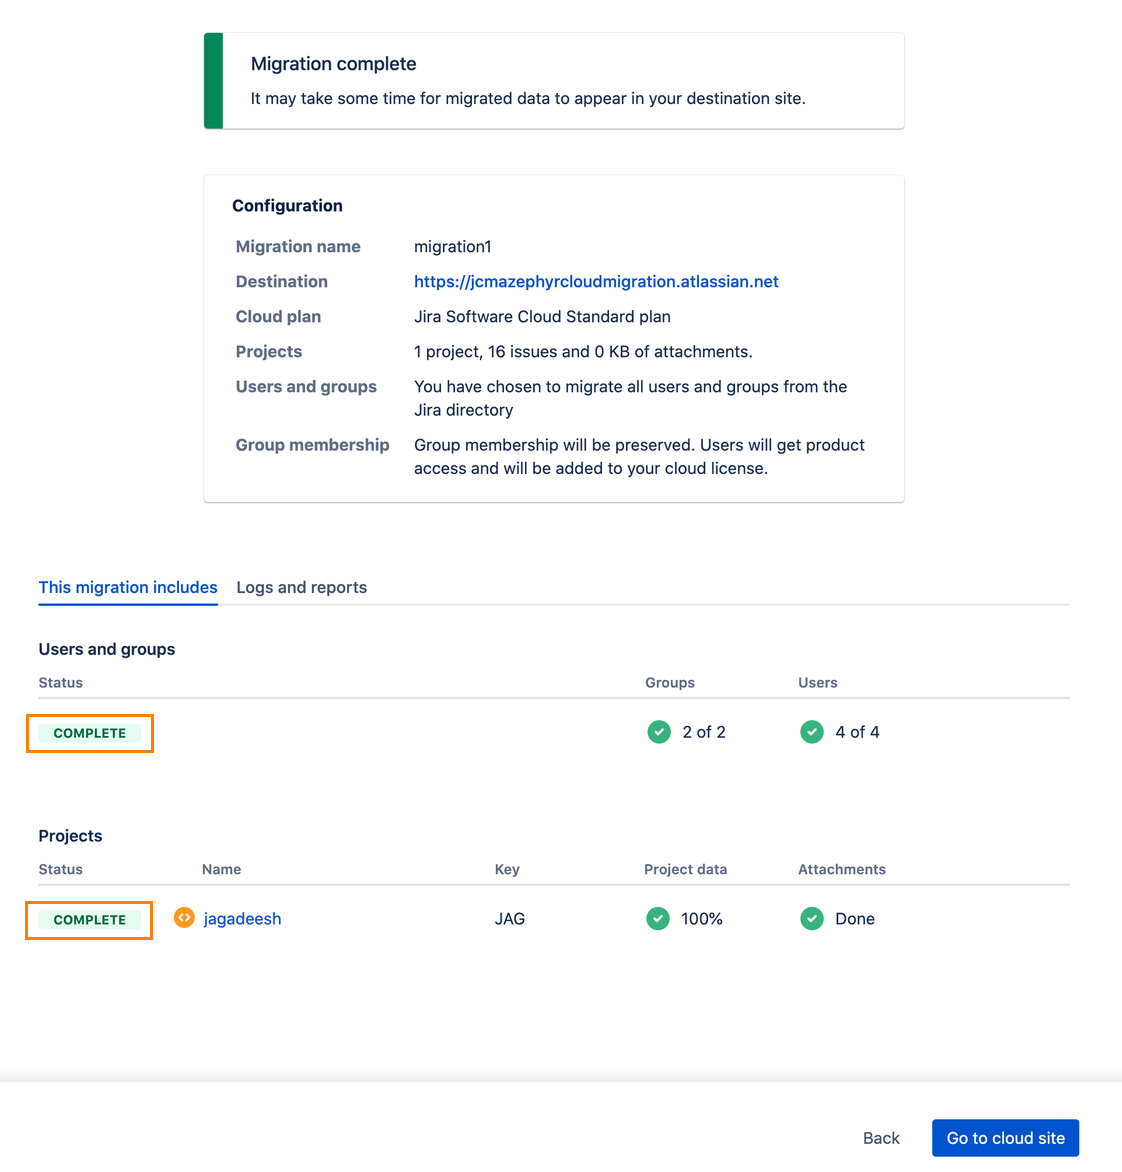
To review the migration status:
Go to your Jira Cloud instance and navigate to Apps > Manage apps > JCMA Migration.
Click the refresh button to view the current migration (the migration will appear in the list). Wait for the status to become Success:
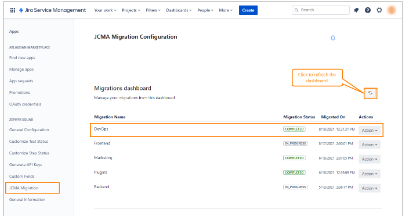
Note
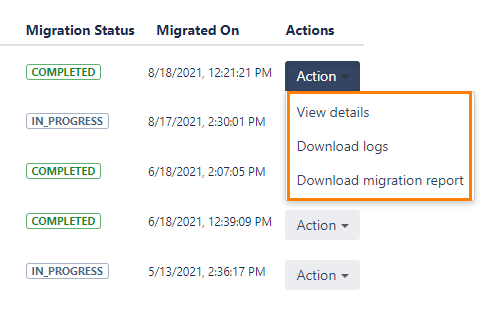
Each migration in the list has the Action button. Clicking the button opens a dropdown that you can use to view the migration details and download the migration report and logs:
Post-migration steps
Once you import the Zephyr Squad data into Cloud, you must check three main data points: Test Cases, Test Executions, and Cycles. This will help you validate whether your data on Cloud matches the data on Server.
Add permissions
To view and edit migrated issues, your Jira account must belong to all migrated user groups. JCMA does not add your Jira account to migrated user groups for security reasons.
To add your Jira account to the group:
Go to Settings > User management, then click Groups on the left.
Click Show details for the needed group from the list of groups.
Click Add group members to include your account to the group.
Repeat these steps to add your account to other groups. See Atlassian documentation for details.
You may need to add the Project Role (atlassian-addons-project-access) to all the project permissions schemes because of Atlassian’s bug MIG-672.
Clear cache and reindex data
Once the migration status is Success, do the following:
Select General Configuration in the Jira sidebar to open the Zephyr Squad Cloud settings.
Scroll down the page and click Clear Cache and Clear Permission Cache:
While staying on the General Configuration page, scroll up to the Re-Index section and re-index all your projects:
Select Project Metadata and click Re-Index.

Select Executions and click Re-Index.

On the same page, check the value of the Sort Cycles Order option. If it is Custom order, you also need to reset the sorting for the migrated projects:
Add the migrated projects to the Reset Custom Order list.
Click reset.

Now you can open your project in Zephyr Squad Cloud and validate the migrated data. If no issues are found, you can start working with your project.
Update Test Automation jobs
If you have Test Automation jobs that use ZBot, you need to configure a new ZBot agent for Zephyr Squad Cloud and modify the migrated jobs to use the new ZBot agent.
Download and install ZBot for Zephyr Squad Cloud:
https://atombuild.zephyr4jiracloud.com/atom.zip
The installation instructions are in the README file inside the archive.
In Jira Cloud, navigate to the Zephyr Squad > Test Automation page.
Find jobs with Automation Type = ZBot. Edit each of these jobs and select the new ZBot agent.

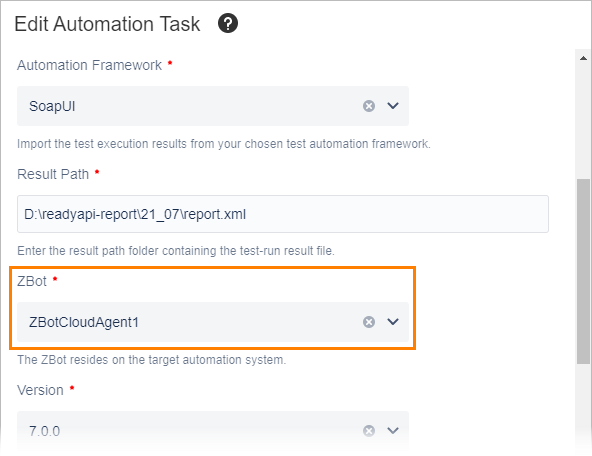
Now you can execute and schedule these automation jobs again.
Validating Migrated Data
The best way to validate the imported data is to run some JQLs or ZQLs queries. The Test Summary page is expected to present different results on Server and Cloud.
You must check the following data points:
Number of Tests on Cloud
To validate the number of tests:
Go to Jira > Filters > Advanced Issue search
Enter this JQL query in the search box:
project=ProjectKey AND issuetype=Test
Press Enter. Check the result displayed.
Number of Test Executions on Cloud
To validate number of test executions:
Go to Project > Squad > Search Test Executions
Enter this JQL query in the search box:
project=ProjectKey AND executionStatus in (status1, status2, status3)
Note
Add all execution statuses separated by a comma.
Press Enter. Check the result displayed.
Number of Cycles on Cloud
To validate the number of Cycles:
Go to Project > Squad > Cycle Summary
Enter this JQL query in the search box:
project=ProjectKey AND issuetype=Test
Press Enter. Check the result displayed.
If you are not seeing the Zephyr data, consider the following:
Unable to see Test Cases:
Check Permissions: Review permissions in the Add permissions section. Ensure there are no Issue Security schemes blocking your access.
Check the Test issue type.
Warning
You must not rename the issue type "Test" before migration. If the issue type changed to “Migrated” after the JCMA migration, edit it back to the original value.
To check your Test issue type, run in browser URL: https://<jira_cloud_baseurl>.atlassian.net/rest/api/3/issuetype and verify issuetype "Test" exists and has description:
This JIRA Issue Type is used to create Zephyr Squad Tests.If the result is not
This JIRA Issue Type is used to create Zephyr Squad Tests., edit the description to meet the above, and uninstall/reinstall the Squad app. Then, run https://<jira_cloud_baseurl>.atlassian.net/rest/api/3/issuetype again and get the “id” (e.g "id":"10005"), now compare to Manage Apps > Zephyr Squad > General Information. The IDs and Issue type descriptions should match. If they do, check your data again. Otherwise, contact Zephyr Support. Do not rerun your migration without our confirmation.Unable to see Executions:
The Test Summary page calculates the Executions differently from Server to Cloud. See the Test Summary View on our Server vs Cloud page.
If you are not seeing any Executions, make sure you ran the post-migration steps correctly and allowed enough time for them to finish. The re-index job might take hours to finish depending on your data size.
Contact Zephyr support before trying any other steps. Do not rerun your migration without our confirmation.
Retry migration
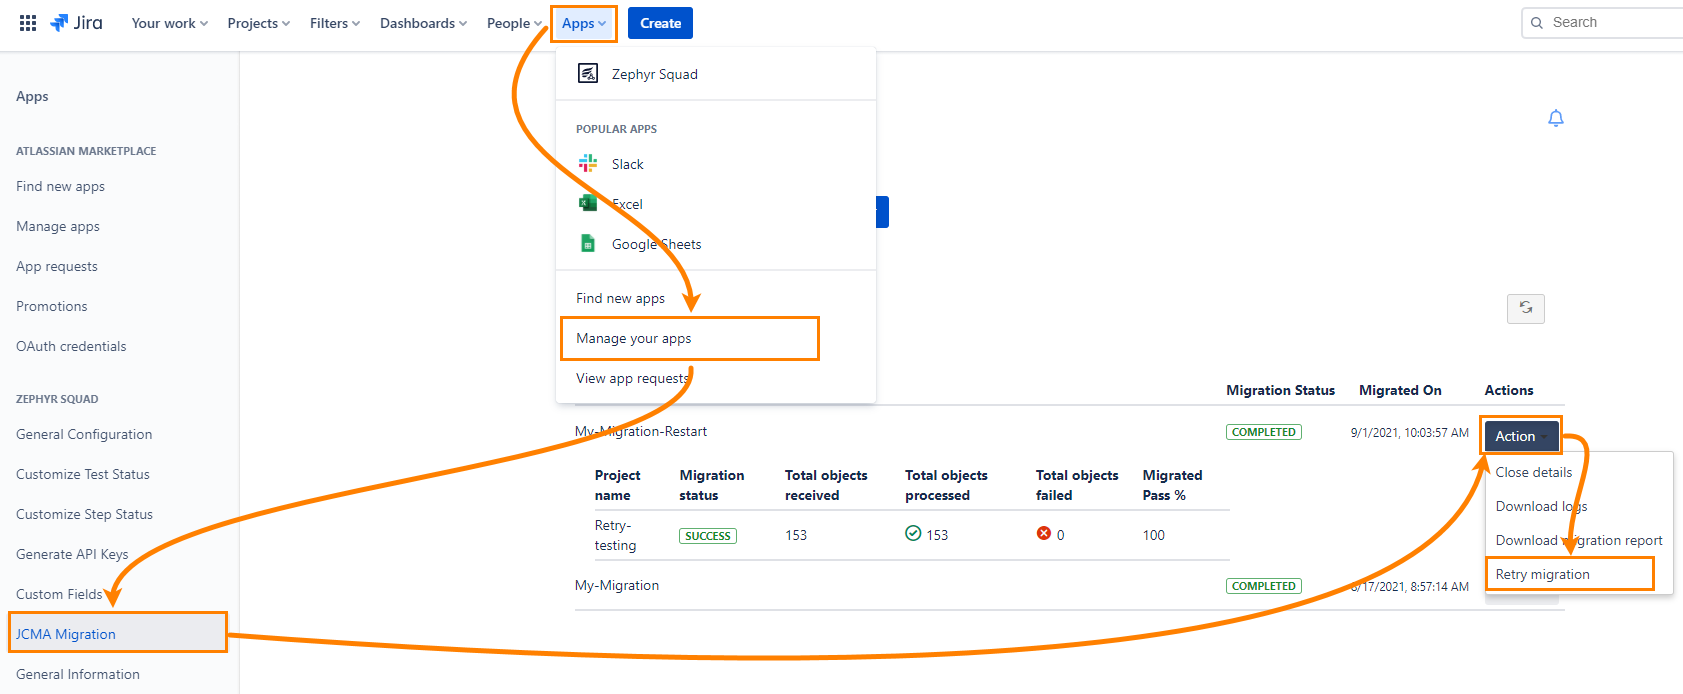
You can restart the JCMA migration within 14 days after it failed. To do that:
Go to Apps > Manage your apps and click JCMA Migration.
Click Action next to the failed migration.
Select the Retry migration item.
Select any or all of the projects, or failed projects only, click Retry.
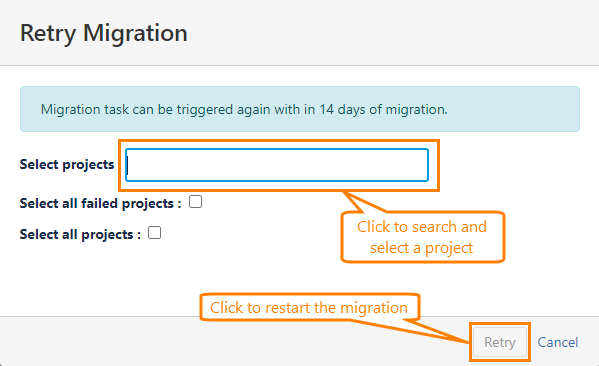
The migration will restart, and its status will change to IN PROGRESS.
Managing Data Migration and Re-indexing in the Cloud: Best Practices and Considerations
At this point, your data is secure in the Cloud and you can release the site to end-users to start creating new data. However, the migrated Executions will only appear after the Re-index is complete. This is because the UI does not directly gather data from the production database, but from an Index.
The re-index job may take several hours depending on the size of the migrated dataset, as it was designed to grow organically and not in large chunks. If you have over 1 million Zephyr objects, we recommend timing the re-index and factoring it into your production migration timeline.
Note:
if you select 'ALL PROJECTS', it will not be possible to determine which project is being re-indexed.
If you select projects individually, the re-indexing will follow the same order.
New data may be created while the re-indexing is in progress.
The progress bar on the re-indexing page will only function for 30 minutes, after which it will no longer track the re-indexing progress.
- To track progress, go to the Search Test Executions page and keep an eye on the total number of executions until it matches the number on the server or stops increasing.
You don't have to wait for all projects to be migrated before triggering the reindex job. You can run it as soon as the project is migrated to the cloud and cycle data is visible.
Only one reindex job can be run at a time, but it can be for all projects or selected projects.
If you are migrating a large dataset with a restricted timeline, be sure to review this point with our Cloud Migrations Manager by raising a ticket with us.
Known issues and limitations
For the common JCMA issues and limitations, see the Atlassian documentation:
JCMA known issues and troubleshooting
What gets migrated with the Jira Cloud Migration Assistant
The following limitations are specific to the Zephyr Squad app data migration.
Data that is not migrated:
Tests with issue-level security and their details (steps, executions, and so on).
Archived tests and their details (steps, executions, and so on).
ZBot agents used by Test Automation jobs. You need to Configure new Zbot and update the migrated jobs to execute automation tasks using newly created Zbot.
Miscellaneous:
Timestamps in issues might be different in Jira Server and in Jira Cloud. Since Jira Cloud uses UTC, there might be a shift in time zones if the Jira Server instance uses another time zone.
Sorting tests in the Cycle Summary by ID may produce incorrect sorting order.
FAQ
See our Cloud Migration FAQ for quick answers to some commonly asked questions.
Support and troubleshooting
Should you have any questions, please visit our Support Portal where you can search for an answer in Zephyr Squad Community or contact our Customer Care team.