
When a review is created, users assigned to it are invited to participate in the review process. As they inspect the materials, they may leave comments and create defects, however, this is optional. Before the review can be completed, the author or another user responsible for it will have to fix defects, and reviewers will have to verify that the fixes are effective and do not raise more defects.
The actual tasks assigned to each review participant depend on their role in the review. The list of roles is configurable by the Collaborator Server administrator and thus roles and responsibilities associated with roles differ from team to team.
Get Notified About New Review
When a review leaves the Planning phase and enters the Annotating or Inspection phase, its participants and members of assigned review pools receive email notifications inviting them to participate in the review. To proceed to the review process, select the review on the Action Items panel in the Collaborator Web Client, Eclipse Plug-in or Tray Notifier, or the Collaborator View in the Visual Studio Extension. This will open the Review Screen.
The review will also appear in the Action Items list in the Tray Notifier. Double-clicking the review will open the Review Screen in the Web Client.
Take review pool selection
If a review pool was assigned to the review, and you are a part of that review pool, you may take a review pool selection and become a participant of the review in a given role, if no one has done it first.
To take a review pool selection:
Click the Take this Review Pool selection button in the Participants section:

Click the image to enlarge it.
Click the Take this Review Pool selection button in the Participants section:

Click the image to enlarge it.
Right-click the review pool in the Participants section and select Take this Review Pool selection from the context menu:

Click the image to enlarge it.
Use the ccollab admin review pool take command.
Annotate Review
When the Planning phase of the review is finished, the review can be moved to the optional Annotating phase. In this phase, all the participants of the review will be invited to leave comments, add files and create defects before the actual review process begins.
The review will enter the Annotating phase if there are unassigned review pools when the Planning stage ends.
The review can be moved to the Inspection phase when the annotating process ends and all the review pools are assigned.
Perform Review
The review process starts when the review enters the Inspection phase.
Checklist
Depending on the configuration of the review template, a review might have a checklist shown on the Review Screen. The checklist is used to remind review participants to perform certain actions in the review. When a user selects a checkbox in the checklist, Collaborator logs their name and the timestamp of the change.

Click the image to enlarge it.

Click the image to enlarge it.

Click the image to enlarge it.
If the Checklist Mandatory? property of the review template is set to "Mandatory", all the points of the checklist must be checked before the review can be completed.
Review materials
To start reviewing materials attached to the review, open a file in the Review Materials section:
Click the file name in the Review Materials section:

Click the image to enlarge it.
Click the file name in the Review Materials section:

Click the image to enlarge it.
Double-click the file in the Review Materials section:

Click the image to enlarge it.
The file will open in the respective editor: Diff Viewer in Web Client, Code Viewer or Diff Viewer in Visual Studio Extension, or Compare Editor in Eclipse Plug-in. The editors offer means of viewing files and file differences and working with comments and defects.

Click the image to enlarge it.

Click the image to enlarge it.

Click the image to enlarge it.
| Note: | The Collaborator Visual Studio Extension and Eclipse Plug-in are designed to review source code and text files. To review other files such as Word processing documents, spreadsheets, presentations, PDF documents, Visio graphics and images, use the Web Client. |
Comment
Comments are the way of communication in a review. You can leave a comment about the whole review (Global comment), a file attached to the review (Overall file comment), or a place in the file (for example, Line comment or Pushpin comment), and other participants will see the comment and be able to respond in a threaded conversation.
| Note: | The commenting format and functionality depend on the type of the reviewed material. You can read about types of comments here: Review Chats, Comments and Defects. |
To leave a global comment on the entire review:
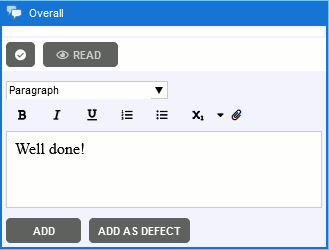
Open the Review Screen, type your message in the Chat section, and click Add.

Click the image to enlarge it.
Open the Review Screen, type your message in the Chat section, and click Add.

Click the image to enlarge it.
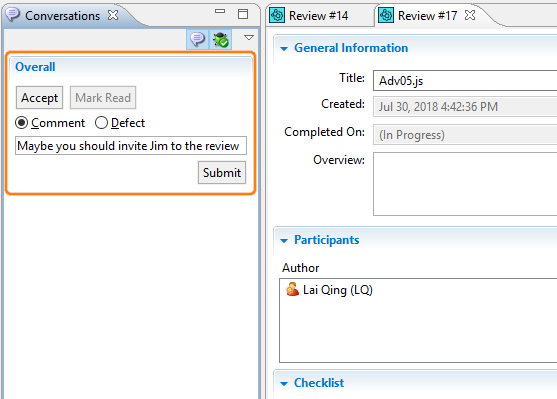
Open the Review Screen, type your message in the Overall section of the Conversations pane, and click Submit.
Use the ccollab admin review comment create command without any optional parameters.
For example, to create a Global comment in review #123:
To leave an overall comment for the entire file or revision:
Open the file you wish to comment on in the Diff Viewer, type your comment in the Overall section in the Chat pane, and click Add.
Open the file you wish to comment on in the Code Viewer or Diff Viewer, type your comment in the Overall section in the Conversation pane, and click Add.

Open the file you wish to comment on in the Compare Editor, type your comment in the Overall section in the Conversations pane, and click Submit.
Use the ccollab admin review comment create command with either --file or --version parameters.
For example, to create an Overall comment for the foobar.c file in review #123:
To leave a comment on a particular line, coordinate or cell in one of the reviewed files:
Open the file you wish to comment on in the Diff Viewer, click the desired line, coordinate or cell in the content view, type your comment in the text box, and click Add.

Right-click the line you wish to comment on in the Code Viewer or Diff Viewer. In the context menu, select Collaborator > Add Comment, type your comment and click Add comment.

Click the image to enlarge it.

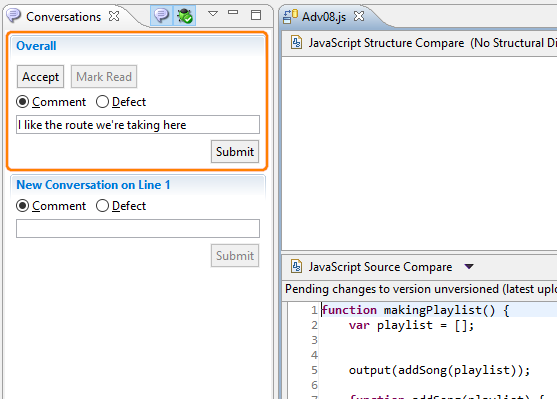
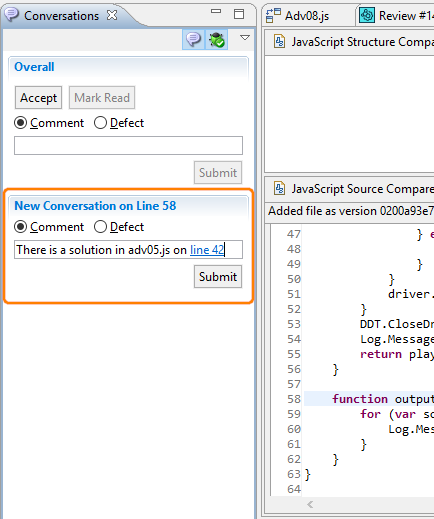
Click the line you wish to comment on in the Compare Editor. Type your comment in the New Conversation on Line X section, where X is the number of the line. Click Submit.
For text-based files, call the ccollab admin review comment create command with either --file or --version parameters and the --line-number parameter.
For example, to create a comment on line 36 of a file version with ID 789 in review #1000:
For images, presentations, PDFs and word-processing documents, call the ccollab admin review comment create command with either --file or --version parameters and the --page, --x and --y parameters.
For example, to create a comment at certain coordinates on first page of the Requirements.doc file in review #567:
For spreadsheets, call the ccollab admin review comment create command with either --file or --version parameters and the --cell parameter.
For example, to create a comment at certain cell of the results.xls file in review #789:
Comments do not necessarily indicate that there is something wrong with the file and do not require any fixes before the review can be moved to the next phase. However, depending on the system administration settings, participants in certain roles might be required to mark all the comments read before the review can be completed. The Web Client, Visual Studio Extension and Eclipse Plug-in highlight unread comments with yellow background.
In addition to marking a conversation as read, you can mark it as accepted. This marks it read and puts a green check mark icon (![]() ) next to that conversation in the Review Materials section of the Review Screen. You can read more about accepting comments here: Review Chats, Comments and Defects.
) next to that conversation in the Review Materials section of the Review Screen. You can read more about accepting comments here: Review Chats, Comments and Defects.
To mark a conversation as read or accepted:
To mark a comment as read, click the Read button in the corresponding chat. To clear the "unread chat" for all messages in the current chat, click the Mark all read button at the bottom of the chat pane:

To mark a comment as accepted, click the Mark Accepted button. The Mark Accepted button affects conversations/revision that is currently displayed in the After pane of the Diff Viewer. The button can be inactive when the conversation/revision is already accepted, or when the revision currently displayed in After pane actually precedes (is earlier than) the revision displayed in Before pane.

To mark a comment as read, click the Mark Read button in the corresponding chat in the Conversation pane. Unread comments are highlighted in yellow.
To mark a comment as accepted, click the Mark Accepted (![]() ) button in the corresponding chat.
) button in the corresponding chat.
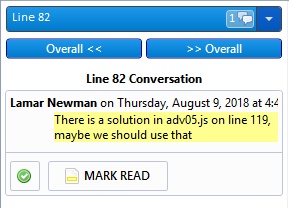
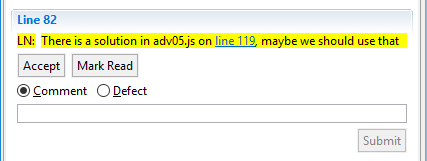
To mark a comment as read, click the Mark Read button in the corresponding chat in the Conversations pane. Unread comments are highlighted in yellow.
To mark a comment as accepted, click the Accept button in the corresponding chat.
To mark a comment as read, use the ccollab admin review conversation mark-read command.
To mark a comment as accepted, use the ccollab admin review conversation accept command.
To identify the desired conversation you may either use the same set of parameters as the ccollab admin review comment create command uses (--file, --version, --line-number, --page, --x, --y, --cell), or specify the --conversation-id parameter to disambiguate situations where there is more than one conversation at a particular location.
The Collaborator Web Client, Eclipse Plug-in and Command-Line Client give participants an option to redact their erroneous or inappropriate comments. Redacted comments will be displayed in a much more difficult to read manner, discouraging users from reading them.
To redact a comment:
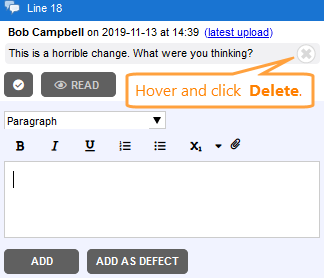
Mouse-over the comment in the Chat pane and click the X icon that will be displayed to the right of the comment.
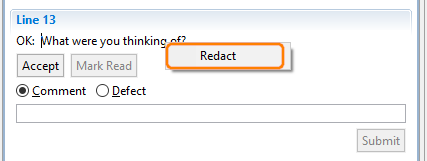
Right-click the comment in the Conversations pane and select Redact from the context menu.
Use the ccollab admin review comment redact command.
Create defects and check if they were fixed
To indicate that there is a problem with the materials you are reviewing, you create a defect. The defect may relate to the review as a whole (Global defect), a file attached to the review (Overall file defect), or a specific place in the file (for example, Line defect or Pushpin defect).
| Note: | The format and functionality of defects depend on the type of the reviewed material. You can read about various types of defects here: Types of Review Comments and Defects. |
When creating a defect, you have to specify the comment text and fill in a number of additional fields such as Severity and Type. The list of additional fields is fully configurable by the administrator and thus might differ from team to team.
To create a global defect for the entire review:
-
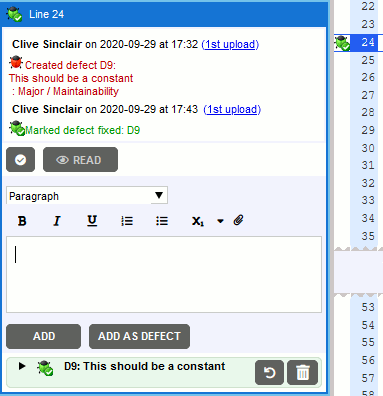
Type the description of the defect in the Chat section of the Review Screen and click Add as Defect.

Click the image to enlarge it.
-
Fill in custom fields in the Specify defect custom attributes area and click Add Defect.

Click the image to enlarge it.
-
Type the description of the defect in the Chat section of the Review Screen and click Add as Defect.

Click the image to enlarge it.
-
Fill in custom fields in the Specify defect custom attributes area and click Add Defect.

-
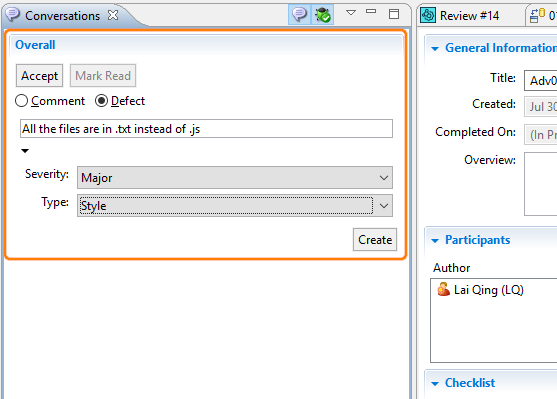
Open the Review Screen. Select Defect in the Overall section in the Conversations pane.
-
Type the description of the defect in the box below and fill in the custom fields below.
-
Click Create.
Use the ccollab admin review defect create command and specify only values for defect custom fields and no other optional parameters.
For example, to create a Global defect in review #123:
To create a defect for the entire file or revision:
Open the file you wish to comment on in the Diff Viewer, type your comment in the Overall section in the Chat pane, and click Add.
-
Open the desired file in the Diff Viewer.
-
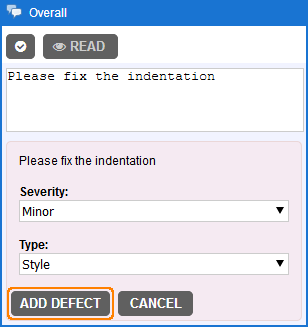
Type the description of the defect in the Overall section in the Chat pane and click Add as Defect.

-
Fill in custom fields and click Add Defect.
-
Open the desired file in the Code Viewer or Diff Viewer.
-
Type the description of the defect in the Overall section in the Conversation pane and click Add as Defect.

-
Fill in custom fields in the Specify defect custom attributes area and click Add Defect.

-
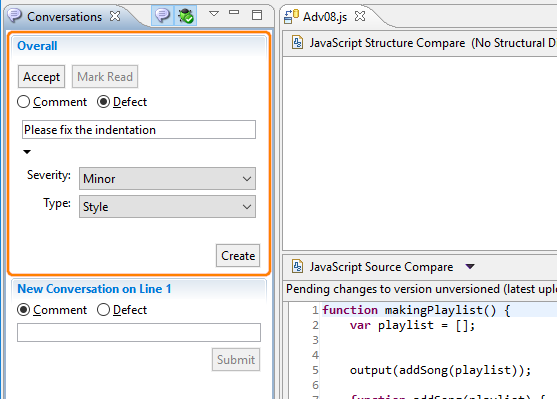
Open the desired file in the Compare Editor.
-
Select Defect in the Overall section in the Conversations pane.
-
Type the description of the defect in the box below and fill in the custom fields.
-
Click Create.
Use the ccollab admin review defect create command with either --file or --version parameters and specify values for defect custom fields.
For example, to create a defect in overall section of the bizbaz.java file in review #567:
To create a defect for a particular line, coordinate or cell in one of the reviewed files:
-
Click the desired desired line, coordinate or cell in the Diff Viewer.
-
Type the description of the defect in the Chat pane and click Add as Defect.
-
Fill in custom fields and click Add Defect.
-
Right-click the desired line in the Code Viewer or Diff Viewer. In the context menu, select Collaborator > Add Defect.

Click the image to enlarge it.
-
Type the description of the defect in the Defect description box and fill in custom fields in the Defect custom attributes area. Click Add defect.

-
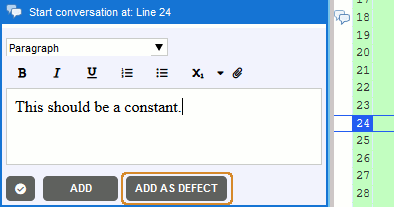
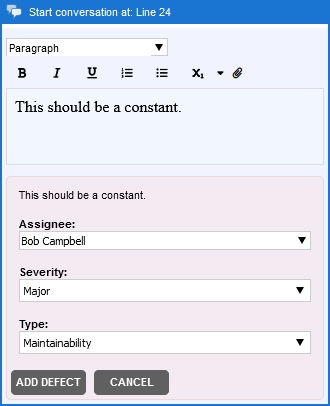
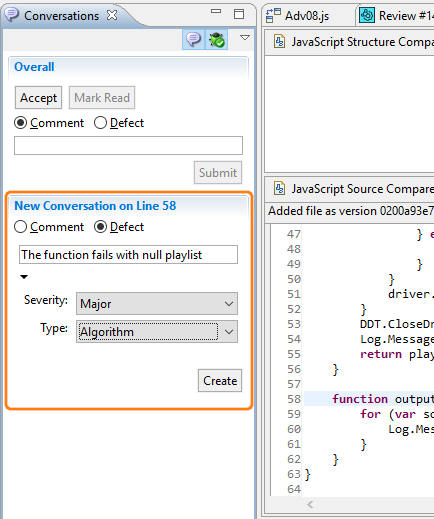
Select the desired line in the Compare Editor.
-
Select Defect in the New Conversation on Line X section in the Conversations pane, where X is the number of the selected line.
-
Type the description of the defect in the box below and fill in the custom fields.
-
Click Create.
For text-based files, call the ccollab admin review defect create command with either --file or --version parameters, the --line-number parameter and specify values for defect custom fields.
For example, to create a defect on line 36 of a file version with ID 789 in review #567:
For images, presentations, PDFs and word-processing documents, call the ccollab admin review defect create command with either --file or --version parameters, the --page, --x and --y parameters and specify values for defect custom fields.
For example, to create a defect at certain coordinates on first page of the Requirements.doc file in review #567:
For spreadsheets, call the ccollab admin review defect create command with either --file or --version parameters, the --cell parameter and specify values for defect custom fields.
For example, to create a defect at certain cell of the results.xls file in review #789:
A review with defects can't be completed until the author has reworked the defects and participants have marked them as fixed or tracked them externally. Tracking a defect in an external issue-tracking system is useful if you want to fix it at a later date. To read about integration between Collaborator and issue-tracking systems, see Issue-Tracking Integrations: Overview.
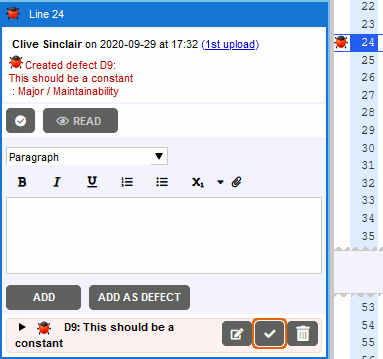
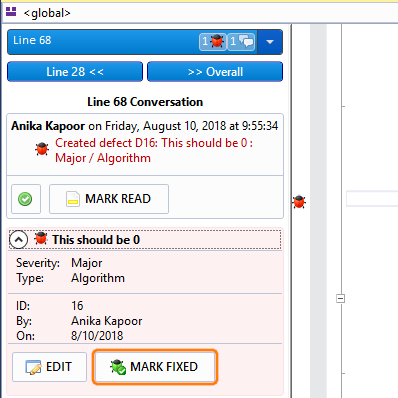
To mark a defect as fixed:
- Locate the defect in the Chat pane.
-
Click the Mark Fixed button in the defect pane.
-
Expand the defect description in the Conversation pane.
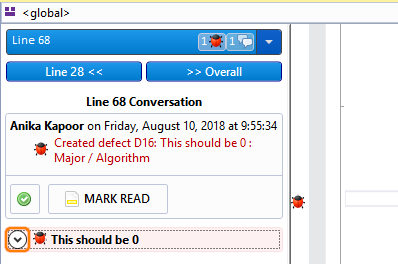
-
Click Mark Fixed.
Click Mark Fixed in the defect's description in the Conversations pane.

Use the ccollab admin review defect mark-fixed command.
For example, to mark the defect D5 as fixed:
To mark a defect as tracked externally:
- Locate the defect in the Chat pane.
-
Click the Edit button in the defect pane.
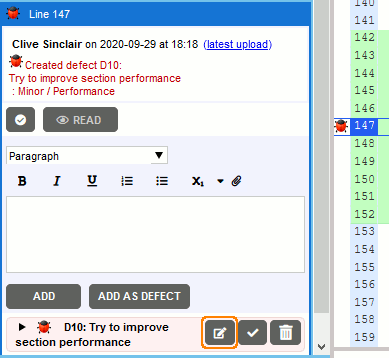
-
Do any of the following:
-
Click Track externally and specify the defect identifier in your external issue tracking system.

-
Click Export issue and specify the defect details in the ensuing dialog.
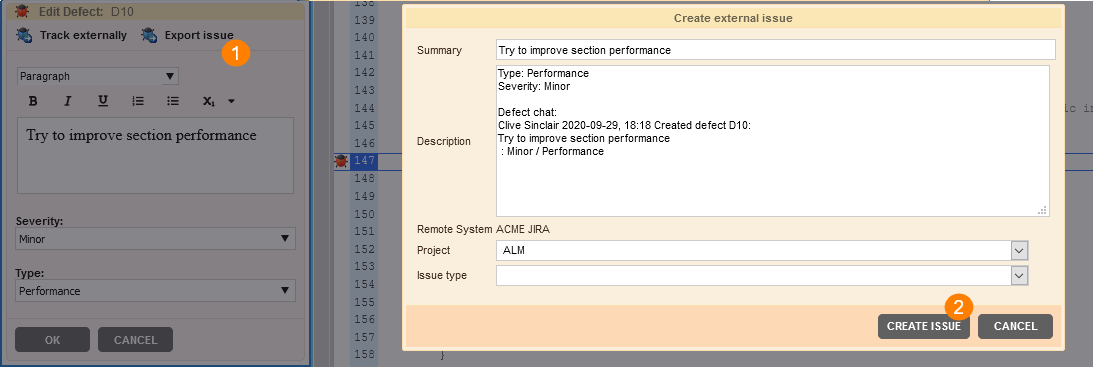
The latter requires, that your Collaborator administrators setup and configure issue-tracking integration.
-
- Expand the defect description in the Conversation pane.
-
Click Edit.
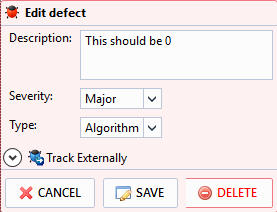
-
Expand the Track Externally section.
-
In the External name box, specify the defect identifier in your external issue tracker.
-
Click the Track Externally button.

-
Click Track Externally in its description in the Conversations pane.
-
In the External name box, specify the defect identifier in your external issue tracker, and click Track Externally.

Click the image to enlarge it.
Use the ccollab admin review defect mark-external command.
For example, to mark the defect D5 as external:
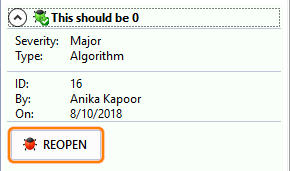
If a defect reappears in a later revision, you can re-open it.
To re-open a defect:
- Locate the defect in the Chat pane.
-
Click Reopen.
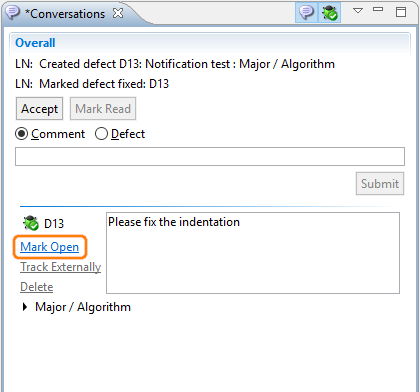
-
Expand the defect description in the Conversation pane.
-
Click Reopen.
Click Mark Open in the defect description.
Use the ccollab admin review defect mark-open command.
For example, to re-open the defect D5:
Move On
Once you have finished reviewing materials, you can indicate that you are done with the current phase of the review. When all the required participants have indicated that they are finished, the review will move to the next phase:
-
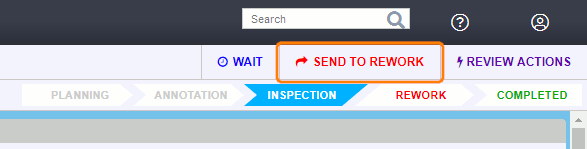
If there are open defects, the review will go to the Rework phase. The author will have to fix defects, upload changed files and send the review back to Inspection.
-
If there are no open defects, the review will go to the Completed phase.
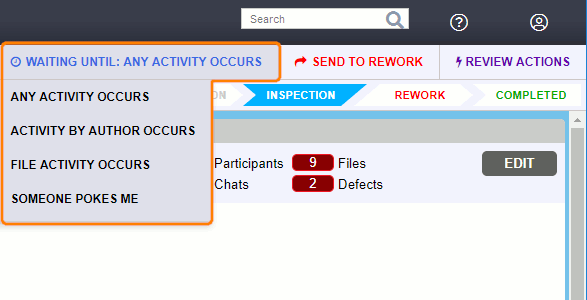
If you want to prevent the review from going to the next phase, you can opt to wait until certain activity occurs. When it does, you will be notified via email.
Depending on the presence of open defects, either the Send to Rework or Send to Completed button will be available in the header of the Review Screen.
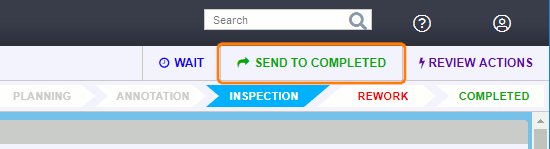
If you want to wait for certain actions to happen before finishing the review, click Wait in the header and select the appropriate option in the drop-down list.
Depending on the presence of open defects, either the Send to Rework or Send to Completed button will be available in the Next Steps section of the Review Screen.


If you want to wait for certain actions to happen before finishing the review, click Wait in the Next Steps section and select the appropriate option in the list.


To indicate that you are finished with the current phase of the review, select Finished button in the Moving On section of the Review Screen.

If you want to wait for certain actions to happen before finishing the review, select the action you are waiting for in the Waiting drop-down box in the Moving On section and then click the Waiting button.

To indicate that you are finished with the current phase of the review, use the ccollab admin review finish command.
To indicate that you are waiting for a certain action to happen, use the ccollab admin review wait command.
See Also
Create Reviews
Rework Defects
Review Chats, Comments, and Defects
Types of Review Comments and Defects
Review Screen