
This section describes the diff viewing interfaces offered by Collaborator. Those interfaces are where most of the reviewing takes place and where comments and defects are created and displayed.
The interfaces differ from client to client and have different names. In Web Client, it is called Diff Viewer, in Visual Studio Extension, it is either Code Viewer or Diff Viewer, and in Eclipse Plug-in, it is named Compare Editor.
Diff Viewer (Web Client)
Diff Viewer includes a number of configuration and display options that may change depending on the specific type of file that is being reviewed.

Click the image to enlarge it.
The Diff Viewer is divided into a number of sections:
- Chat Pane and associated toolbar options
- Diff Viewer Toolbar (Which includes the Display Options pane)
- Diff Viewer Header
- Diff Viewer Content (The actual content under review)
| Note: | The Diff Viewer opens in the same window and tab, when launched from the Review Screen. To open it in a new window, you can Shift+click the link. |
Chat Pane
On the left of the main Diff Viewer page, there is a pane for chat threads. This pane allows you to add both global and content-specific comments and defects to the document you are reviewing. Comments may hold any information concerning the review: a question, a clarification, a remark, an encouragement, whatever else. Defects indicate a problem that needs to be fixed. Comment and defect description could be in plain-text or use rich-text and Markdown formatting, they could also mention other Collaborator users. To learn more about global and content-specific comments and defects, see Types of Review Comments and Defects.
To hide or show the Chat pane, you can either click the expander button in the pane border or the ![]() Focus Mode toolbar button. When you click anywhere in the Diff Viewer content, the Chat pane automatically expands so that you can input your comment or see existing comment or defect. Similarly, it automatically expands when you click on a link to comment or defect (except for Overall comments and defects).
Focus Mode toolbar button. When you click anywhere in the Diff Viewer content, the Chat pane automatically expands so that you can input your comment or see existing comment or defect. Similarly, it automatically expands when you click on a link to comment or defect (except for Overall comments and defects).
To cancel adding a comment or defect, just press Esc. This will clear input text (after confirmation) and will collapse the Chat pane if you were reviewing in Focus Mode.
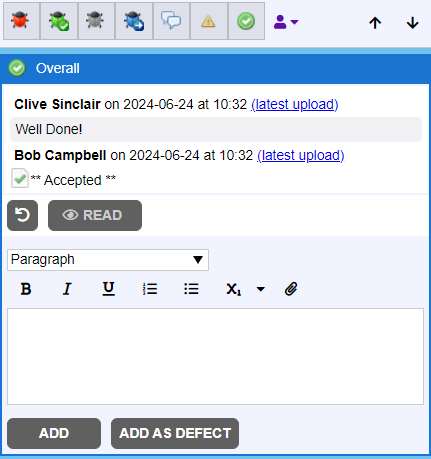
At the top of the chat pane, you will find a series of buttons that control whether or not certain types of comments/defects appear in full or in collapsed states (to save viewing space). Note that defects, count as unread comments until they are accepted/marked read. The combination of these toolbar options acts as a filter of what comments/defects will be collapsed in the chat pane.
The first four icons control whether defects appear collapsed or expanded in the chat panel. The red bug ![]() controls the display for open defects, the green bug
controls the display for open defects, the green bug ![]() controls the display for fixed defects, the gray bug
controls the display for fixed defects, the gray bug ![]() controls the display for rejected defects and the blue bug
controls the display for rejected defects and the blue bug ![]() controls the display for defects tracked externally.
controls the display for defects tracked externally.
The next four icons control the display of non-defect conversations. The white conversation bubble ![]() controls the display for all comments. The yellow hazard sign
controls the display for all comments. The yellow hazard sign  controls the display for unread comments. The green checkmark
 ![]() controls the display for conversations that have been marked accepted. The pushpin icon
controls the display for conversations that have been marked accepted. The pushpin icon ![]() controls whether to display markers for coordinate comments within word-processing documents, presentations, PDF documents, images and vector graphics. The user icon with a drop-down
controls whether to display markers for coordinate comments within word-processing documents, presentations, PDF documents, images and vector graphics. The user icon with a drop-down ![]() specifies whether to display comments and defects from all participants who has made any comment or defect, or just from the selected participant.
specifies whether to display comments and defects from all participants who has made any comment or defect, or just from the selected participant.
The next two icons ![]()
![]() allow navigating to the previous or next comment, defect or change within the current document. Navigation is performed according to currently selected of filter buttons. For example, if only the Show conversations with unread comments filter is enabled, navigation is performed only through unread comments.
allow navigating to the previous or next comment, defect or change within the current document. Navigation is performed according to currently selected of filter buttons. For example, if only the Show conversations with unread comments filter is enabled, navigation is performed only through unread comments.
Each comment and defect display who and when made them, as well as links to file revision where that comment or defect was submitted. For files from-source control systems, the version information link displays the commit ID, whereas for locally uploaded files it displays the upload number.
To learn how to make conversation during the review, see Types of Review Comments and Defects and Review Chats, Comments, and Defects topics.
Diff Viewer Toolbar
The toolbar at the top of the Diff Viewer includes options for altering the display of information and navigation through documents within the review. The number of available toolbar items varies a little depending on the reviewed material.

Toolbar appearance during code review

Toolbar appearance during document review

Toolbar appearance during Simulink model review
|
Returns back to Review Screen. |
|
|
Navigate to the previous or next file in the review, respectively. |
|
|
Specifies whether the file is marked as reviewed or not-reviewed.
Mark is displayed and applied to only the user, that marked the file as reviewed. The mark is cancelled automatically if a new version of the file is uploaded. If two versions of the file are opened in the Diff Viewer, then ‘mark as reviewed’ is applied to the version, that is opened in ‘After’. |
|
|
Displays the name of current file. |
|
|
Specifies whether the Diff Viewer displays in side-by-side mode or over/under mode.
This button is displayed only for text-based formats and images. |
|
|
Determines which pane is considered the 'After' pane, for the purposes of highlighting additions and deletions.
|
|
|
Toggles between adding coordinate comments and panning the file contents.
This button is displayed only for word-processing documents, presentations, PDF documents, images and vector graphics. |
|
|
Toggles between zooming and scrolling the file contents.
This button is displayed only for word-processing documents, presentations, PDF documents, images and vector graphics. |
|
|
Locks mouse action for both panes.
This button is displayed only for word-processing documents, presentations, PDF documents, Simulink models, images and vector graphics. |
|
|
Specifies the zoom level for both Before and After panes. You can set the scale to various percentages, Page Width or Full Page. This button is displayed only for word-processing documents, presentations, PDF documents, images and vector graphics. |
|
|
Performs a full-text search within the current document. Type the desired text in and press Enter. This button is displayed only for Word processing and PDF documents, presentations and vector graphics. |
|
|
Launches the current document review in an external diff viewer. |
|
|
Downloads a Diff file of the current document. Downloads can be disabled by the administrator, in this case the |
|
|
Expands or collapses the main toolbar and the Chat section, so that you can focus on review content.  Click the image to enlarge it. |
|
|
Opens the Display Options panel which controls how Diff Viewer should display various data. This button is displayed only for text-based formats, for documents and for Simulink models. |
|
|
Opens the help menu with descriptions of color-code legend, keyboard shortcuts, and links to documentation. |
Diff Viewer Header
The content of the header varies depending on the type of file being reviewed, current revision selection mode, and content orientation.

Diff Viewer header in simple revision selection mode

Diff Viewer header in advanced revision selection mode
|
Allows to select which file revisions (if available) will be compared. The available options are:
|
|||
|
Toggles between simple and advanced modes of revision selection. |
|||
|
Displays the current revision selection mode, or the file revision to be compared when the Display changes selector is set to Commits. Each file revision is identified according to the Revision Caption Pattern setting and may include provider type, creation time, item identifier and description. |
|||
|
Visible in advanced revision selection mode. Specifies the file revision displayed in the 'After' pane. Each file revision is identified by its SHA-1 hash value. Additionally, the When you select the same file revision in 'Before' and 'After' drop-downs, Diff Viewer will unite the 'Before' and 'After' panes. In this case, added file revisions will have green background, while removed file revisions will have red background. |
|||
|
Visible in advanced revision selection mode. Specifies the file revision displayed in the 'Before' pane. Each file revision is identified by its SHA-1 hash value. Additionally, the When you select the same file revision in 'Before' and 'After' drop-downs, Diff Viewer will unite the 'Before' and 'After' panes. In this case, added file revisions will have green background, while removed file revisions will have red background. |
File revisions in Select revision, Before and After drop-down lists are further identified by an icon which appears adjacent to the revision number denoting:
| Icon shape: |  |
Square shape indicates that file was uploaded from any source control system (within changelist, commit, diff and so on). |
 |
Circle shape indicates that file was uploaded from local storage without any versioning. |
|
| Icon color: |  |
Green color indicates that file was added. |
|
Blue color indicates means that file was modified. |
|
 |
Red color indicates that file was removed. |
|
| Icon checkmark: | |
Unchecked indicates that file change was not accepted yet. |
 |
Checked indicates that file change was accepted. |
Display Options Panel
The Display Options panel contains various options that determine what data is displayed by the Diff Viewer and how it is displayed. This panel is available only for text-based formats and for spreadsheets, presentations, word processing documents and PDF documents.
The list of panel option varies, depending on a format of the current file:
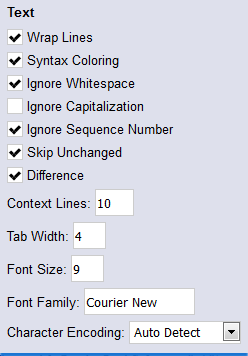
Text-based formats
|
Wrap Lines |
Controls whether lines of text are wrapped to the width of the pane.
|
||
|
Syntax Coloring |
Controls whether syntax-specific coloring is used, when supported. |
||
|
Ignore Whitespace |
Controls whether white-spaces are taken into account when showing differences.
|
||
|
Ignore Capitalization |
Controls whether capitalization is taken into account when showing differences.
|
||
|
Ignore Sequence Number |
Controls whether COBOL sequence numbers are taken into account when showing differences.
|
||
|
Skip Unchanged |
Determines whether large blocks of unchanged content is displayed. These gaps will appear, in the Diff Viewer as 'Skipping X lines...' and will include the two links labeled 'More', which will allow you to see more of this skipped content. |
||
|
Difference |
Enables highlighting of additions, deletions and differences in the viewer. |
||
|
Context Lines |
Defines the number of lines to show before and after the actual changes so that you can better understand the context of changes performed. |
||
|
Tab Width |
Sets the number of spaces per tab. |
||
|
Font Size |
Allows customization of the font size. |
||
|
Font Family |
Allows customization of the font family |
||
|
Specifies the character encoding for the file. |
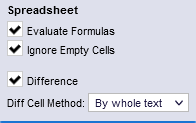
Spreadsheets
|
Evaluate Formulas |
Specifies whether to evaluate formulas and display the resulting value, or to display the formula itself. This setting affects the entire spreadsheet. To evaluate formulas for the selected cell, you can use the |
|
Ignore Empty Cells |
Specifies whether to ignore addition and deletion of empty cells, or to highlight them. |
|
Difference |
Enables highlighting of additions, deletions and differences in the viewer. |
|
Diff Cell Method |
Specifies how to calculate and highlight differences in cell content. Possible values are By whole text and By words. Each of the methods is described in the Cell content difference section of Reviewing spreadsheets. |
 button in the cell detail pane.
Word processing documents, PDF documents, presentations

|
Difference |
Enables highlighting of additions, deletions and differences in the viewer. |
Simulink models

|
Show diff based on block properties |
Enables highlighting of additions, deletions and differences in block properties. |
|
Show diff based on image comparison |
Enables highlighting of additions, deletions and differences in graphical objects. |
|
Show diffs in nested levels |
Enables highlighting of parent block as changed when some of its nested blocks have changes. |
|
Ignore Whitespace |
Controls whether white-spaces are taken into account when showing differences in block properties. |
|
Ignore Capitalization |
Controls whether capitalization is taken into account when showing differences in block properties. |
|
Ignore Sequence Number |
Controls whether COBOL sequence numbers are taken into account when showing differences in block properties. |
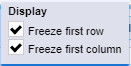
Doors documents
|
Freeze first row |
Freeze/un-freeze first row which contains name attribute for the column. Default value is enabled. |
|
Freeze first column |
Freeze/un-freeze first column which contains requirement ID in the document(s) under review. Default value is enabled. |
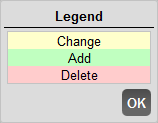
Legends
The differences are noticeably highlighted and color coded as explained by the legend: changes appear in yellow, additions are green and deletions are red.
Keyboard Shortcuts
The Diff Viewer is completely navigable from the keyboard. You can move around the file, jump to changes, expand conversation, make defects and mark file as reviewed/un-reviewed. To get the list of keyboard shortcuts, click the ![]() Help button in the menu bar, then select Keyboard Shortcuts.
Help button in the menu bar, then select Keyboard Shortcuts.
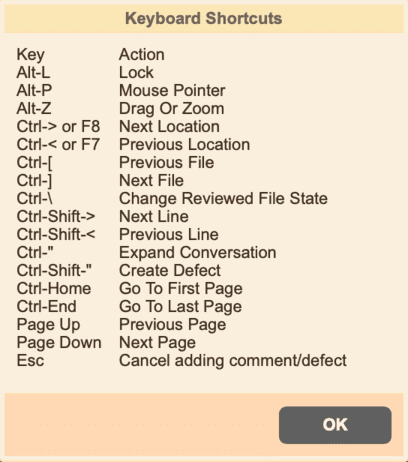
Option key is used in shortcuts instead of ALT on Apple Macintosh.
Limitations
Collaborator does not guarantee that Diff Viewer will display correct comparison results for the following cases:
- Subversion, Perforce, TFS, RTC, Git: If you have "gaps" while adding subsequent atomic changelists to the same review. For example, add changelists 1, 2, and 4, but forget to add changelist 3.
- Perforce, TFS, RTC: If you add pending changelists from different workspaces to the same review.
- Git: If you add changelists from different branches or repositories to the same review.
- RTC: If you add changelists from different workspaces or streams to the same review.
- All source control systems: If you add several diffs (non atomic changelists) to the same review.
Code Viewer / Diff Viewer (Visual Studio Extension)
Clicking on a file in the Review Screen opens it in a Code Viewer or in a Diff Viewer.
 |
Collaborator Visual Studio Extension is designed to perform code reviews, rather than document reviews. That is, from the Code Viewer or the Diff Viewer you can review and compare source code and text files, but may fail to review and compare other types of review materials. To review Word documents, Excel tables, PDF files, images, presentations or URLs, you should use the Collaborator Web Client. |
-
If a review has only one revision of the desired file, it will be opened in a Code Viewer (standard code editor of Visual Studio in read-only mode).
-
If a review has several revisions of the desired file, it will be opened in a Diff Viewer (standard Diff Window of Visual Studio).

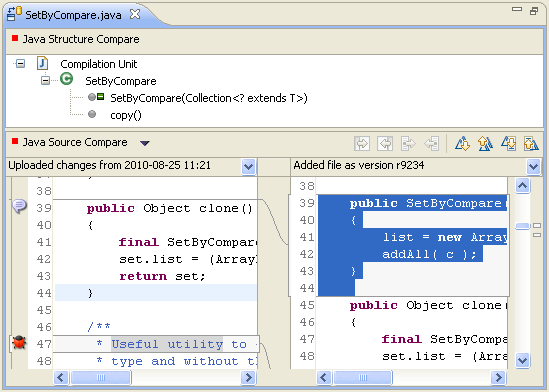
Two revisions of a file in a Diff Viewer
In the Diff Window, the most recent revision is displayed in the right pane and the previous revision is displayed in the left pane. New text is highlighted in green and removed text is highlighted in red.
The comment icon (![]() ) in the viewer's gutter indicates that a line has some comments related to it. The defect icon (
) in the viewer's gutter indicates that a line has some comments related to it. The defect icon (![]() ) indicates that a line has some defects related to it. Click the icon to navigate to the corresponding comment or defect.
) indicates that a line has some defects related to it. Click the icon to navigate to the corresponding comment or defect.
Conversation Pane
On the left side of a Code Viewer and Diff Viewer, a Conversation Pane is displayed. It lists the comments and defects that were created for the file being displayed. You can read the conversation, reply to and/or argue with other participants, mark the defects as fixed and so on.
Comments and defects may relate to the entire file (these are called overall comments and defects) as well as to a particular line of code (these are called line comments and defects).
To create an overall comment:
-
Specify your message in the Overall section of the Conversation pane
-
Click Add.
To create an overall defect:
-
Specify your message in the Overall section of the Conversation pane.
-
Click Add as Defect and specify defect type and severity.
To create a line comment:
-
Right-click the desired line and choose Collaborator > Add Comment from the context menu.
-
Specify your message in the subsequent dialog and click Add comment.
To create a line defect:
-
Right-click the desired line and choose Collaborator > Add Defect from the context menu.
-
Specify your message, defect type and severity in the subsequent dialog and click Add defect.

Creating line comments and defects
Depending on the Group conversations by lines setting, the Conversation Pane may display all defects and comments simultaneously or group comments and defects that relate to the same line. In the latter layout, you may use combo box and buttons to navigate between conversations that relate to different lines.

Conversation pane: "Standard" and "Group by lines" layouts
Compare Editor (Eclipse Plug-in)
Double-clicking on a file in the Review Screen opens it in the standard Eclipse Compare Editor.
|
Collaborator Eclipse Plug-in is designed to perform code reviews, rather than document reviews. That is, from the Compare Editor you can review and compare source code and text files, but may fail to review and compare other types of review materials. To review Word documents, Excel tables, PDF files, images, presentations or URLs, you should use the Collaborator Web Client. |
Conversations on the file are shown in the Conversations View when the Compare Editor is active.
The exact appearance of the Compare Editor depends on the type of file being compared. The Collaborator Eclipse Plug-in uses the compare viewer registered in your Eclipse installation for that file type, and then tries to add review-related controls on a best-effort basis.
Side-by-side Compare Viewers
If the registered compare viewer for the file type is based on the standard Eclipse side-by-side compare viewer, the Collaborator Eclipse Plug-in adds a drop-down menu above each content pane to select which versions of the file you want to compare.
If the file was uploaded from your machine, you can select Local File from the menu to compare against the local version of the file. Comparing against the local version of the file lets you navigate the code in your workspace (for example, use Ctrl+click to open a type or method implementation), and edit the code in-place. You can also right-click on the pane containing the local file and select from many of the same context menu options that you can when you right-click on the file in the normal Eclipse editor.
Text Compare Viewers
If the registered compare viewer for the file type is based on the standard Eclipse text compare viewer, the Collaborator Eclipse Plug-in adds a ruler to the left content pane showing the state of each conversation on the file. Clicking on a line selects that conversation in the Conversations View, or starts a new conversation if there is not already one on that line.
Syntax highlighting is shown if it is supported by the registered compare viewer for the file type.
See Also
UI Reference
Web Client
Visual Studio Extension
Eclipse Plug-in
External Diff Viewer Launcher