Private Node Server provides a web-based Control Panel where you can configure the private node settings and see the monitoring status. Control Panel is the default GUI of Private Node Server. You can also access the Control Panel from any browser on the same network, using this URL:
http(s)://<IP address>
where <IP address> is that of your private node. Use https for Private Node Server 2.x and http for earlier versions.
The default login and password are:
insiteadm / 1nSitePa$$ for Private Node Server 2.x
admin / password for earlier versions
Make sure to change the default password to something more secure.
Contents
- Control Panel
- Manage Location
- Configure Settings
- ServerAgent
- Register ServerAgent
- Start/Stop ServerAgent
- Diagnostics
- Connection Tests (v. 2.0.2 and later)
- Diagnostic Tests
- Retrieve System Logs
- Send Test Notification *
- Check System Utilization *
* Features available only after Private Node Server registration.
† Features also available in the Private Node Server VM console.
Control panel
This is the main page you see when you log in to Private Node Server Control Panel.
It shows the following information:
-
Location details:
-
Location name in AlertSite.
-
Location Number – The location ID that you can use in AlertSite API calls to create monitors or generate reports programmatically.
-
-
Activities:
-
Last Monitor – Last time a monitor was run.
-
Results Sent to AlertSite – Last time monitoring results were sent to AlertSite.
-
Database Update – Last time the private node received data from AlertSite data (such as the monitor configuration).
-
Notification Attempt – Last time notification process checked for outgoing alerts.
Note: Activity timestamps are in the time zone selected in your AlertSite account settings, whereas the private node system time displayed in the top right of the control panel is GMT-based. -
-
Configuration – The network, email and other settings, with links to edit these settings.
-
Device Status Report – Status of monitors run on the Private Node Server.
Manage location
Register location
The first thing you need to do is to register your Private Node Server in AlertSite. This adds the private node as a new location to your global locations list, so you can use it in your monitors. For step-by-step instructions, see Registering Private Node Server as Location in AlertSite.
Change web password
Once your Private Node Server is registered, you can change the admin password for logging into the Private Node Server Control Panel. Enter the current password and the new password and click Apply Changes.
The password must be 6-20 characters long. The password cannot contain the following characters:
< > ` ; | \
Start/stop remote access
In certain cases, if you request technical support for your Private Node Server, our engineers may need remote access to it. Remote access is done via Secure Shell (ssh) with authentication.
You can enable or disable remote access on this page. Access remains open for 12 hours, or until you manually disable it.
| Note: | Remote access requires that outbound traffic is allowed on port 22 to insiterepair.alertsite.com. |
Upgrade software
On this page you can see your Private Node Server software version and check for updates.
If an update is available, select it and click Upgrade. If multiple updates are available (for example, 1.7.1, 1.7.2 and 1.8.0), install the next major revision (1.8.0).
Notes:
-
Updating from v. 2.1.0 to v. 2.1.2 or later preserves the private node’s registration and network configuration (proxy, DNS, static IP). In earlier versions, these settings are overwritten during the upgrade and need to be restored manually.
-
Client-side certificates installed on your private node by the AlertSite staff via Remote Support are not preserved during the upgrade and will need to be reinstalled.
Certificates installed via the certificate upload feature (introduced in Private Node Server 2.1.2) will be reinstalled automatically.
-
The web interface password is reset during the upgrade.
Reboot device
To reboot the private node, open this page and click Reboot. Monitoring will not occur while the node is rebooting.
To check when the node is back up, you can:
-
Ping the IP address of the private node.
-
Open http(s)://<IP address> in a browser, where <IP address> is that of your private node. Use https for Private Node Server 2.0 and later, and http for earlier versions.
Reset to factory defaults
Available only in Private Node Server versions up to 1.9, this page lets you reset your private node to its default settings. This clears any configuration changes you made (such as network and proxy settings, and so on), and deletes any log data collected. It is a complete reset, as if you just deployed the private node.
 |
Only do this if you have been instructed to by AlertSite Customer Support. |
After the reset, you will need to re-register your private node using its existing registration ID (or location ID in AlertSite 1.0). You can find the registration ID as follows:
-
In AlertSite UXM, navigate to > Settings > Private Locations and click next to the location name.
-
In AlertSite 1.0, navigate to Configure > InSite Locations and click your location in the list.
Configure settings
Network configuration
By default, Private Node Server obtains its IP address through Dynamic Host Configuration Protocol (DHCP). If you need to use a static IP address, you can configure it on this page:
-
Set Use DHCP to No.
-
Enter the IP address, subnet mask, DNS server, and gateway host.
-
(Optional) To add additional DNS servers, click Advanced DNS Configuration and enter their addresses.
To remove an added name server, clear its entry.
- Click Apply Changes to reboot the Private Node Server with the new settings.
Proxy connection settings
If you connect to Internet via proxy, specify the proxy settings on this page. To test connection via proxy, use the Connection Tests or Diagnostic Tests page.
-
No proxy – Select this option if you connect to the Internet directly.
-
Manual proxy configuration – Select this option to use a proxy server.
-
HTTP Proxy, SSL Proxy, Port – The proxy servers and ports for HTTP and SSL (HTTPS) traffic. Both are required.
-
In Private Node Server 2.1 and later, a proxy can be specified by a host name or IP address. Earlier versions require IP addresses for the proxy.
-
Some proxy servers use the same port for both HTTP and SSL, and some use different ports. Contact your network administrator for the correct settings for your network.
-
-
SOCKS Host and Port – Specify a SOCKS proxy if needed.
-
SOCKS v4 and SOCKS v5 – Select the type of your SOCKS proxy.
-
No proxy for – Optional. A comma-separated list of domains or IPv4 addresses to connect to directly, bypassing the proxy.
-
Userid and Password – If your proxy requires authentication, specify the username and password. If the username includes a domain name, such as DOMAIN\user, you need to use a double backslash: DOMAIN\\user.
Note for DéjàClick users: DéjàClick does not support automatic proxy authentication. Authentication needs to be handled in the DéjàClick script using dialog prompts.
-
What traffic goes through proxy
A proxy server is used for:
-
Private node registration
-
Reporting to the AlertSite platform
-
All monitors types except Selenium
A proxy is not used for:
-
Selenium monitors
-
Some alert types: JSON alerts, HTTP POST, ServiceNow, Splunk, PagerDuty
- ServerAgent
- Remote access
Note for DéjàClick users: DéjàClick monitors support private node system proxy starting from Private Node Server 2.1.3. If you use an earlier version, you need to specify the proxy settings directly in your DéjàClick scripts. To learn how to do this, see:
 Proxy settings for DéjàClick Chrome
 Proxy settings for DéjàClick Firefox
In any case, proxy settings specified in DéjàClick scripts override the system proxy settings configured for Private Node Server.
Email configuration
Private Node Server sends email alerts on port 25. If your local network does not allow outgoing connections through the firewall on port 25, you need to specify a mail relay host on your local network to send alerts through.
On this page you can configure the mail relay:
-
Relay Host – The name or IP address of the host to pass all outbound email to.
-
Relay Port – The port to connect to the mail relay host (specify only if different from the default 25).
-
Masquerading host – Not used. Reserved for future use.
| Note: | If your mail relay host requires authentication or works over SSL (like Gmail), please contact SmartBear Support for assistance. |
Private Node Server does not retry alerts if it cannot reach the mail relay host.
NTP configuration
Network Time Protocol (NTP) is a common method to synchronize computer time with public time servers on the Internet. To learn more about NTP, visit http://www.ntp.org.
Private Node Server uses NTP to maintain the system time. It can synchronize with one or two NTP servers. The default servers are:
-
For Private Node Server 2.x:
0.ubuntu.pool.ntp.org
1.ubuntu.pool.ntp.org
-
For Private Node Server 1.9 and earlier:
0.debian.pool.ntp.org
1.debian.pool.ntp.org
If you have an NTP server in your private network or at your ISP, you can use those for greater accuracy. Or you may want to use the NTP servers local to your continent or country. For local NTP servers, use:
0.XX.pool.ntp.org
1.XX.pool.ntp.org
where XX is your continent name or two letter country code. For a list of public NTP servers, see http://www.pool.ntp.org/zone/@.
Notes:
-
Disable time synchronization with the host so it does not conflict with NTP.
-
After changing the NTP servers, reboot the Private Node Server to apply the changes.
-
Time synchronization works only if the system time is not too far from the NTP server time. Otherwise, set the system time manually, and the time will start syncing.
SoapUI version (v. 2.1 and later)
Starting from v. 2.1, Private Node Server includes two versions of the SoapUI test runner, which is used to run API monitors. Select the version you want to use:
- ReadyAPI 1.9
- ReadyAPI 1.1
You may want to use an earlier version if your API tests run successfully on it, but are not compatible with later versions of ReadyAPI.
| Note: | Earlier versions of Private Node Server include only one version of the SoapUI test runner: Private Node Server and InSite v. 1.6–2.0.2 use ReadyAPI 1.1, and InSite 1.5 uses SoapUI 4.5. See Versions of ReadyAPI and SoapUI Used by AlertSite. |
Set system time
The Private Node Server system time is GMT and is displayed in the top right corner of the control panel.
Maintaining the correct time is important so that your monitoring data has accurate timestamps. Private Node Server synchronizes system time with the public time servers using Network Time Protocol (see NTP Configuration).
If the time difference between the node and the NTP server is large (say, several hours), time will not sync. In this case you need to manually set the system time to the approximate correct time, so the time can start syncing.
You can adjust the system time on this page. Enter the time in GMT (not your local time) and click Apply Changes.
SSL/TLS Settings
Use this page to select the TLS version that will be used for HTTPS connection to your Private Node Server and click Apply Changes. The default value is TLSv1.1 and TLSv1.2.
Set Hostname Lookup (v. 3.0 and later)
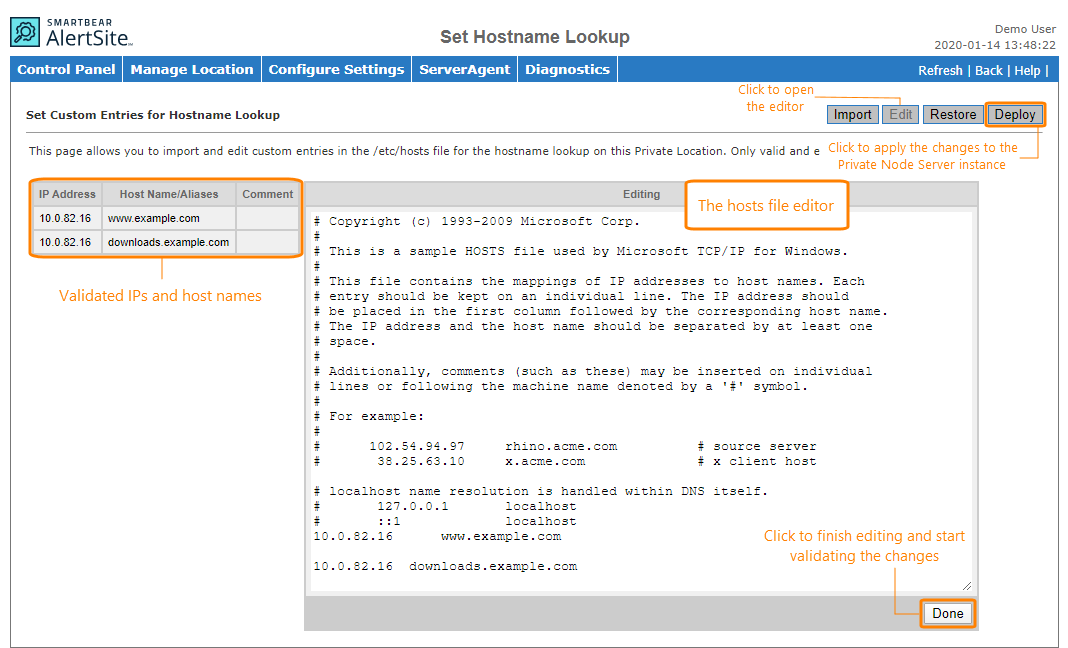
Use this page to import the /ets/hosts file and define custom mapping of IP addresses to host names to be used by your private location. Private Node Server will validate all IP addresses and host names and exclude:
-
The 127.0.0.1 localhost or loopback.
-
All uploaded host names or aliases for hosts with the
alertsite.comsuffix.
To import the hosts file:
-
Click Import in the top right corner.
-
Click Choose File and browse for the hosts file.
-
Click Upload.
You can edit the imported hosts file:
-
Click Edit in the top right corner.
-
Make any changes in the hosts file.
-
Click Done.
To apply the changes to the private location, click Deploy in the top right corner. You can then roll back to the last successfully deployed version of the hosts file by clicking Restore.
ServerAgent
Private Node Server includes the ServerAgent that monitors the node health, such as the CPU, memory and disk usage, and results of the heartbeat check. ServerAgent sends this information to AlertSite, and you can see it in the AlertSite 1.0 console.
For instructions on how to set up the ServerAgent, see Configuring ServerAgent for Private Node Server.
| Note: | If you need to delete and reconfigure the ServerAgent, you must disable it first in order to register a new ServerAgent. |
Diagnostics
Connection tests (v. 2.0.2 and later)
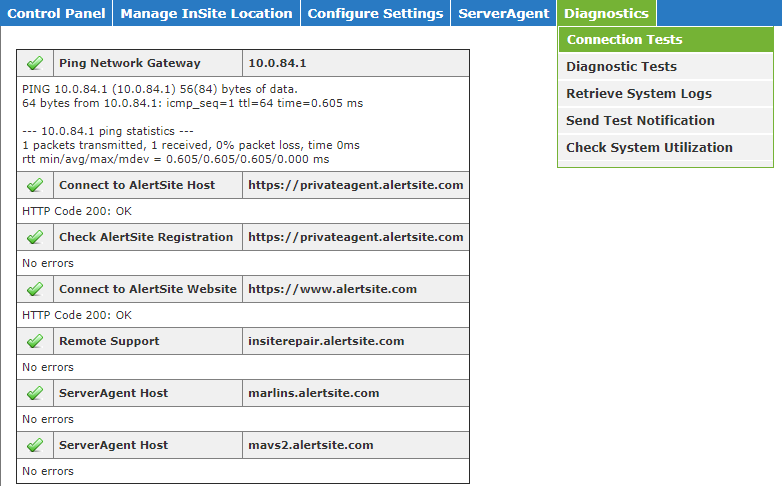
Use this page to check the connectivity to AlertSite hosts and ports required for proper functioning of Private Node Server (see Network Connectivity). Tests are performed using the network parameters configured for this private node, including the proxy server, DNS server, and so on.
The results are displayed after some time (about a minute). Please do not refresh the page during this time.
If there are problems when connecting to certain hosts, make sure your firewall allows traffic from the private node to these hosts. You can run a detailed traceroute to these hosts in Diagnostics > Diagnostic Tests to see if the problem lies within or outside of your network.
A failed registration check means your private node is not registered yet. If the error appears for a registered node, register it again using its 32-character registration ID (or location ID in AlertSite 1.0) you can find on the list of your private locations in AlertSite.
Diagnostic tests
Here you can run various tests to check connectivity from the Private Node Server.
-
Hostname Lookup – Gets an IP address for a domain name, and vice versa.
-
Traceroute – Runs a traceroute to the specified IP address or domain. Traceroute shows the path that traffic takes to reach the target server, and the delays that occur at each stop.
-
Ping – Checks if an IP address or domain is accessible.
Note: For lookup, ping and traceroute, enter the domain name without http://. -
AlertSite Web Test – Checks if a web page is accessible and measures its response time.
Note: Private Node Server must be registered to use this feature.
Retrieve system logs
On this page, you can send your Private Node Server system logs to SmartBear support for troubleshooting. Select all or specific logs, the delivery method, and click Send Logs in the top right.
| Note: | The log files may be large, so please send one at a time and not all at once. |
Send test notification
Private Node Server can send alerts via e-mail, SMS, VoIP, and SNMP traps. On this page you can send test alerts to verify alert delivery. The page lists all compatible recipients configured in your AlertSite account. Click the recipient in the list to send a test alert to it.
Check system utilization (v. 2.1.3 and later)
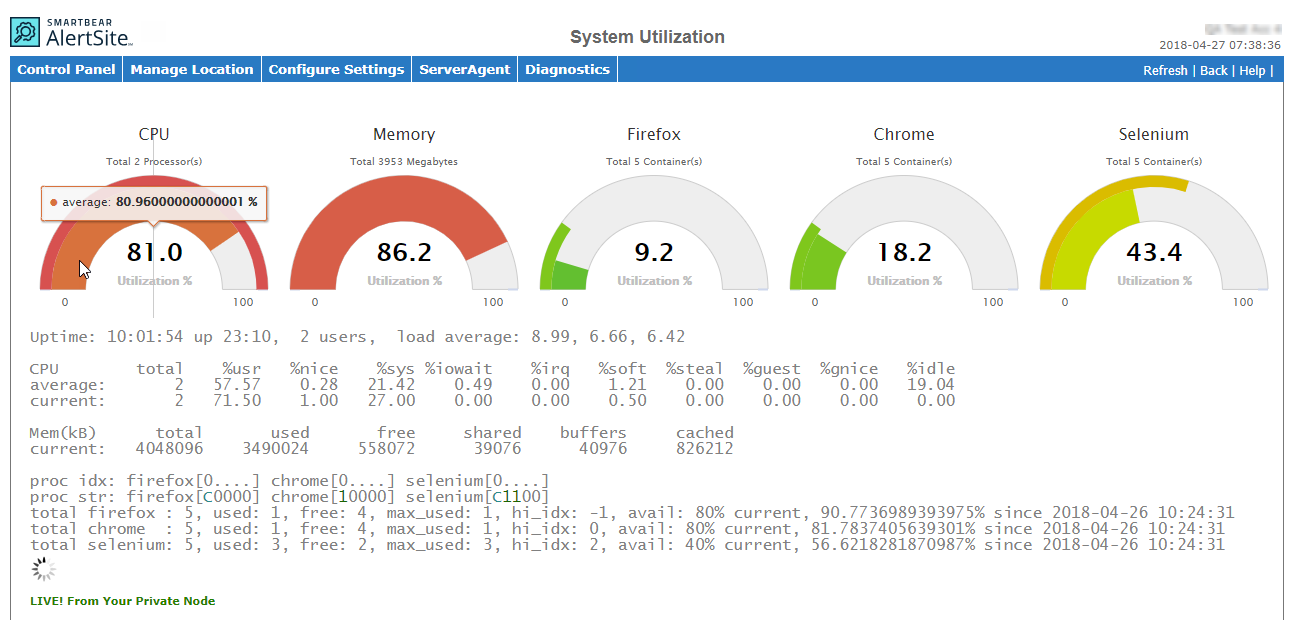
Use this page to view your private node system utilization: CPU, memory and disk usage, and the usage of Firefox, Chrome and Selenium browser profiles. If the resource utilization is constantly high, consider adding more hardware resources to your VM to avoid performance issues.
The report under the charts contains the following information:
-
Uptime – The system clock, uptime, and the average system load indicator in 1, 5, and 15 minutes.
-
CPU – The CPU utilization report similar to that produced by the Linux
mpstatcommand. See mpstat(1) for a description of the included metrics (%urs, %nice and others). -
Mem (kB) – The total amount of free and used memory in the system, and the buffers and caches used by the kernel.
-
proc idx (indexes) and proc str – The total number and statuses of browser profiles in the current system configuration. Each character in the square brackets
[ ]corresponds to a single browser profile, and the proc idx line is the header for proc str data. The statuses in proc str are:0– idle1– busyC– checking (this is a transition state between other states)K– killed and under recoveringS– stopped or initializing
Consider the following example:
prod idx: firefox[0....5....]
proc str: firefox[111SS00000]This means the private node has 10 Firefox profiles (as indicated by 10 characters in the brackets). In the top row,
0,5and.serve as indexes for numbering purposes. Out of 10 profiles, 3 are used (status1in the bottom row), 2 are initializing or stopping (statusS), and 5 are idle (status0). -
total firefox, total chrome, total selenium – The total number of used and available browser profiles, and their usage percentage. This is a text representation of proc str data.


 Examples


