This topic describes how to create alert recipients.
Create and configure a recipient
This video shows how to create an email recipient:
More detailed steps are described below.
1. Add a new recipient
AlertSite UXM
-
On the Alerts > Alert Recipients screen, click + New Recipient.
-
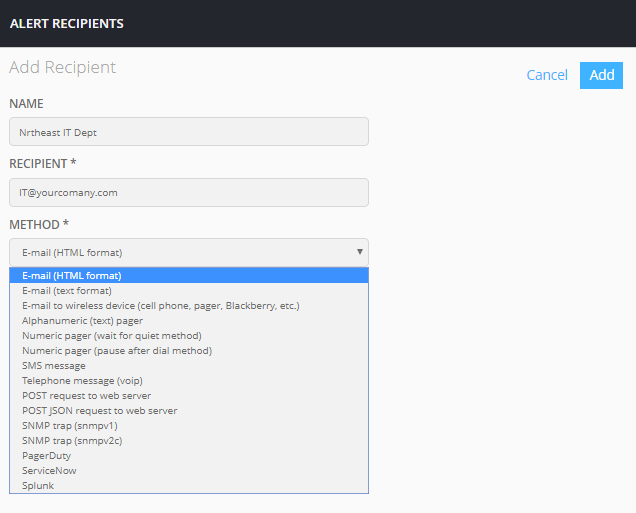
Enter the recipient details.
-
Name – (Optional) The recipient name or description.
-
Method – The alerting method: email, phone, SMS, and so on.
-
Recipient – Where to send the alert. The value depends on the alerting method.
-
E-mail (HTML or text): the email address.
-
E-mail to wireless device: the email address provided with the cell phone by the cell phone company.
-
SMS: the phone number, including the country code and area code.
Note: Your mobile provider must support SMS. -
Telephone message (regular or VoIP): the phone number, including the country code and area code.
-
Numeric pager: the pager’s phone number.
-
POST request and POST JSON request: The URL to send the request to. Make sure to include http:// or https://. The URL must be publicly available.
-
SNMP trap: The IP address of the SNMP listener.
-
PagerDuty: Click Alert with PagerDuty to connect AlertSite to PagerDuty. See PagerDuty Integration for details.
-
ServiceNow: The URL in the format
https://<instancename>.service-now.com/api/now/table/em_event
and the username and password to access your ServiceNow instance. See ServiceNow Integration for details.
-
Splunk: The URL of your Splunk server with the port number (8089 by default), user name and password. See Splunk Integration for details.
-
Note: There are additional fees for notifications by SMS and non toll-free paging. -
-
Click Add.
AlertSite 1.0
-
From the top menu, select Notifiers > Notifiers.
-
At the upper right, click Add Notifier.
-
Enter the recipient details.
-
Description – (Optional) The recipient name or description.
-
Send a(n) – The alerting method: email, phone, SMS, and so on.
-
To – Where to send the alert. The value depends on the alerting method.
-
E-mail (HTML or text): the email address.
-
E-mail to wireless device: the email address provided with the cell phone by the cell phone company.
-
SMS: the phone number, including the country code and area code.
Note: Your mobile provider must support SMS. -
Telephone message (regular or VoIP): the phone number, including the country code and area code.
-
Numeric pager: the pager’s phone number.
-
POST request and POST JSON request: The URL to send the request to. Make sure to include http:// or https://. The URL must be publicly available.
-
SNMP trap: The IP address of the SNMP listener.
-
PagerDuty: Click Alert with PagerDuty to connect AlertSite to PagerDuty. See PagerDuty Integration for details.
-
ServiceNow: The URL in the format
https://<instancename>.service-now.com/api/now/table/em_event
and the username and password to access your ServiceNow instance. See ServiceNow Integration for details.
-
Splunk: The URL of your Splunk server with the port number (8089 by default), user name and password. See Splunk Integration for details.
Note: There are additional fees for notifications by SMS and non toll-free paging. -
-
Click Submit.
-
2. Configure alerting options
AlertSite has the following main alert types:
-
availability alerts – sent when a monitored website is unavailable or having errors,
-
performance alerts – sent when your website response time value is too high,
-
private node connectivity alerts – sent when a private location loses connectivity to the AlertSite platform.
The recipient properties specify which alert types to receive.
AlertSite UXM
-
Select the created recipient, and click on the right.
-
To receive availability alerts or private node connectivity alerts:
-
In the Availability Alerts column, select Enabled.
-
Set the number of consecutive errors that trigger an alert.
-
Change other settings as required.
For a description of available settings, see Availability Alerts Settings.
-
-
To receive performance alerts:
-
In the Performance Alerts columns, select Enabled.
-
Select whether to receive errors only, or both warnings and errors (they are triggered at different response time thresholds).
-
Select whether to receive repeated alerts while the problem remains.
For a description of available settings, see Performance Alert Settings.
-
-
Click Save.
AlertSite 1.0
-
Click the created recipient on the Configure Notifiers screen.
-
To receive availability alerts or private node connectivity alerts:
-
In the Configure Standard (Availability) Notifications section, select the Enable availability notifications check box.
-
Set the number of consecutive errors that trigger an alert.
-
Change other settings as required.
For a description of available settings, see Availability Alerts Settings.
-
-
To receive performance alerts:
-
In the Configure Performance Alerts section, select the Enable performance alerts check box.
-
Select whether to receive errors only, or both warnings and errors (they are triggered at different response time thresholds).
-
Select the Repeat successive performance alerts check box to continue receiving alerts while the problem remains.
For a description of available settings, see Performance Alert Settings.
-
-
Click Submit.
3. Configure recipient groups
If you do not have any recipient groups configured, all recipients get alerts from all your monitors. With recipient groups, you can target alerts to specific people.
If the recipient needs alerts only from specific monitors, combine this recipient and the relevant monitors into a recipient group, or add the recipient to an existing group. For instructions, see Recipient Groups.
4. (Optional) Configure blackout periods
To prevent sending alerts to the recipient at specific times (for example, on weekends), you can configure recipient blackouts. To do this, on the Alert Recipients screen, click in the Blackouts column. For instructions, see Scheduling Recipient Blackouts.
5. Send a test alert
To verify that the recipient configuration is correct, you can send a test alert to that recipient.
AlertSite UXM
-
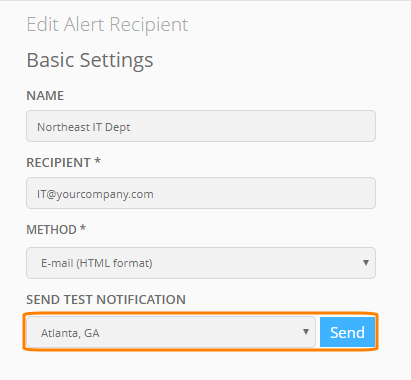
At the bottom of the Basic Settings column, select a location to send an alert from and click Send.

If you see an error message, double-check the recipient configuration (email address, phone number format, URL for HTTP POST alerts, or similar).
-
You can send more test alerts from other locations if needed.
AlertSite 1.0
-
Open the recipient properties.
-
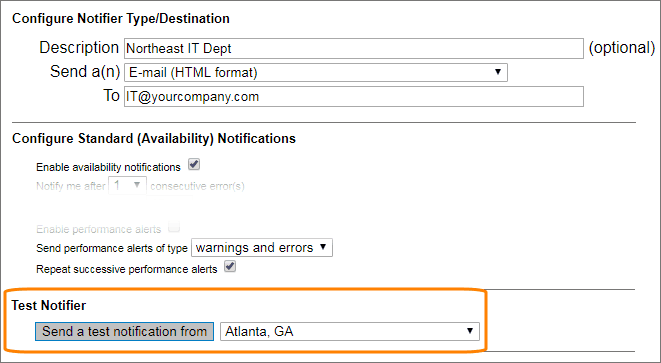
Under Test Notifier, select a location to send the alert from and click Send a test notification from.
If you see an error message, double-check the recipient configuration (email address, phone number format, URL for HTTP POST alerts, or similar).
-
To send an alert from another location, click the Back link and select another location.
Notes:
-
Test alerts are not supported for SNMP recipients.
-
To send a test alert from a private location (Private Node Server or InSite), use the Diagnostics > Send Test Notification page in the location’s Control Panel.
-
Test alerts sent this way use the default template for the given recipient type. To test alerts using custom templates, use the Send Test button in the Template Editor.
See Also
Alert Recipients
Editing Recipients
Alert Delivery Methods
Recipient Groups
Scheduling Recipient Blackouts


 Examples