The default alerting behavior in AlertSite is “alert everyone”. That is, any monitor sends alerts to all recipients in your Alert Recipients list. To send alerts just to specific people, you need to configure recipient groups.
| Note: | Only Admin, Co-Admin and Power Users can create and change recipient groups. |
How recipient groups work
Recipient groups implement alert routing rules in the following form (square brackets [ ] indicate optional parts):
|
If an error is found by:
send alert to:
[using custom template:
|
You typically use recipient groups to configure which monitors send alerts to which recipients:
|
If Monitor A or B fails, send alert to Alice |
If Monitor C fails, send alert to Bob |
You can target different recipients and alert templates based on the monitor error code:
|
If Monitor B fails with error 5 send alert to Alice |
If Monitor B fails with any other error send alert to Bob |
Or, you can target different recipients based on which monitor step fails:
|
If Monitor C fails at step 2 send alert to Alice |
If Monitor C fails at any other step send alert to Bob |
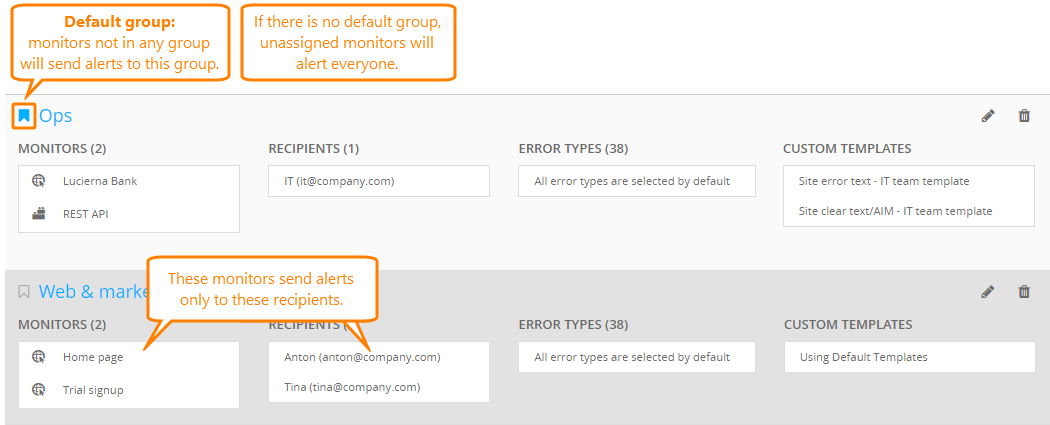
Once a monitor is added to a recipient group, it sends alerts only to people in that group. Groups work independently, and you can have several groups set to receive alerts from the same monitor. Both monitors and recipients can be included in multiple groups for flexible alerting configuration.
Keep in mind that:
-
Monitors not included in any group send alerts to all recipients, unless you have configured a default recipient group, in which case alerts from unassigned monitors will be sent to this group.
-
If a group targets only specific error types or monitor steps, you should also create groups for other errors and steps of the same monitor. Errors and steps not included in any groups will not trigger alerts and will go unnoticed.
| Note: | The exact conditions that cause an alert to be sent depend on your monitor and recipient settings. For details, see Alerts: Checklist. |
Example
Assume two monitors, A and B, and two recipients, Alice and Bob.
A recipient group is created with the following parameters:
-
Monitor A.
-
Recipient Alice.
Monitor A sends alerts only to Alice.
Monitor B sends alerts to both Alice and Bob. Because this monitor is not in any recipient group, the default “send to everyone” rule applies.
Default recipient group
By defaut, monitors not assigned to any recipient groups send alerts to everyone. If this is undesired, you can designate a default recipient group. Alerts from unassigned monitors will be sent only to the recipients in the default group, rather than to all recipients.
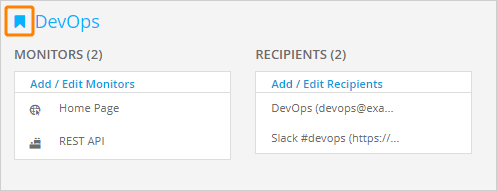
In AlertSite UXM, the default group is indicated by the blue icon on the Recipient Groups screen.
Learn how to create a default recipient group.
Create a recipient group
AlertSite UXM
-
On the Recipient Groups screen, click + New Recipient Group.
-
Enter a name for the group.
-
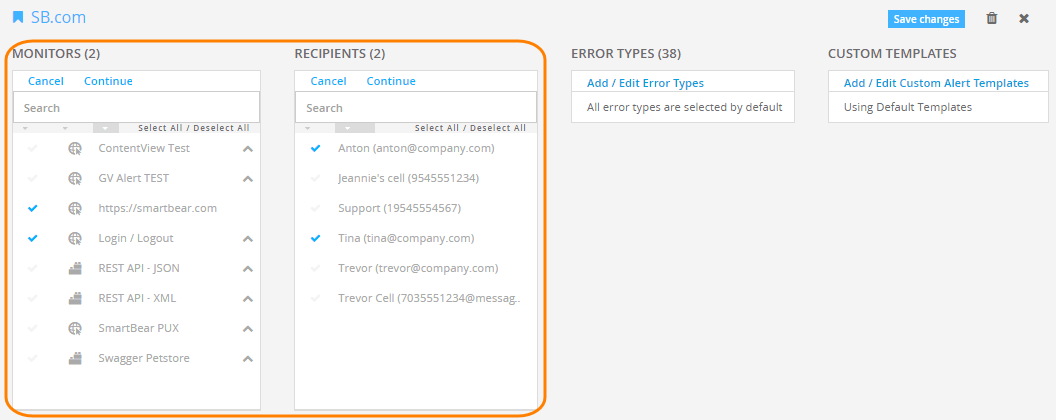
Select the monitors to be included in the group and the recipients who will get alerts from these monitors. To do this, click the Add / Edit Monitor and Add / Edit Recipients links, and then select the check box next to the desired items.
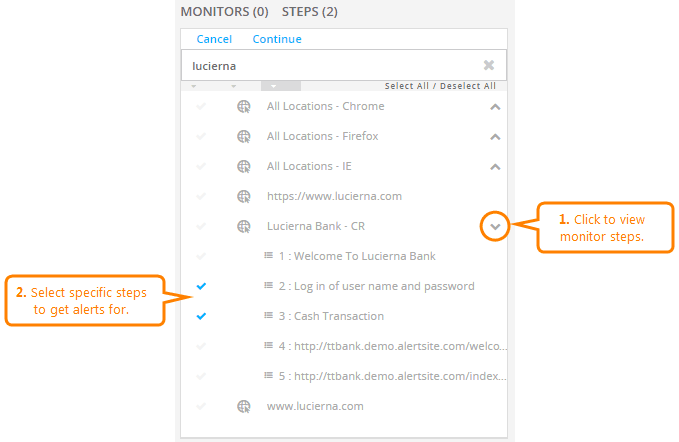
Tip: If you have multi-step monitors, you can create recipient groups for individual monitor steps to target different recipients based on which step fails. To select specific steps, click to the right of the monitor to expand its steps, then select the desired steps. -
(Optional.) Select the Error Types that will trigger alerts to the chosen recipients. No selection means all errors, that is, the recipients will get alerts for any errors in the selected monitors. For details, see Alert Routing by Error Type.

If you create an error-specific recipient group for a monitor, you should also add groups for other errors of the same monitor. Errors not included in any groups will not trigger alerts and may go unnoticed. For example, if you have only one group for monitor A with error 5, no one will get alerts about any other errors for that monitor. -
(Optional.) Select Custom Templates that will be used to format alerts. These templates must be created beforehand in Alerts > Template Editor.
-
(Optional.) To make this group the default group for any unassigned monitors, click the icon to the left of the group name so that it becomes blue .
-
Click Save as new.
Now the selected monitors will send alerts only to the specified recipients.
AlertSite 1.0
-
On the Configure Notifier Groups screen, click the Add a New Group button.
-
Enter a name for the group.
-
Select the monitors to be included in the group.
To include items in the group, select them in the Available Sites list on the right, then click << to move them to the Included Sites list on the left.
-
In a similar way, select the recipients from the Available Notifiers list who will get alerts from these monitors.
-
(Optional) To receive alerts only for specific errors (like only HTTP errors or only keyword validations) rather than all errors, select the errors to be included. No selection means all errors, that is, the recipients will get alerts for any errors in the selected monitors.
-
(Optional) Select custom templates that will be used to format the alerts. The templates must be created beforehand in Notifiers > Notifiers > Manage Notification Templates.
-
(Optional.) To make this group the default group for any unassigned monitors, select the Default check box.
-
Click Submit at the top right.
Set the default recipient group
AlertSite UXM
-
Go to Alerts > Alert Recipients.
-
Create a new group or click an existing group to edit it.
-
Click the icon to the left of the group name so that it becomes blue .
-
Click Save changes.
AlertSite 1.0
-
Go to Notifiers > Notifier Groups.
-
Create a new group or click the name of an existing group.
-
Select Default check box.
-
Click Submit.
Monitors not assigned to any recipient groups will now send alerts to this group, not to all recipients.
Select recipient groups for a specific monitor
In AlertSite UXM, you can also select recipient groups for a monitor in the monitor settings:
-
Open the monitor settings.
-
Select the Alerts tab.
-
To configure monitor-level alerts:
-
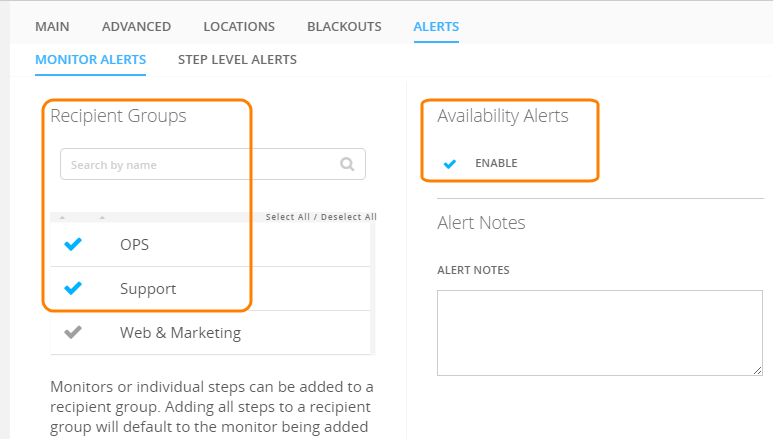
Switch to Monitor Alerts.
-
Enable availability or performance alerts or both, if required.
-
Select the recipient groups that will be alerted about monitor errors:
-
-
If the monitor has multiple steps and you want to send alerts for specific steps only:
-
On the Monitor Alerts tab, unselect all the recipient groups (otherwise, the monitor-level settings will override the step-level settings).
-
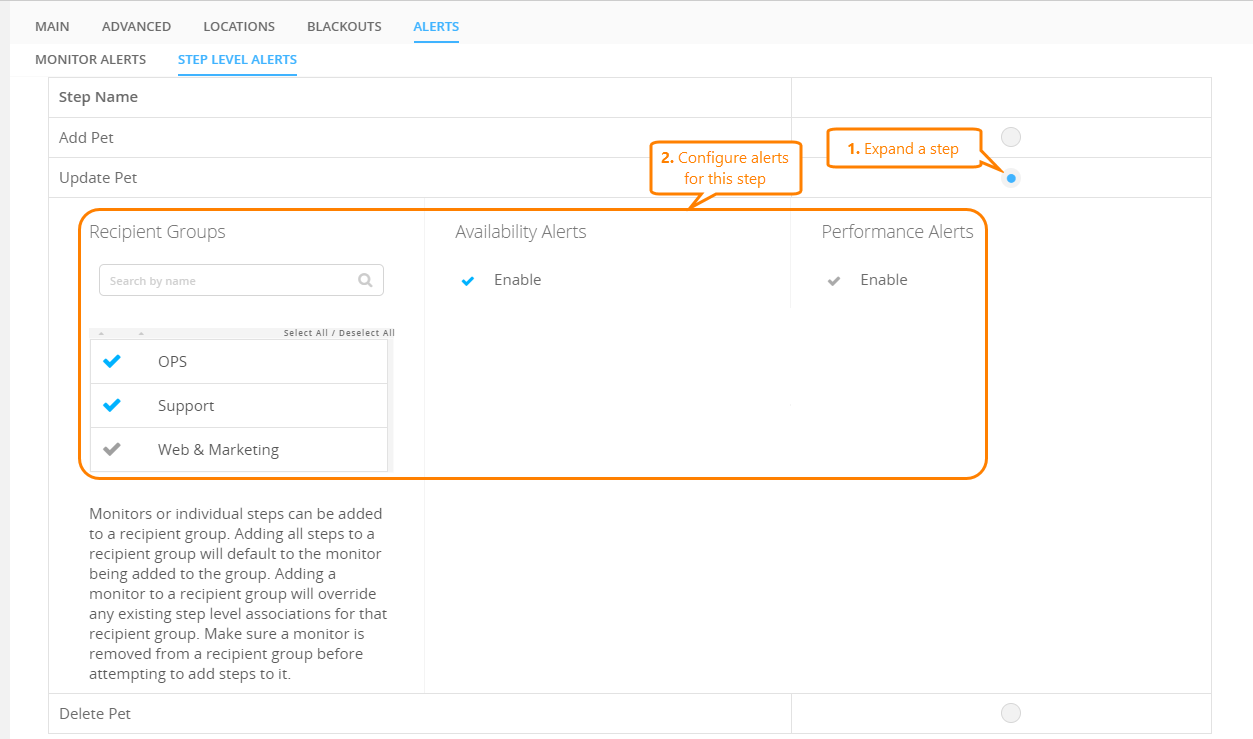
Switch to Step Level Alerts.
-
Expand a step by clicking to the right of the step name.
-
Enable availability or performance alerts for this step or both, if required.
-
Select the recipient groups that will be alerted about errors at this step:
-
Configure alerts for other steps, if needed.
-
-
Save the monitor settings.
From now on, the monitor will send alerts only to the selected recipient groups.
If no recipient groups are configured for a monitor, it will send alerts to the default recipient group, or if there is no default group – to all recipients configured in your AlertSite account.
Edit a recipient group
AlertSite UXM
-
On the Recipient Groups screen, click a group to open the editor.
-
Make your changes – change the group name, selected monitors, alert recipients, error types or templates.
-
Click Save changes.
AlertSite 1.0
-
On the Configure Notifier Groups screen, click a group to open the editor.
-
Make your changes – change the group name, selected monitors, alert recipients, error types or templates.
-
Click Submit.
Delete a recipient group
AlertSite UXM
Click next to that group on the Recipient Groups screen.
AlertSite 1.0
-
Select a group from the Configure Notifier Groups screen.
-
Click Delete at the top right.
| Note: | Deleting a recipient group does not delete recipients that were in this group. |
See Also
Alert Recipients
Creating Alert Recipients
Scheduling Recipient Blackouts
Alert Routing by Error Type
Alerts: Checklist

 View image