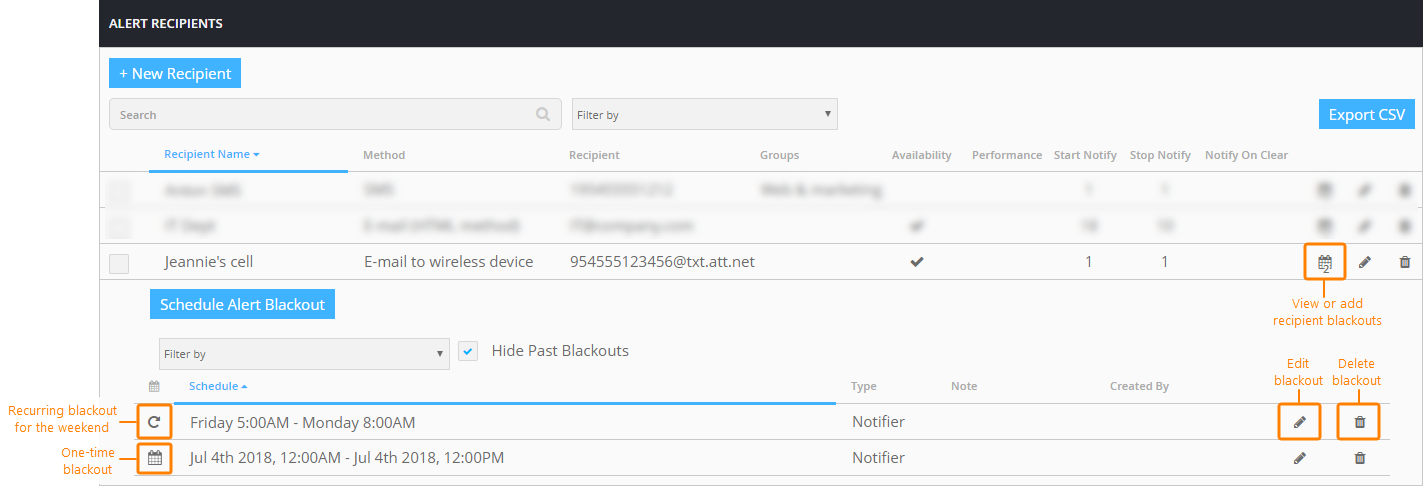
A recipient blackout is a “do not disturb” period, during which availability alerts are not sent to this recipient. You can use blackouts to restrict alerting to specific times, for example, to alert different users at different times of the day (or days of the week).
Notes:
-
To disable alerting during maintenance periods, use monitor blackouts instead.
-
Monitor and recipient blackouts affect availability alerts (like HTTP errors or timeouts), but not performance alerts.
Example
Suppose you have 3 on-call teams:
-
8 AM - 5 PM on business days.
-
5 PM - 8 AM on business days.
-
Weekends.
For team 1 members, blackouts should include weekends and the hours 5 PM - 8 AM.
For team 2 members, blackouts should include weekends and the hours 8 AM - 5 PM.
For team 3 members, blackouts should include business days.
View recipient blackouts
You can view and manage recipient blackouts on the Alert Recipients (in AlertSite UXM) or Manage Notifier (in AlertSite 1.0) screen. To open it:
The blackout hours are displayed in the time zone selected in your AlertSite preferences.
Add a recipient blackout
AlertSite UXM
-
On the Alert Recipients screen, click next to a recipient you want to add a blackout for.
-
Click Schedule Alert Blackout.
-
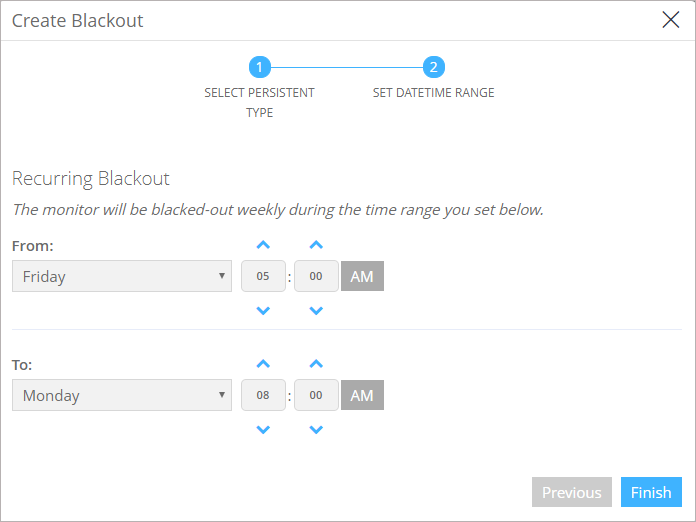
Select the blackout type – one-time or recurring (repeating every week) and click Next.
-
Specify the From and To date and time, and then click Finish.
AlertSite 1.0
-
From the top menu, select Notifiers > Notifiers.
-
Click a recipient in the list.
-
On the Manage Notifier screen, click Blackouts at the upper right.
-
Select the blackout time –persistent (recurring every week) or one-time.
-
Set the period during which the recipient will not receive alerts.
-
Click Submit.
Edit a recurring blackout
AlertSite UXM
-
On the Alert Recipients screen, click next to the recipient.
-
Click next to the blackout you want to edit.
-
Change the From and To dates, and then click Save.
AlertSite 1.0
-
From the top menu, select Notifiers > Notifiers.
-
On the Configure Notifiers screen, click the
 icon next to the recipient whose blackout settings you want to change.
 -
Change the Blackout From and Blackout To dates, and then click Submit.
| Note: | You can edit only recurring blackouts. To change a one-time blackout, you must delete and recreate it. |
Delete a recipient blackout
AlertSite UXM
-
On the Alert Recipients screen, click next to the recipient.
-
Click Delete next to the blackout you want to delete, and confirm by clicking OK.
AlertSite 1.0
-
From the top menu, select Notifiers > Notifiers.
-
On the Configure Notifiers screen, click the
 icon next to the recipient whose blackout you want to delete.
 -
Select the Delete Day check box, and then click Submit.
See Also
Alert Recipients
Creating Alert Recipients
Scheduling Monitor Blackouts


