All the tests of your project belong to the Tests collection. This topic explains how to run a load test.
To learn how to create load tests, see Creating and Configuring Load Tests.
Prepare for a Test Run
Before running a test, specify all needed test settings. To do this, double-click the test in the Project Explorer panel: the test will be opened in the Load Test editor. In this editor, you set various run settings for the selected test. For example, on the Continuous Load tab of the editor, you can specify how long the test run will last. For more information on the tabs and settings available in the editor, see About Load Test Editor.
| Note: | To simulate the recorded traffic via a proxy server, specify the needed server in the Proxy Options dialog. If your load test simulates traffic on remote computers or on Amazon cloud computers, to command them to simulate traffic using the same proxy server, enable the Use proxy server for remote agents option in LoadComplete. |
If your load test uses Amazon cloud computers to simulate traffic, you can also view the approximate cost of using those computers before running the test. See Estimating Cloud Resource Costs.
After specifying all necessary settings, you can run the test to simulate the recorded traffic.
Run a Test
-
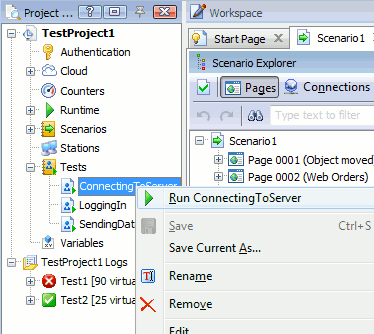
Right-click the test in the Project Explorer panel and select
 Run from the ensuing context menu.
– or –
-
Select Test | Run from LoadComplete main menu and then select the desired test from the ensuing submenu.

– or –
-
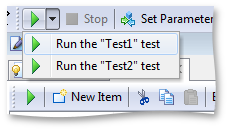
Click the down arrow on the right of the
 Run Load Test item on the Test Engine toolbar and select the desired test from the ensuing drop-down list.
– or –
-
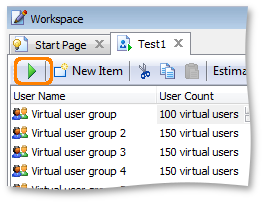
Open the desired test in the Load Test editor and then select the
 Run This Load Test item on the toolbar.
Depending on the Store log data option, LoadComplete can gather detailed information on all simulated virtual users or on failed virtual user iterations. If your load test simulates many virtual users (several hundreds of them or more), gathering detailed information can cause performance issues. In this case, when you run such a test, LoadComplete will show the You are going to run a large test with detailed logging warning. We recommend that you disable gathering detailed information if you do not need it. To do this, click Reduce logging level and run in the message. After the test run is over, LoadComplete will generate the Report log only. Click Run with current logging settings to run the test with your current Store log data setting anyway.
When you run a load test and LoadComplete is configured to save the test logs, LoadComplete checks whether the disk where your project is located has enough free space to store the log. The minimum required amount of free disk space is 100 MB. If there is not enough free space, LoadComplete will show a warning informing you about the problem and telling you how much space you need to free to save the log successfully.
If your load test uses Amazon cloud computers to simulate traffic, LoadComplete will show the Cloud Test Price dialog informing you about the cost of using those cloud computers. Click Continue to start the test. To cancel the test, click Cancel.
Simulating the Recoded Traffic
When a test starts, LoadComplete launches the embedded LoadComplete Remote Agent utility that simulates the recorded traffic. The utility sends the recorded requests to the web server and gets responses from it. It also simulates the web browser behavior and establishes several concurrent connections to the server to load page resources faster. (See Configuring Parallel Requests.)
A single instance of the LoadComplete Remote Agent utility can simulate a limited number of virtual users. To simulate more virtual users, LoadComplete launches additional instances of the utility.
Multiple instances of the utility can simulate up to 2000 virtual users on a single workstation. If you need to simulate a greater number of virtual users in your test, you will have to distribute them among several workstations.
When testing is over, LoadComplete closes all extra utility instances automatically.
| Note: | The maximum number of virtual users LoadComplete can simulate on a single Amazon cloud computer is specified by the Max VU number property of the Amazon machine image from which the cloud computer was launched. You set the property value in the Amazon Image editor of LoadComplete. The default value is 400. |
During the test run, LoadComplete neither opens the web browser nor loads pages to it. It just sends the recorded requests from the tested application to the web server and checks the received responses. In other words, LoadComplete simulates work with the server and makes it "think" that a real user is working with it. However, we do not recommend that you open the browser while executing your test and perform some actions with pages. This may cause a test failure or an error may occur.
 |
LoadComplete supports load tests running for up to 24 hours. |
Monitor the Test Run
To monitor the execution process, you can use the Runtime pages of the project:
The Runtime > Graphs page shows how various metrics that represent the performance of the tested web site or web application change during the test run. The Runtime > Messages page shows information on the events that occurred at runtime. The Runtime > Progress page shows the progress of the executed test. It is the same progress bar that the LoadComplete indicator shows (an icon and a balloon in the top right corner of the screen).

| Note: | The pages store the results until the next test is run. So, when you run your test again, or when you run another test, the results of the previous run will be cleared. |
To terminate the test run, click Stop on the LoadComplete indicator. For more information on stopping a test, see Stopping the Test.
Analyze Test Results
When testing is over, LoadComplete processes the test results. You can view the test results in the Test Log panel.
See Also
Stopping the Test
Monitoring Test Progress
Server Monitoring
Load Testing on Cloud Computers

 Prepare for a Test Run