To view and manage your private locations in AlertSite, do the following:
-
In AlertSite UXM, navigate to > Settings > Private Locations.
-
In AlertSite 1.0, navigate to Configure > InSite Locations.
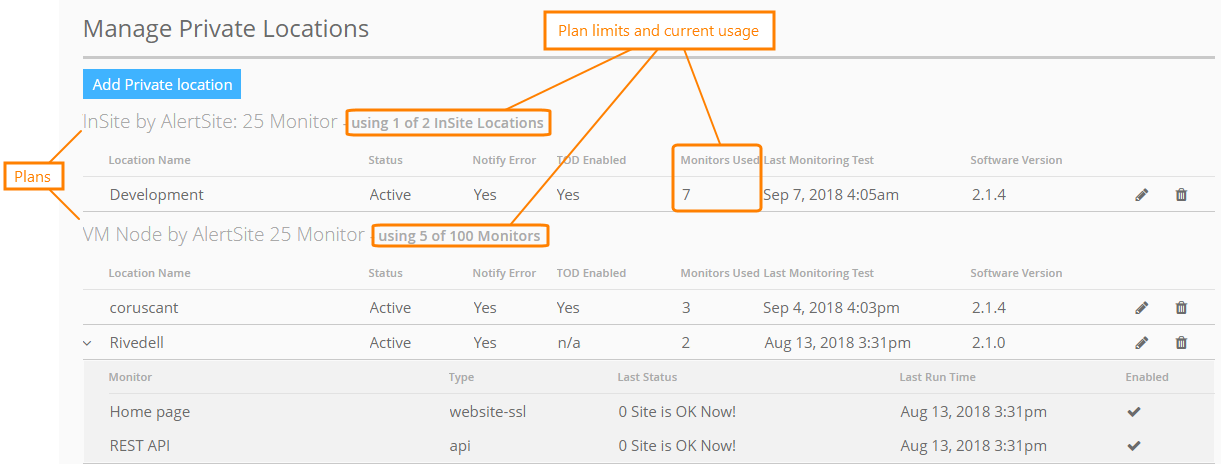
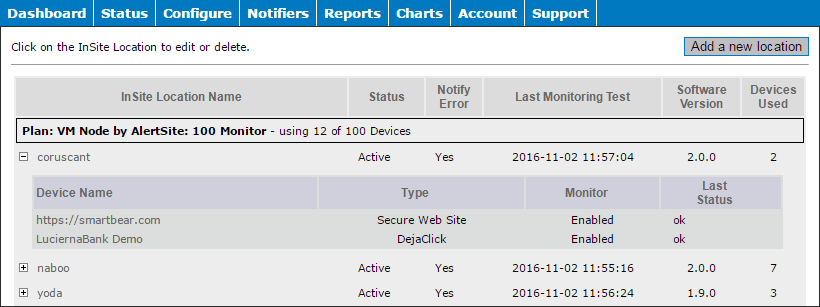
The table with private location details has the following columns:
| Column | Description |
|---|---|
| Location Name | The location name that is displayed in AlertSite dashboards and reports. |
| Status | Whether the location is active, that is, runs the monitors. Private locations can be disabled temporarily, for example, for maintenance. |
| Notify Error | Whether monitor errors detected at this location will trigger alerts. It can be changed at any time. |
| TOD Enabled | Specifies whether the users will be able to run tests on demand at this location. This feature is only supported for Private Node Server v. 2.1.4 and can be enabled or disabled as required (see below). |
| Last Monitoring Test | The date and time of the latest monitor run performed at this location. If the location has active monitors, but this value lags behind significantly, it may indicate a problem with the location. For example, there might be connectivity problems, or the location may need a restart. |
|
Software Version |
The location’s software version number. For the Private Node Server (VM) release notes, see Version History. |
| Monitors Used (or Devices Used in AlertSite 1.0) |
The total number of monitors configured to use this location. This includes both enabled and disabled monitors. |
Private location plans
All private locations are grouped by their billing plans:
-
VM Node by AlertSite – Private Node Server virtual machines.
-
InSite by AlertSite – InSite hardware appliances.
-
PrivateNode EndPoint – PrivateNode EndPoint locations (powered by a desktop application).
Add a new private location
| To add a location powered by | See |
|---|---|
| Virtual machine | VM setup |
| Hardware appliance | InSite setup |
| Desktop application | PrivateNode EndPoint setup |
Access a private location’s web interface
Private Node Server and InSite locations have a web interface (Control Panel) for configuration. To access the web interface, navigate to:
-
https://<IP address> – for Private Node Server 2.0 and later
-
http://<IP address> – for earlier versions
where the <IP address> is that of your private location. The Control Panel can be used to change the proxy settings, mail relay and other internal configuration settings for your private location. For details, see Private Node Server Control Panel (Web Interface).
Find monitors that use a private location
In the list of private locations, click or ![]() next to the location name to view a list of monitors configured to use this location. The list includes both enabled and disabled monitors – disabled monitors also count towards your plan limits. The Monitors Used (or Devices Used) column shows the total number of monitors associated with this private location.
next to the location name to view a list of monitors configured to use this location. The list includes both enabled and disabled monitors – disabled monitors also count towards your plan limits. The Monitors Used (or Devices Used) column shows the total number of monitors associated with this private location.
You can change the locations for a monitor in the monitor settings.
Set a private location as the default one
New monitors created with private plans are automatically assigned to the primary private location.
To make a private location the primary one:
-
Select > Settings from the top menu.
-
Switch to the Default Locations tab.
-
Select the check box in the Active column next to the needed location.
-
Select the location to be used as Primary.
-
Click Submit to save the changes.
Edit location settings
To edit location settings:
-
In AlertSite UXM, click next to the location.
-
In AlertSite 1.0, click the location name to open the configuration screen.
The location settings are:
-
Registration ID (in AlertSite UXM) or Location ID (in AlertSite 1.0) – Read-only. A unique location registration ID that is generated when you register the location in AlertSite. This ID maps the location entity in AlertSite to the actual VM or hardware appliance that performs the monitoring. You will need the registration ID if you ever need to re-register the location or replace its underlying VM or hardware appliance.
-
Name (or Description in AlertSite 1.0) – Specifies the location name displayed in AlertSite dashboards, reports and alerts.
-
Select Plan (or Location Plan in AlertSite 1.0) – The billing plan for this location. VM Node plans are used for virtual machines and InSite plans are for hardware appliances.
-
Latitude and Longitude – Optional. The geographical coordinates of this private location. These coordinates are currently not used, but may be used in the future.
Latitude varies from -90 to 90, and longitude varies from -180 to 180. Include up to 4 decimal places, for example, 26.3125.
Tip: You can copy the coordinates from Google Maps. Paste the address into the search box, then right-click the location and select What’s here. Copy the latitude and longitude from the box that appears. -
Monitoring is active – A private location is Inactive until it has been registered. Once registered, it becomes Active, that is, starts running the monitors. Changing the status to Inactive will temporarily stop monitoring from this location until you restore the Active status.
-
Notify on error – Specifies whether the location will send alerts about monitoring errors found at this location.
Note: This option affects only monitor alerts, it does not affect connectivity alerts. -
Reset UUID – Do not select this option unless you are going to change InSite location hardware, replace an InSite hardware appliance with a VM, or replace a VM with another one. Contact Support to learn how to migrate private locations.
-
Alert when no connection after this time (minutes) – Private Node Server locations check the connection with the AlertSite platform to send monitoring results and confirm that the locations are up and running. This option specifies the maximum acceptable reporting interval for the location. If the location does not connect to AlertSite during this interval, a status 4050 alert will be sent to the Connectivity alert recipients. For more information, see Private Node Server Connectivity Alerts.
-
Connectivity alert recipients – Select the recipients to send alerts to if the location has not reported to AlertSite within the time interval specified by the Alert when no connection after this time option. You can create additional recipients in Alerts > Alert Recipients in AlertSite UXM or on the Notifiers screen in AlertSite 1.0.
-
Enable test on demand – Specifies whether the users will be able to run tests on demand at this location. This is only supported for Private Node Server v. 2.1.4.
Temporarily stop monitoring from a private location
-
In AlertSite UXM, click next to the location, clear the Monitoring is active check box, and click Save.
-
In AlertSite 1.0, click a location in the list, change Monitoring Is to Inactive, and click Submit.
If there are monitors configured to use this location, they will continue running from other configured locations, but not from this one.
Delete a private location
-
In AlertSite UXM, click next to the location on the list and confirm the deletion.
-
In AlertSite 1.0, click a location in the list, then click Delete in the top right corner and confirm the deletion.
Notes:
-
Deleting a private location disconnects it from your AlertSite account and deletes all the previous monitoring data collected by this location.
-
The VM or hardware appliance remains intact, but it no longer appears as a location in AlertSite. You can re-register it later if needed, or you can delete the VM or shut down the hardware appliance if you no longer need it.


