AlertSite monitoring servers reside in over 80 locations around the world. We recommend that you monitor your website from at least 6 locations: 1 close to your location, and the rest where your users are.
You can set the default locations for all monitors in your AlertSite account settings. You can also change the locations for individual monitors, if needed.
| Note: | You need to be an Admin, Co-Admin, or Power User to change the monitoring locations. |
Select locations for one monitor
AlertSite UXM
-
On the Dashboard, click on the monitor tile and select Edit Configurations.
–or–
Click Edit Monitor on the Monitor Summary, Monitor Availability, or Monitor Performance dashboard.
-
Click Locations.
Note: To configure locations for API monitors, switch to the Main tab. -
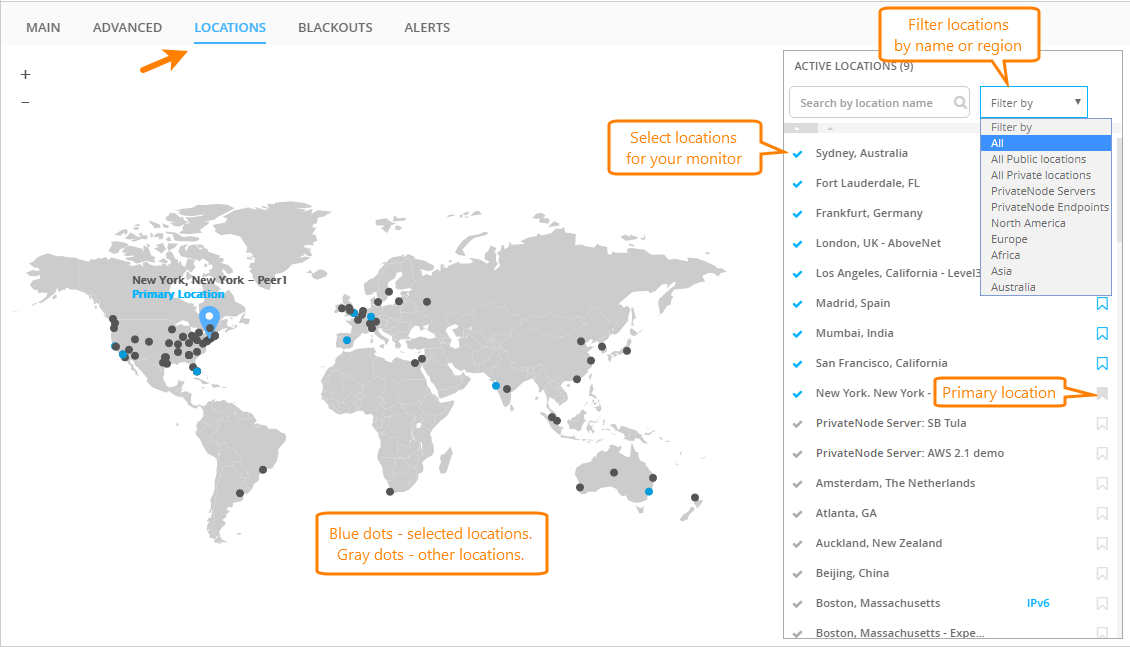
In the locations list, select the locations you want to use and unselect those you do not want to use. The location marked as primary will be used for alerts and for tests on demand.
All selected locations appear on the map as blue dots, other locations - as gray dots.
Notes:
-
The list includes only those locations that support the given monitor type and the billing plan selected for the monitor. For monitors with the InSite or VM Node plan, the list includes only the corresponding private locations.
-
The IPv6 label indicates locations that support both IPv4 and IPv6. IPv6 monitoring is currently supported for Firefox real-browser monitors only.
-
-
Click Save to save the changes.
AlertSite 1.0
-
On the Dashboard, click the wrench icon next to the monitor whose location you want to change to open the Manage page.
-
Click Locations in the top right corner.
-
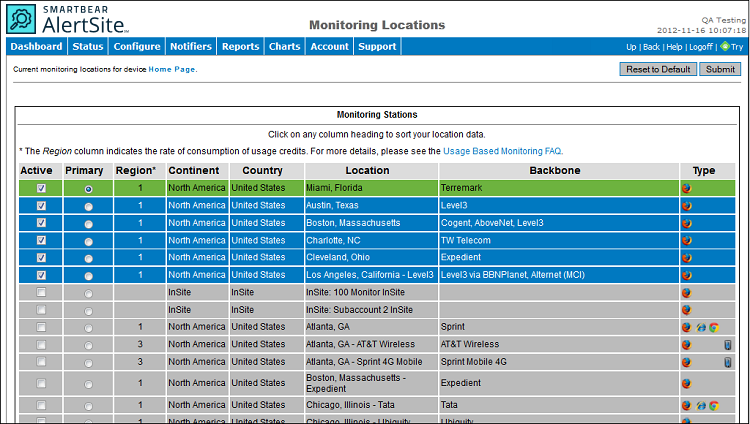
Select the check boxes in the Active column for those locations you want to use and clear for those you do not want to use.
The number of locations should not be smaller than the number selected in the Locations per Interval drop-down list on the Manage Transaction page.
-
To change the primary location, select the radio button in the Primary column. The primary location is highlighted in green and used for alerts and tests on demand.
 |
If you unselect any locations, previous monitoring data from those locations will be unavailable. |
Bulk edit locations for multiple monitors
You can use the AlertSite UXM bulk editor to change locations for multiple monitors at once.
| Note: | The new locations will override the current locations used by these monitors. |
-
On the AlertSite UXM Dashboard, click Bulk Edit.
-
On the left, select the check boxes next to the monitors the locations of which you want to change.
-
Switch to the Locations tab.
-
Select the new locations for these monitors.
-
Click Apply and confirm the update.
About primary location
In monitors with several locations, you need to set one location as primary. Primary location serves several purposes:
-
Primary location determines where alerts come from, depending on the monitoring mode selected in the monitor settings:
-
In the Primary mode, only errors detected at the primary location trigger alerts. Errors found from other locations are included in reports, but alerts are not sent.
-
In the SLA (MultiPOP) mode, the primary location sends alerts even if it is not the only location facing the error.
-
-
Tests on demand triggered from AlertSite 1.0 run from the primary location.
-
Primary private locations are automatically assigned to new monitors created with private plans (for example, VM Node by AlertSite, InSite by AlertSite).
Select default monitoring locations
To change the default monitoring locations for your account:
AlertSite UXM
-
Select > Settings from the top menu.
-
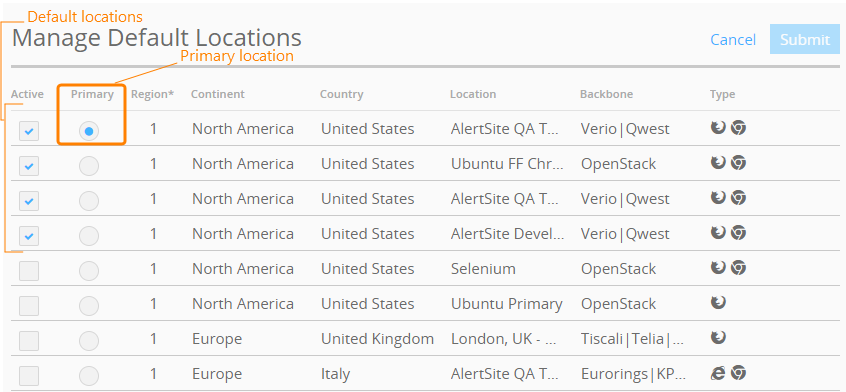
Switch to the Default Locations tab. This opens a list of all global AlertSite locations available to your account. The current default locations are listed at the top, the primary location is the first one.
-
Select the check boxes in the Active column for those locations you want to use as the default ones, and clear for those you do not want to use.
-
(Optional.) Select a new location to be used as Primary.
-
Click Submit to save the changes.

If you have monitors that use the default locations, the new defaults will be applied to these monitors. Keep in mind that if you unselect a location, the previous monitoring data from this location will be unavailable.
AlertSite 1.0
-
From the top menu, select Account > Manage Account.
-
Click Locations.
This opens a list of all global AlertSite locations available to your account. The current default locations are listed at the top with the primary location first.
-
Select the check boxes in the Active column for those locations you want to use as default ones and clear for those you do not want to use.
-
(Optional.) Select a new location to be used as primary.
-
Click Submit.
 |
If you have monitors that are using the default locations, the new defaults will be applied to these monitors. Note that, if you unselected any locations, previous monitoring data from these locations will be unavailable. |
This changes the locations for all monitors that are using the default locations. All monitors created from now on will also use the new locations. Monitors where you set the locations manually (see below) will not be affected.
Private locations
Customers on the Enterprise plan can set up private monitoring locations in the local network. With private locations, you can monitor internal applications that are not accessible from the Internet, and monitor public sites from inside your firewall. To learn more about private location types and how to use them, see Private Locations.
Regions and rates
All AlertSite locations are categorized by regions:
-
United States, Canada, and Europe.
-
All other countries.
-
Mobile network provider locations (ATT Wireless, Spring Mobile).
The region determines the usage rate of measurement credits on Usage-Based Monitoring plans. For more information, see Usage-Based Monitoring.
Location IP addresses
For a list of IP addresses used by AlertSite monitoring locations, see Monitoring Locations - IP Addresses. Make sure your web servers allow connections from these IPs.
You can use this list to filter out AlertSite traffic from your website analytics.


 Description of columns