PrivateNode EndPoint is a lightweight desktop application that makes any computer an AlertSite monitoring location. Once installed, the application runs in the background with no interaction with the user. Monitoring is performed as long as the computer is on and the application is running. See How it works below for details.
Supported monitor types
- Web URL (both HTTP and HTTPS)
- API endpoint (both HTTP and HTTPS)
- SoapUI
- DéjàClick Firefox and Chrome
- other monitor types except Selenium and BitBar
There is no need to have Firefox, Chrome, or SoapUI installed on your local computer to run monitors of the corresponding types.
System requirements
-
Operating system:
- Windows 7, Windows 8.1 or Windows 10, Windows Server 2008 R2, Windows Server 2012 (32-bit or 64-bit), or Windows Server 2016 (64-bit).
- OS X Mavericks 10.9 or later, 64-bit only.
- Linux distributions: Ubuntu 14.04–18.04, Debian 8 or later, openSUSE 13.3 or later, or Fedora Linux 24 or later.
-
(Windows/Linux) An SSE2-capable Intel Pentium 4 processor or higher.
-
160 MB of free disk space.
Note that only one instance of PrivateNode EndPoint can run on the computer at a time.
Network connectivity
To use PrivateNode EndPoint behind a firewall or proxy server, your firewall or proxy needs to support WebSockets, and also to allow outbound TCP connections to port 443 on alertsite.com and subdomains of alertsite.com. These domains do not have fixed IPs, please use the domain names in your firewall rules.
You can configure connectivity alerts to get notified when PrivateNode EndPoint loses connection to the AlertSite platform.
When monitoring from PrivateNode Endpoint locations, alerts are sent from AlertSite servers, not from the EndPoint machines. The IP addresses of those AlertSite servers are provided below. Make sure to allow the appropriate inbound traffic (such as email or webhooks) from these IP addresses.
| Hostname | IP address |
|---|---|
| knicks01.alertsite.com | 52.144.45.34 |
| knicks02.alertsite.com | 52.144.47.171 |
| knicks03.alertsite.com | 52.144.44.253 |
| raiders01.alertsite.com | 138.128.245.224 |
| raiders02.alertsite.com | 104.238.212.38 |
| raiders03.alertsite.com | 138.128.245.110 |
Plans
Before using PrivateNode EndPoint, you need to purchase the appropriate plan (license). Please contact your AlertSite account manager or Sales representative for details. You can find the contact information in AlertSite 1.0, on the Support > Contact Support screen.
A single PrivateNode EndPoint plan allows up to 10 monitors to use EndPoint locations, regardless of the monitoring status (active or disabled). The number of EndPoint locations is not limited, you can have as many as you need. For example, you can add 5 (or 10, or 25) EndPoint locations and set up 10 monitors to use any of these locations. A single monitor can use both AlertSite global locations and your private EndPoint locations, or just private locations if you are monitoring an intranet website.
If you need to test a larger number of monitors from EndPoint locations, you will need to purchase multiple PrivateNode EndPoint plans. For example, 2 plans allow a maximum of 20 monitors, 5 plans – 50 monitors, and so on.
Download
AlertSite UXM
If you do not have any PrivateNode EndPoint locations yet, you will be prompted to download the application when setting up PrivateNode EndPoint (see below).
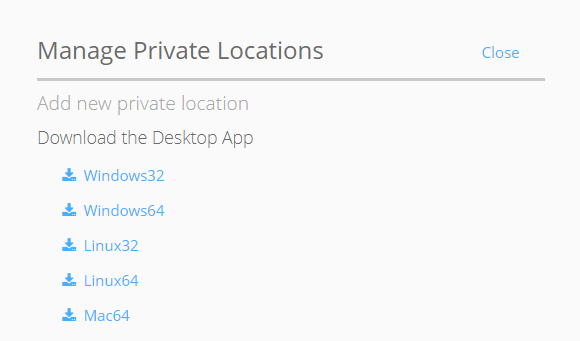
If you already have a location configured, you can download the application from the > Settings > Private Locations screen in AlertSite UXM. Click in the table to see the download links for various operating systems.
AlertSite 1.0
From the top menu, select Support > Downloads. Here you can find the download links for your operating system.
Installation
Step 1. Configure location in AlertSite
AlertSite UXM
-
Navigate to > Settings > Private Locations.
-
Click Add Private Location.
-
Specify the location information:
-
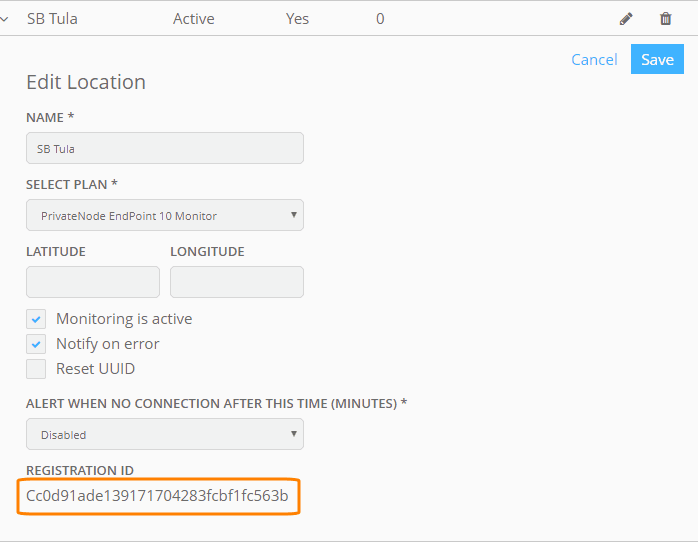
Give your desktop location a name. This name will appear in AlertSite dashboards, alerts, and reports.
-
Select the PrivateNode EndPoint 10 Monitor plan.
-
Select the Monitoring is active and Notify on error check boxes.
-
-
Click Add.
-
Click the link to download the PrivateNode EndPoint application for your operating system, then click Close.
Copy the generated Registration ID. You will need it later.
AlertSite 1.0
-
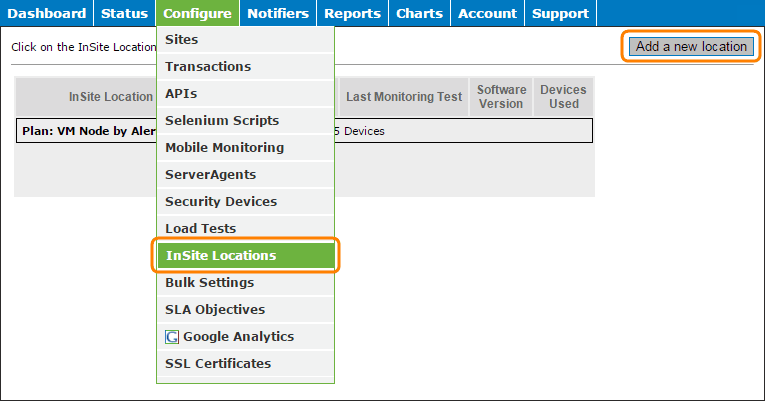
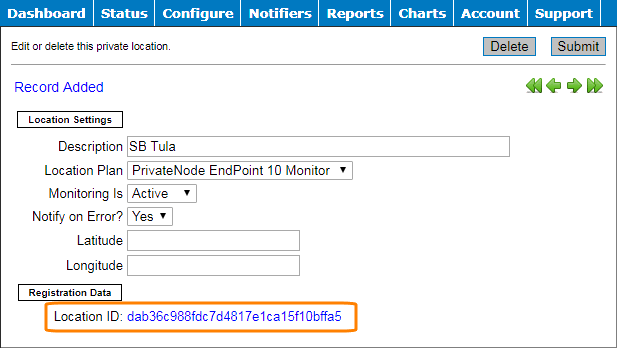
Navigate to Configure > InSite Locations and click Add a new location.
-
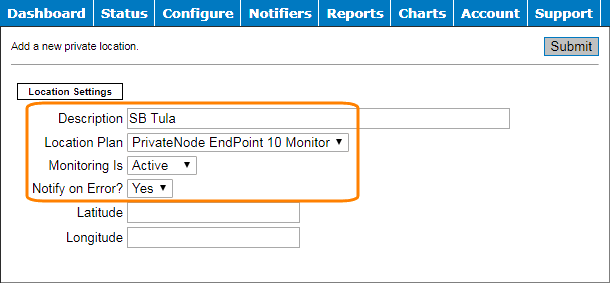
Enter the location parameters:
-
Description – the location name that will appear in AlertSite dashboards, alerts, and reports.
-
Location Plan – select PrivateNode EndPoint 10 Monitor.
-
Monitoring Is – set to Active.
-
Notify on Error? – set to Yes in order to receive alerts about monitor errors found at your desktop location.
-
-
Click Submit.
-
This will generate the Location ID. Copy it somewhere – you will need it later.
Step 2. Launch app on your desktop
Interactive mode
-
Unzip the application you have downloaded from AlertSite.
-
Launch the application (AlertSite Endpoint.exe on Windows, AlertSite Endpoint.app on OS X, AlertSite Endpoint on Linux).
-
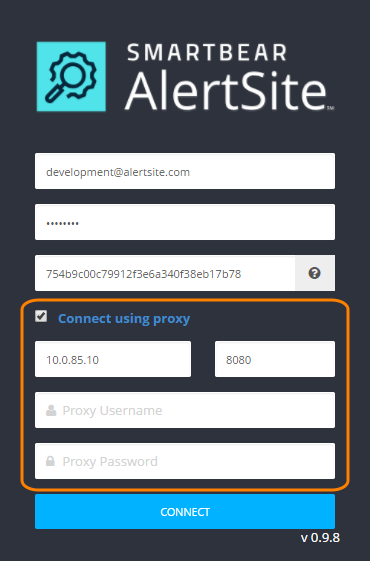
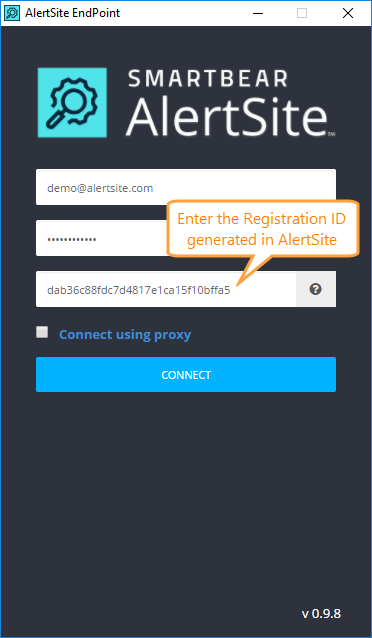
Enter your AlertSite login email and password, and the 32-character registration ID (or location ID in AlertSite 1.0) you generated earlier.
-
(Optional.) If you are using a proxy server, select Connect using proxy and enter your proxy host (the host name or the IPv4 address) and port. If the proxy requires authentication, also enter the proxy username and password.
-
Click Connect.
-
Depending on your operating system, you may be asked to allow the application to connect to the Internet.
-
If everything is OK, the application will show Connected and the location name you assigned in AlertSite.

If the application failed to connect to AlertSite:
-
Double-check the login, password, registration ID, and proxy settings.
-
Make sure your firewall allows outbound TCP connections to port 443 on alertsite.com and subdomains of alertsite.com.
-
-
You can now minimize the application and leave it running in the background.
Command-line mode
| Note: | This feature was introduced in PrivateNode EndPoint v. 1.0. |
To launch the PrivateNode EndPoint application in the service mode, use the --service-mode command-line argument:
-
Windows:
"AlertSite Endpoint.exe" --args* --service-mode -
OS X:
$: open "AlertSite\Endpoint.app" --args* --service-mode
* Enter the following command-line arguments to log in to PrivateNode EndPoint. If you have already logged in via the UI, skip these arguments.
--username
Your AlertSite user name.
--password
Your AlertSite password.
--password=SuperSecret
--registration
The 32-character registration ID (or location ID in AlertSite 1.0) you generated earlier.
--log-file
Changes the log file location.
--log-file <path>
The default location of AlertSiteEndPoint.log is:
-
Windows: %LOCALAPPDATA%\AlertSiteEndPoint\User Data\Default
-
Linux: ~/.config/AlertSiteEndPoint/Default
-
OS X: ~/Library/Application Support/AlertSiteEndPoint/Default
--log-size
Changes the log file size. The default is 2 MB.
--log-size <size>
--proxy-enabled
Indicates that the Internet connection will be established via proxy.
--no-proxy-enabled
Indicates that the Internet connection will be established directly.
--proxyHost
The proxy server address.
--proxyHost <server-address>
--proxyPort
Your port number.
--proxyPort <port>
--proxyUsername
Your proxy username.
--proxyUsername <username>
--proxyPassword
Your proxy password.
--proxyPassword <password>
Notes
-
Keep the computer on and the application running, otherwise, monitoring from this location will stop. If the computer goes to sleep or hibernation mode, monitoring will stop.
-
If you need to disable this location temporarily (for example, to restart the computer), click Disconnect before closing the application. This will mark the location as inactive in AlertSite, and AlertSite will not schedule tests at this location until the location is online again.
-
The application will reconnect to AlertSite automatically on startup. You can also autorun the application when your computer starts, as explained below.
Step 3. Configure connectivity alerts
We recommend that you configure connectivity alerts to get notified when your PrivateNode EndPoint stops reporting data or loses connection to the AlertSite platform. These alerts are supported for all versions of PrivateNode EndPoint.
For instructions, see Configure connectivity alerts.
Step 4. Use private location with your monitors
Once your PrivateNode EndPoint is up and running, you can configure monitors to run from this location. Each monitor can use a combination of AlertSite global locations and private locations, or just private locations if you are monitoring an intranet website.
4a. Add private location to existing monitors
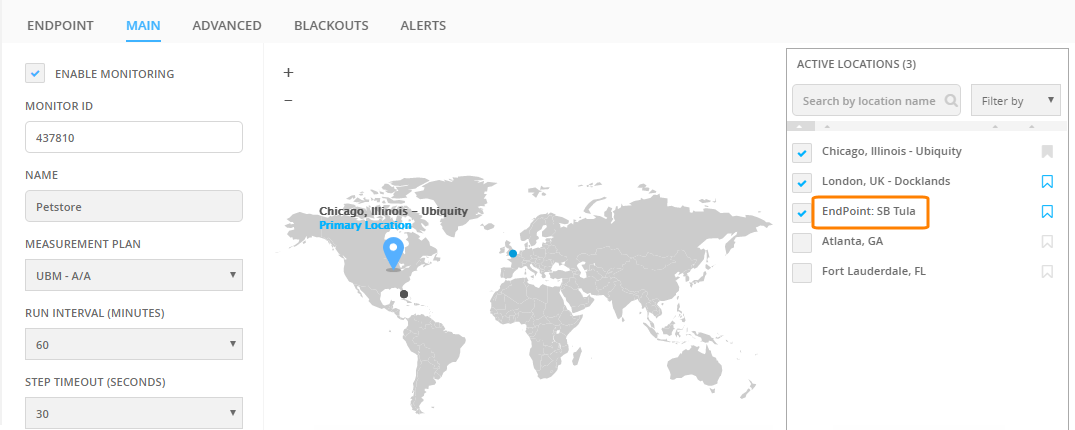
When you select locations for your monitors, you will see your private location in the list. PrivateNode EndPoint locations have the EndPoint prefix in AlertSite UXM (or the Micro prefix in AlertSite 1.0).
Monitors that use PrivateNode EndPoint locations must use the following settings:
-
Monitoring Mode – any mode except for Round Robin and SLA (MultiPOP).
-
Rotated Locations – unselected.
-
(For DéjàClick monitors) Browser – Firefox or Chrome
The other settings can be anything you wish.
4b. Create monitors that use only private locations
To monitor internal websites that are not Internet-facing, you can create monitors that would run only from PrivateNode EndPoint locations. To do this, when you create a new monitor and are prompted to select a measurement plan, select the PrivateNode EndPoint plan. Monitors on this plan can use only PrivateNode EndPoint locations and cannot use AlertSite global locations.

How it works
The PrivateNode EndPoint application serves as a proxy for AlertSite monitoring locations. AlertSite takes care of scheduling tests, running monitoring software, and retrieving the results from PrivateNode.
An AlertSite location, which will actually handle monitoring, is assigned to each PrivateNode location. The assigned location is geographically the closest to you in order to minimize network latency.
When a monitor runs, it connects to the monitored site using PrivateNode as a proxy, as if the connection came directly from the PrivateNode computer. The monitoring software (such as web browsers or SoapUI) runs at an AlertSite location, but all the requests to the target site are sent through the PrivateNode computer. Otherwise, the monitors that use PrivateNode work just like regular monitors – they check the site availability, measure the response time, perform validations, send alerts on errors and so on.
The monitoring results are sent directly to the AlertSite platform, they are not stored locally.
Response time measurement
Since PrivateNode EndPoint works as a proxy, some of the measured network timings have a different meaning than in regular monitors:
-
DNS Time is always 0. When using a proxy, this metric reflects the time to resolve the proxy domain name, and AlertSite connects to PrivateNode EndPoint by using the direct IP address.
-
Connect Time is the proxy connect time, that is, the time taken to connect from an AlertSite location to the PrivateNode EndPoint computer.
-
Time to First Byte is the sum of DNS Time + Connect Time + Time to First Byte of the monitored server as measured from the PrivateNode computer.
-
The total response time is the sum of all network timings, including the above-mentioned DNS Time and Connect Time, so it includes the network latency between the PrivateNode computer and AlertSite servers.
Please keep this in mind when analyzing the response time and setting up performance alerts. We recommend using the Time to First Byte and Content Download Time metrics to access the response time of your monitored site.
| Note: | These specifics apply only to PrivateNode EndPoint and do not apply to Private Node Server locations (VM and hardware appliances). |
Run PrivateNode EndPoint on computer startup
PrivateNode EndPoint can be launched automatically on computer startup. This way your private location will get online when you log in to your computer.
Windows
On Windows, you need to add a shortcut to the AlertSite Endpoint application to the Startup folder:
-
Right-click the AlertSite Endpoint.exe file in Windows Explorer or in other file manager, and select Create shortcut.
-
Press Windows+R, type
shell:startupand press Enter. This opens the Startup folder. -
Copy the shortcut and paste it to the Startup folder.
The shell:startup folder contains items that autorun when you log in using your user account. If you want to run PrivateNode EndPoint whenever any user logs in, use shell:common startup instead.
Mac
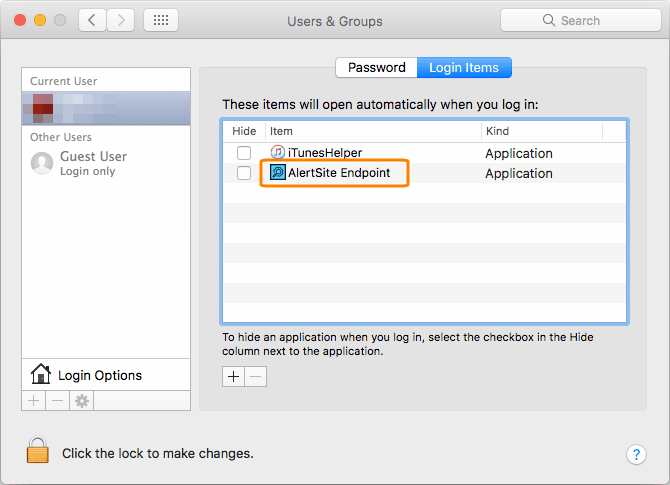
On Mac, you need to add the AlertSite Endpoint application to the Login Items:
-
Select System Preferences from the menu.
-
Click Users & Groups (or Accounts in earlier versions of OS X).
-
Switch to the Login Items tab.
-
Click and browse for the AlertSite Endpoint.app file.
–or–
Drag the AlertSite Endpoint.app file and drop it onto the list.
Troubleshooting
Monitor status 2
This status means the location is disconnected from AlertSite. Make sure the application is running and displays Connected.
This status may appear shortly after you close the AlertSite Endpoint application (for example, when you shut down or restart your computer). To avoid the issue, click Disconnect before closing the application. When you disconnect explicitly, the connection is force-closed, so that AlertSite knows the location went offline intentionally. In this case, AlertSite will treat the location as inactive and will not schedule tests at it until the location is online again.
Error: getaddreinfo ENOTFOUND www.alertsite.com www.alertsite.com:443
This means the application was unable to connect to AlertSite:
-
Make sure the Internet connection is functioning.
-
If you are connecting through a proxy, make sure the proxy settings specified in the application are correct.
-
Make sure your firewall allows connections to *.alertsite:443.
Test on Demand does not work
-
Make sure the AlertSite Endpoint application is running on the corresponding computer.
-
Make sure the location status is set to Active in > Settings > Private Locations in AlertSite UXM (or Configure > InSite Locations in AlertSite 1.0).


