AlertSite can help you verify that your FTP server is available. AlertSite monitors can test the FTP server connection and optionally test user authentication and file upload/download.
Supported FTP features
AlertSite FTP monitors support the following:
- FTP
- FTP over SSL/TLS (FTPS) – implicit mode only
- Your FTPS server must support the PROT command
- File upload/download test requires passive FTP with a user name and password
- Anonymous FTP access (using the user name anonymous and an arbitrary password)
- client-side certificates
You might need to configure your firewall to allow connections from the IP addresses of AlertSite monitoring locations.
The following are not supported:
- explicit mode FTPS (FTPES)
- FTP over SSH
- SFTP (SSH File Transfer Protocol)
How FTP monitors work
1. Standard handshake
-
Connect to the specified FTP server and port (default ports are 21 for FTP and 990 for FTPS).
-
Receive Response 220 (Service ready for new user).
2. (Optional) Log in
If the user name and password are specified:
-
Send the user name via the
USERcommand. -
Receive Response 231 (User name is OK, password needed).
-
Send the password by using the
PASScommand. -
Receive Response 230 (User is logged in, proceed).
3. (Optional) Change working directory
If the URL contains a directory name, such as ftp.example.com/path/subpath:
-
Change the working directory using the
CWDcommand. -
Receive Response 250 (Requested file action okay, completed).
4. (Optional) Test file upload and download
If the Attempt to upload a file option is selected and both the user name and password are provided, the monitor uploads and downloads a small file:
-
Generate a small test file.
-
Upload the file to the server by using the
STORcommand. -
Download the file by using the
RETRcommand. -
Compare the uploaded and downloaded files.
-
Delete the uploaded file from the server by using the
DELEcommand. -
Close the session with the
QUITcommand.
Create an FTP monitor
AlertSite UXM
-
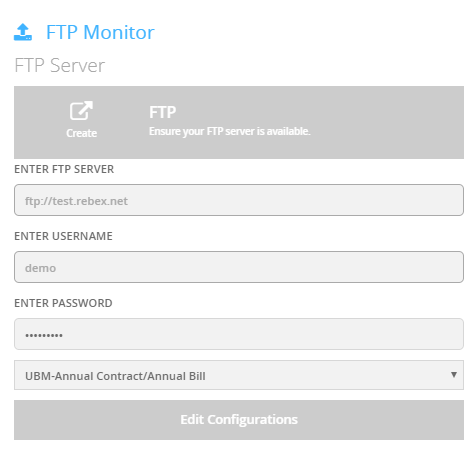
On the AlertSite UXM Dashboard, select + Add New > Monitor > FTP.
-
Click FTP or FTPS (FTP over SSL), depending on the type of your FTP server.
-
Specify your FTP server host name in the ftp://your_ftp_host format or IP address.
-
(Optional). Specify the Username and Password to test FTP authentication.
Note: For anonymous FTP access, use anonymous as the username and an arbitrary password. Commonly used passwords are guest and your email address. Some FTP servers require anonymous passwords in the form of an email address. 
-
Select a billing plan for this monitor. If you have private locations and wish to run the monitor only at private locations, select the VM Node, InSite, or PrivateNode EndPoint plan, depending on the type of your private locations.
-
Click Edit Configurations.
-
Configure other settings:
-
Port – (Optional.) The port number to connect to. The default ports are 21 for FTP and 990 for FTPS.
-
Attempt File Upload to FTP Server – Select this check box to test file upload and download. This test requires a username and password.
-
Run Interval – How often the monitor will run.
-
Alerts – Enable alerts to be alerted when the FTP test fails.
-
Locations – Select the locations for your monitor. The default locations for all new monitors can be configured in your account settings.
-
Change other settings as needed. See FTP Monitor Settings for a description of available settings.
-
-
Click Start Monitoring Now!
-
Run a test on demand to verify the monitor configuration. The results will be displayed on the screen. If there are errors, review the monitor settings. See Common Error Statuses below for some tips..
AlertSite 1.0
-
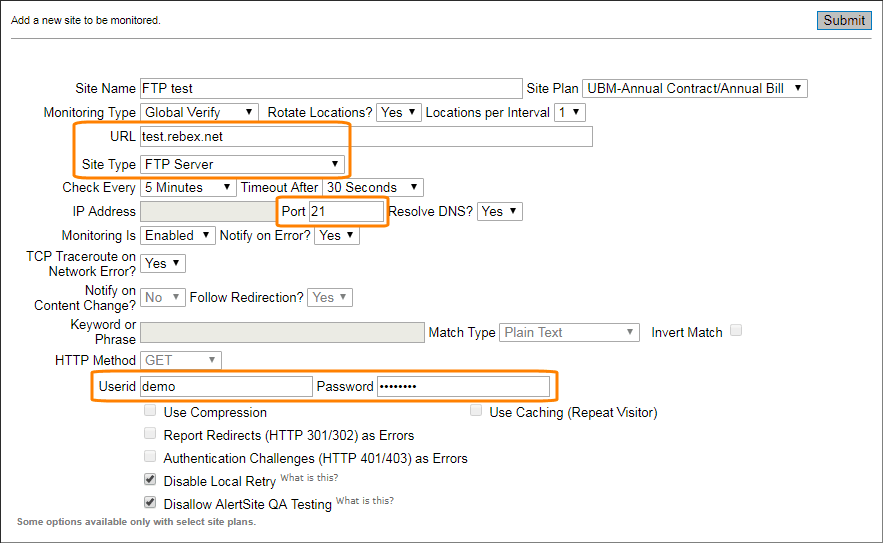
Navigate to Configure > Sites and click Add a new site.
This will open the monitor configuration screen.
-
Specify the basic settings:
-
Change the Site Type to FTP Server or FTP over SSL (FTPS), depending on which one you need.
-
Specify the URL (host name) and, optionally, Port, UserId and Password. The default ports are 21 for FTP and 990 for FTPS.
For anonymous FTP access, use anonymous as the Userid and an arbitrary password. Commonly used passwords are guest and your email address. Some FTP servers require anonymous passwords in the form of an email address.
-
Enter a name for this monitor in the Site Name field.
-
From the Site Plan list, select the billing plan for this monitor. If you have private locations and wish to run the monitor only at private locations, select the VM Node, InSite, or PrivateNode EndPoint plan, depending on the type of your private locations.
-
From the Check Every list, select how often the monitor will run. Possible values depend on the selected Site Plan.
-
(Recommended.) Set Notify on Error? to Yes to be alerted when the monitor cannot connect to your FTP server.
-
-
Click Submit in the top right corner. AlertSite will create the monitor and display additional settings.
-
(Optional.) To test file upload and download, select Upload/Download Test File. This option requires Userid and Password.
-
Click Locations in the top right and select the locations the monitor will run from. The default locations for all new monitors can be configured in your account settings.
-
Configure other settings as needed. See FTP Monitor Settings for a description of applicable settings.
Note: Not all of the settings displayed in AlertSite 1.0 apply to FTP monitors. -
Once you are happy with the configuration, click Test on Demand to test your monitor. The results will be displayed on the screen. If there are errors, review the monitor settings. See Common Error Statuses below for some tips.
Your monitor is ready and will test the connection to your FTP server at the configured intervals. You will see the first results on AlertSite dashboards in a few minutes.
What’s next
Troubleshooting
Common error statuses
Monitor status 0 indicates a successful test, and any other statuses are errors. The following table lists common error statuses for FTP monitors. For a complete list, see AlertSite Status Codes.
| Status | Description |
|---|---|
| 1 - TCP connection failed |
Possible reasons:
|
| 2 - Test timed out |
Possible reasons:
|
| 3 - Invalid response from server |
Possible reasons:
|
| 5 - Keyword verification error | When using the Upload/Download Test File option, this status indicates that the downloaded file does not match the uploaded file. |
| 6 - No response from server |
Possible reasons:
|
| 51 - Unable to resolve IP address | We could not resolve your domain name to an IP address. Double-check whether the domain name is correct. |
View FTP diagnostic log
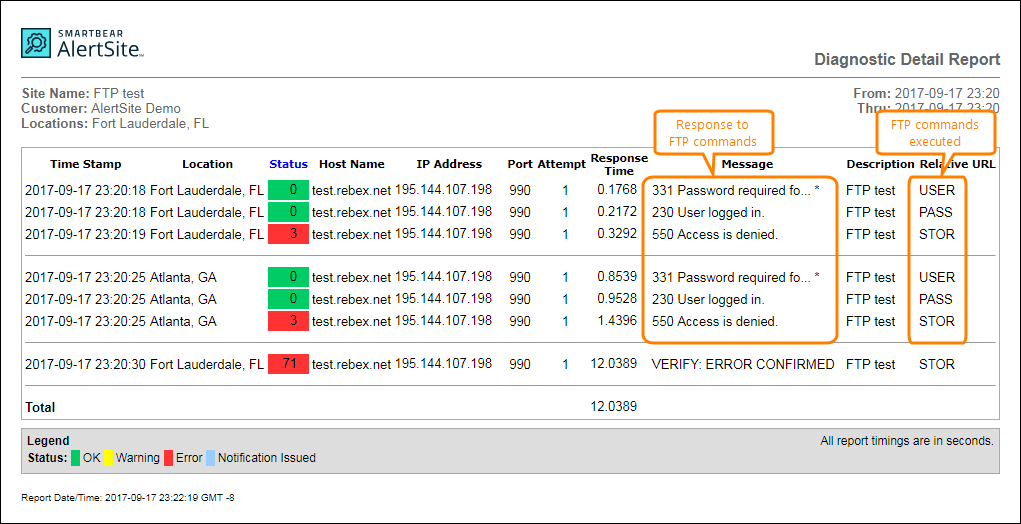
When troubleshooting monitor errors, use the diagnostic log to view the debug messages from the monitor. The diagnostic log is only available for regular monitor runs and not for tests on demand.
To view the log:
-
In AlertSite UXM, go to Monitors > Summary and select your monitor.
-
On the Availability History chart, click a time period. This opens a scatter plot where each dot corresponds to a monitor run.
-
Click a dot, then click View Detail Report.
-
In the report, click the
 icon in the table.
The log contains all FTP commands sent to your server and the response to these commands. You can see the command that failed and the exact error message, such as Access denied.


 Configure Alert Recipients