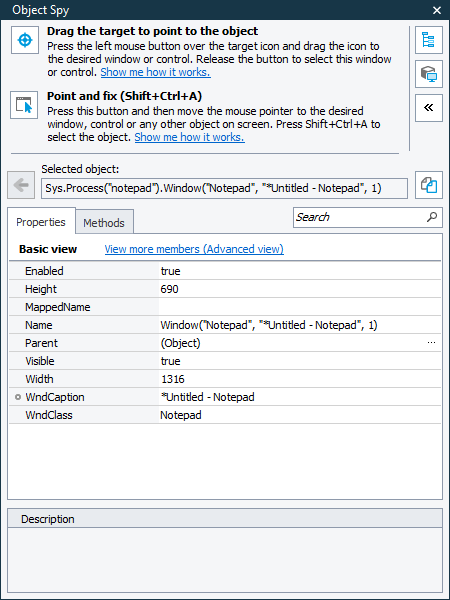
The Object Spy lets you select an object from screen to view its properties and methods. It is a standalone popup version of the Object Browser without the object tree. Using the Object Spy, you can also add objects to the Name Mapping project item and check if an object is in the Name Mapping project item.

To open the Object Spy
Click  Display Object Spy on the Tools toolbar:

Picking onscreen objects in desktop and web applications
Pick the object with the target glyph
-
Drag the target glyph (
 ) to the desired object.
 -
Wait until a red frame appears around the object.
-
Release the mouse button.
Point to the object and fix
-
Click the
 button and then move the mouse pointer to the desired object.
 -
When a red frame appears around the object, press the Select object shortcut, SHIFT+CTRL+A. This shortcut can be changed in the Global Shortcuts options.
| Note: | The elements, which a selection tool highlights, depend on the application type: for Open Applications TestComplete “sees” more than is does with black-box applications. For instance, if you move the selection tool over a web page displayed in Internet Explorer, Firefox, or Chrome TestComplete draws a red frame around the page elements (for instance, the DIV, SPAN, A or IMG tags). This does not happen to pages that are shown in other browsers (for instance, Konqueror), because currently TestComplete can only work with these pages in black-box mode (see Web Testing). |
Picking objects in mobile applications
To explore objects in mobile applications, select the objects from the Mobile Screen window.
Requirements
For TestComplete to access the mobile application and show it in the Mobile Screen window, the application and the mobile device on which it is running must be prepared for testing. The way you do it depends on the target device platform and the technology used to access the device. See one of the following:
Pick the object with the target glyph
-
Drag the target glyph (
 ) to the desired object in the Mobile Screen window.
 -
Wait until a red frame appears around the object.
-
Release the mouse button.
Point to the object and fix
-
Click the
 button and then move the mouse pointer to the desired object in the Mobile Screen window.
 -
When a red frame appears around the object, press the Select object shortcut, SHIFT+CTRL+A. This shortcut can be changed in the Global Shortcuts options.
Exploring object properties, methods, fields, and events
When you select an onscreen object, the window will display the object’s full name, methods, and properties.
Object name
The format of the name depends on:
-
The scripting language of the active project (that is, the project whose items are currently selected in the Project Explorer panel). If there is no active project, the Object Browser panel uses the scripting language specified by the Default language option.
-
(For web objects) Whether the active project is configured to use XPath expressions and CSS selectors to locate objects on web pages. If it is, the list of possible locators is available for objects:

-
(For mobile objects) The mobile support type enabled in the current project. By default, the list of possible locators is available for objects. Otherwise, if the legacy support is enabled, the name is based on internal identification properties.
If there is no active project, the default naming format will be used.
Methods and properties
The methods and properties are organized into categories as in the Object Browser. For more information, see Object Browser Pages.
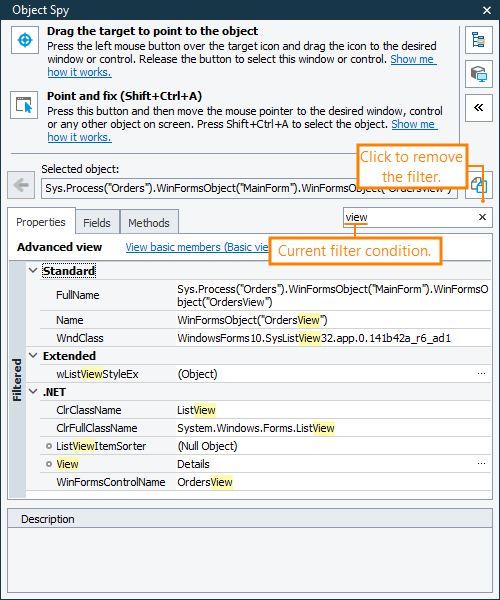
The object that you are exploring in the Object Spy window can contain many properties, fields, methods, and events. Searching for a certain property can be inconvenient. Quick Search simplifies searching for certain items in the Object Spy window. It will filter out the items of the currently opened Object Properties page according to the text that you are typing in the Quick Search edit box. The filter applies both to item names and values:

To remove the filter, erase the text you have typed, or just press the  button.
Note: The Object Spy window may not display all methods and properties of the selected object. This depends on the window view mode. There are two available modes: Basic (only basic members are displayed) and Advanced (all object members are displayed). By default, the Basic view mode is set. To change the mode, click the link in the header of the Properties table. For more information, see Basic and Advanced View Modes.
Note also that protected and private properties are hidden by default. To view them, you should enable the Show hidden members option in the Engines - General Options dialog. See Access to Properties.
Locating the object in the object hierarchy
After capturing an object with the Object Spy, you can quickly find the location of this object in the tree displayed in the Object Browser panel. To do this, either select  Highlight in Object Tree from the context menu of the Object Spy window or click the
  button in this window.
More information on the Object Spy
| To learn more about … | See these topics … |
|---|---|
| Various tasks you can accomplish by using the Object Spy | Working With Object Spy Window |
| Object Spy window’s context menu | Object Spy Context Menu |

 Connecting to Mobile Devices and Opening Testing Sessions