To start working with releases, go to Releases.
Prepare a folder structure
Before creating a release, it is recommended to prepare a logical folder structure for your convenience. To do that, follow these steps:
-
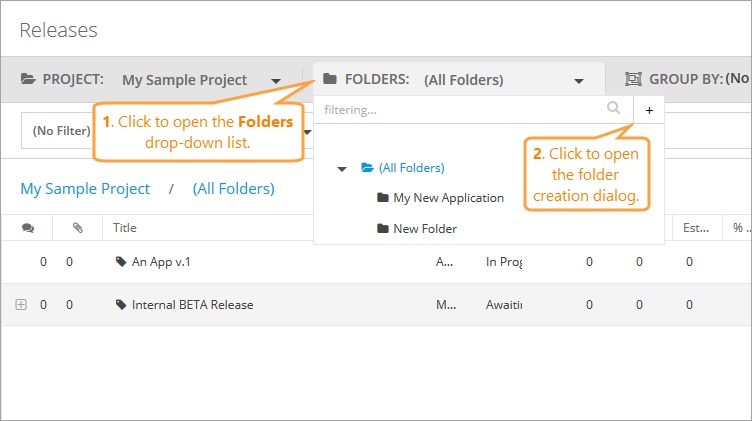
On the Releases screen, open the Folders drop-down list.
-
Click the plus icon.
-
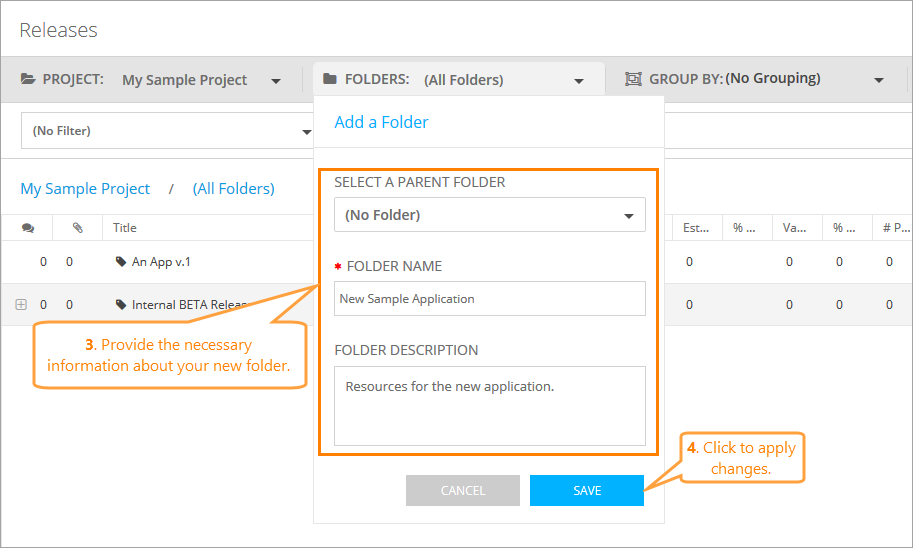
Specify a name for your new folder. Optionally, you can select a parent folder or leave a short description for other users.
Note: To learn more about folders in QAComplete, see Navigation, Folders, and Grouping. -
Click Save.
After that, a new folder will be created. You can select it in the Folders drop-down list to associate your newly created releases, iterations, and builds with that folder.
Create a release
To create a release:
-
On the Releases screen, click Add New.
-
The Create Release form appears.
On the form, specify the name and status for your new release. If you want to specify the start and end dates, also enter them there. In order for QAComplete to automatically calculate the dates using values from your iterations (sprints), select the Automatically Adjust Est Dates check box.
Tip: The required fields are marked with a red asterisk (*). Provide additional descriptive information if necessary. To learn more about the fields available on the Create Release form, see Releases Reference.
For a description of the additional actions you can perform, see below.
-
Once ready, click Save and Close.
Your new release will appear on the Releases screen.
Create iterations and builds
After you create your core release, consider setting up the schedule of iterations or sprints. The way you define these depends on your development method – like Waterfall or Agile.
To create iterations or builds, click the Add New button on the row of the release you need child items for:
The Release dialog appears, offering you to select whether you want to add an iteration or build to the release.

To add an iteration, click Add Iteration.
The Create Release form appears with the parent item and release already specified in the Parent Item and Release fields respectively. Provide all the necessary information about the iteration in the fields.
Once ready, click Save and Close to finish creating the iteration and return to the Releases screen.
If your workflow requires tracking builds within either the release or the sprint, you can add these in the same way as iterations:
-
In the Add Dialog, select Add Build.
-
The Create Release form appears, with the parent release or iteration specified in the Parent Item field and the parent release in the Release field.
-
Describe your new build using the form.
-
Once ready, click Save and Close.
Your new build will appear on the Releases screen.
| Tip: | The fields you use to describe the iteration or build are the same as those you use to describe the release itself. You can learn more about these in Release Reference. |
Edit releases, iterations, and builds
To perform operations with a specific item, click the Edit button on the row of the needed item.
On the Edit form, apply the changes you need to the release, iteration, or build: for example, edit the fields describing the item, attach new mockups and flowcharts, make some comments, and so on. See below for more information.
-
To apply the changes you have made and return back to the Releases screen, click Save and Close.
-
To apply the changes you have made and stay in the Edit Release form, click Save.
-
To revert the changes and return back to the Releases screen, click Cancel.
Delete a release, iteration, or build
To delete a release, iteration, or build, click Delete on the Edit form, then confirm this action in the subsequent dialog.
Miscellaneous actions
To link items
Use the Linked Items panel of the Create or Edit form:
To add comments
To attach files
Switch to the Files tab and do one of the following:
-
Drop the file you need to the panel.
-
Click Choose File and upload a file from your device.
-
Click Add / Link Files and upload the attachment in the subsequent dialog.
| Tip: | Use commands in the Action column to download, open, or delete attachments. |
To view the history of changes
Switch to the History tab of the Edit form, or switch to the Fast Edit History tab to see changes made to the item as part of a bulk.
To learn more about history of changes, see the corresponding topic.
To review and print an item
-
On the item list screen, click the Printer Friendly button on the row of the needed item.
—OR—
-
Click Printer Friendly at the top of the Edit form.
On the review form, QAComplete generates a QR code. Use it to quickly access this item from another device:


Switch to the Notes tab and click Add New: