Navigation, Folders and Grouping

Applies to QAComplete 14.3, last modified on February 19, 2024

In general, QAComplete modules have a very similar interface. After you get familiar with the basic layout and functionality of screens, you will be able to start working with all QAComplete screens.

Main toolbar

At the top of the window, there is the main QAComplete toolbar. Use it to navigate between screens. Move the mouse cursor to the needed section to see the available options, then select the screen you need from the drop-down menu.

QAComplete main toolbar navigation

Click the image to enlarge it.

Folders

Folders allow you to organize your data into logical areas. For example, you can create folders for items that relate to customers, items that describe new functionality to be added to your product and so on.

Create a folder

To create a folder:

  1. Open the Folders drop-down list.

    The Folders drop-down list

    Click the image to enlarge it.

  2. Click the plus icon.

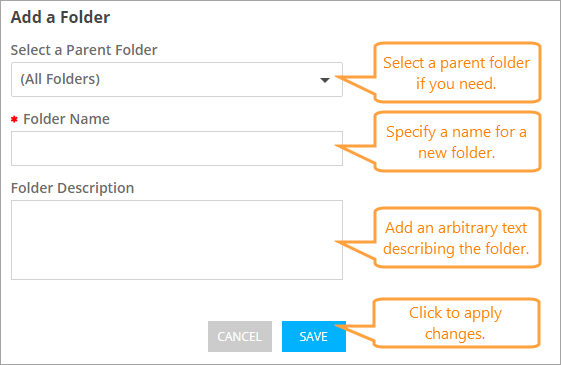
  3. In the subsequent Add Folder dialog, specify a name for the new folder in the Folder Name field.

    The Add a Folder dialog

    Click the image to enlarge it.

    Optionally, you can specify a description in the Folder Description edit box or a parent folder in the Select a Parent Folder drop-down list.

  4. Click Save.

  1. In the navigation panel on the left, switch to the Folders tab.

    The Folders tab

    Click the image to enlarge it.

  2. Click Add.

  3. Specify a name for the new folder in the Folder Name field.

    The folder creation form

    Click the image to enlarge it.

    Optionally, you can specify a description in the Description edit box or a parent folder in the Select a Parent Folder drop-down list.

  4. Click Submit.

Add items to folders

To add an item to a folder:

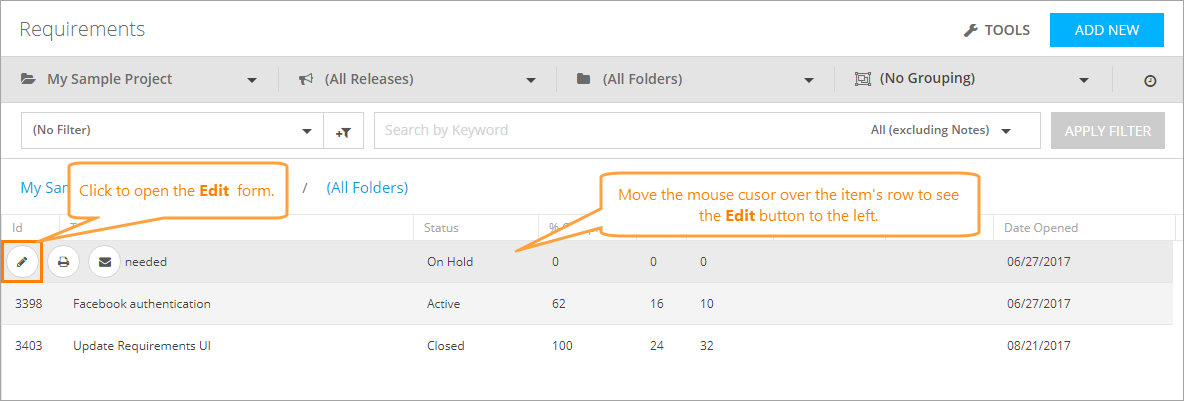
  1. On the item list screen, move the mouse to the item you need and click the Edit icon that appears to the left of it to open the Edit form.

    The Edit button

    Click the image to enlarge it.

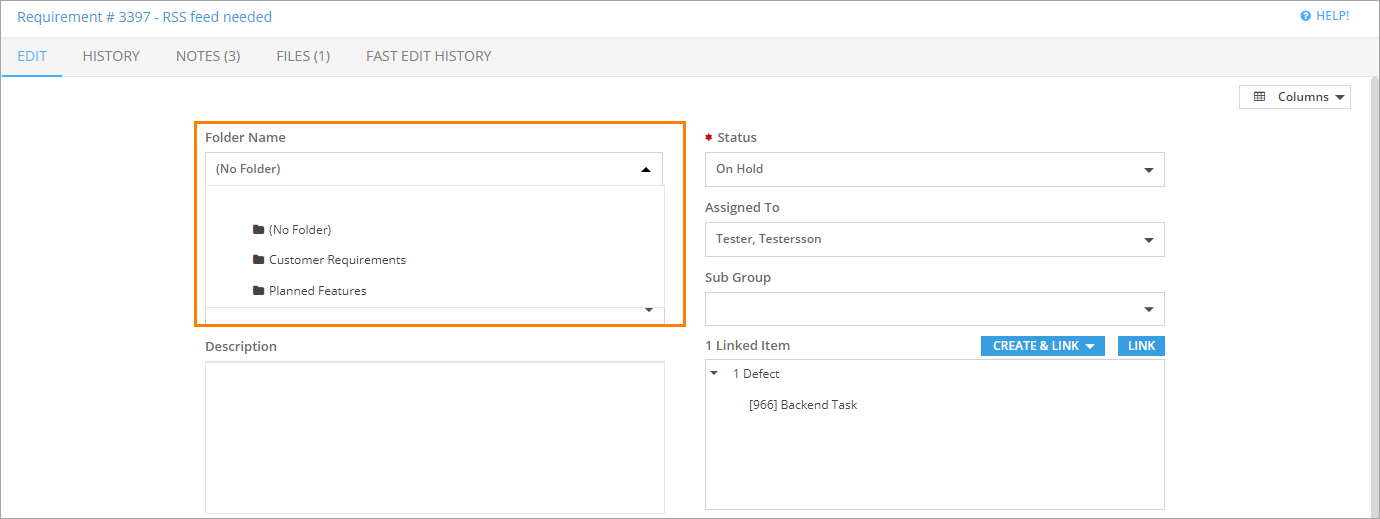
  2. On the Edit tab of the Edit form, select the folder in the Folder Name drop-down list.

    The Folder Name drop-down list on the Edit form

    Click the image to enlarge it.

  3. Click Save and Close.

  1. On the item list screen, click Edit this record next to the item you want to move to the folder.

    The Edit button

    Click the image to enlarge it.

  2. On the Edit form, select the folder in the Folder Name drop-down list.

    The Folder Name drop-down list on the Edit form

    Click the image to enlarge it.

  3. Click Save.

To move multiple items at once:

  1. On the item list screen, click  Fast Edit in the  Tools (Actions) menu.

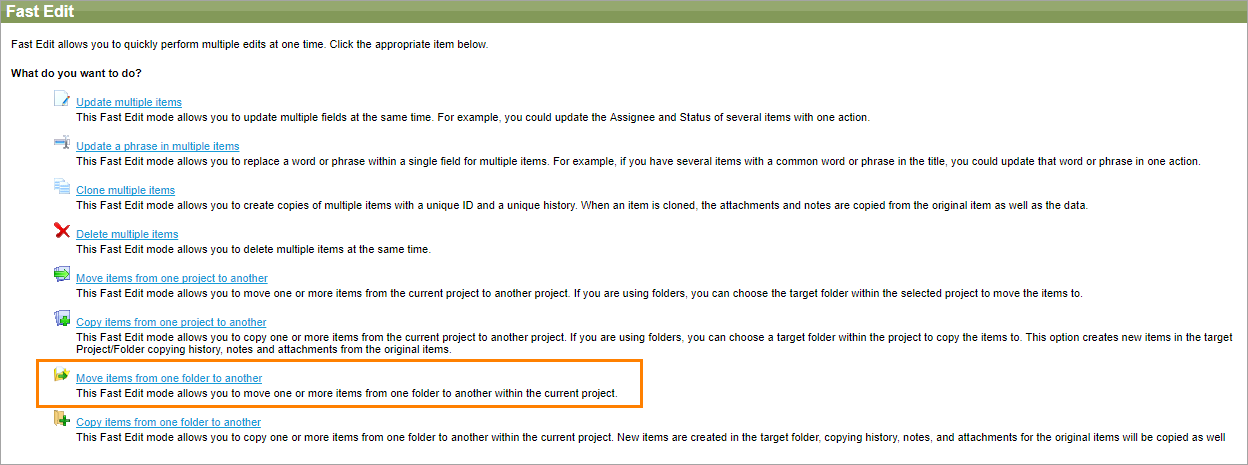
  2. Click Move items from one folder to another.

    The Fast Edit page

    Click the image to enlarge it.

  3. Select items in the left panel, then drag and drop them to the folder you need in the right panel.

    Fast Edit: Move items from one folder to another

    Click the image to enlarge it.

  4. Confirm your action in the subsequent dialog.

Note: To learn more about the Fast Edit feature, see the corresponding topic.

Edit folders

To edit folder parameters:

  1. Open the Folders drop-down list.

  2. Move the mouse cursor to the name of the folder you want to edit.

  3. Click the edit icon.

    The Edit icon

    Click the image to enlarge it.

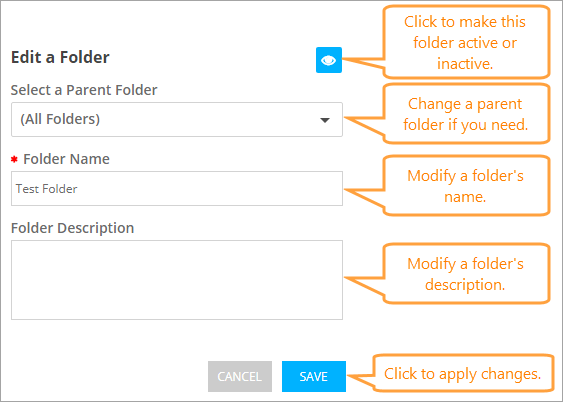
  4. In the subsequent Edit Folder dialog, make the changes you need.

    The Edit a Folder dialog

    Click the image to enlarge it.

  5. Click Save.

Inactive Folders and Items

You can make a folder inactive, that is, you can archive it and hide it from the UI. For this purpose, click the  icon in the Edit Folder dialog. No data will be deleted.

By default, the inactive folders and the items the folders contain disappear from the Folders drop-down list. To make the inactive folders visible, click  Tools >  Show Inactive.

To restore a folder, open the Edit Folder dialog for that folder and click the  icon again so that it becomes blue.

  1. In the navigation panel on the left, switch to the Folders tab.

  2. Select the folder you want to edit.

  3. Click Edit.

    The Edit button

    Click the image to enlarge it.

  4. In the subsequent form, make the changes you need.

    The folder editing form

    Click the image to enlarge it.

  5. Click Submit.

Tip: You can make a folder inactive, that is, you can archive it and hide it from the UI. For this purpose, unselect the Is Active check box. No data will be deleted. To restore the folder, simply open the Edit form for that folder and check Is Active again.

Copy a folder structure

To copy a folder structure to another location:

  1. Open the Folders drop-down list.

  2. Move the mouse cursor to the name of the folder whose structure you want to copy.

  3. Click the Copy icon.

  4. (Optional) If needed, go to the screen you want to paste the folder to, then open the Folders drop-down list there.

  5. Move the mouse cursor to All Folders or to the the folder you want to use as a parent for the copied structure.

  6. Click the Paste icon.

  1. Right-click the folder name in the navigator panel.

  2. In the context menu, select Copy Folder Structure.

  3. Go to the screen you want to paste the folder to.

  4. Right-click somewhere within the Folders tab or on a folder title (this folder will become the parent of the pasted folder).

  5. Select Paste Folder Structure in the context menu.

Delete a folder

To delete a folder:

  1. Open the Folders drop-down list.

  2. Move the mouse cursor to the name of the folder you want to delete.

  3. Click the delete icon.

    The Delete icon

    Click the image to enlarge it.

  4. Click Delete in the subsequent dialog.

  1. In the navigation panel on the left, switch to the Folders tab.

  2. Select the folder you want to delete.

  3. Click Delete.

    The Delete button

    Click the image to enlarge it.

  4. Confirm the action in the subsequent dialog.

Note: If you delete a folder, the data stored in the folder will not be deleted. The folder name will simply be removed from the properties of the items, and these items will appear in the root folder. You can then add them to another folder.

Grouping

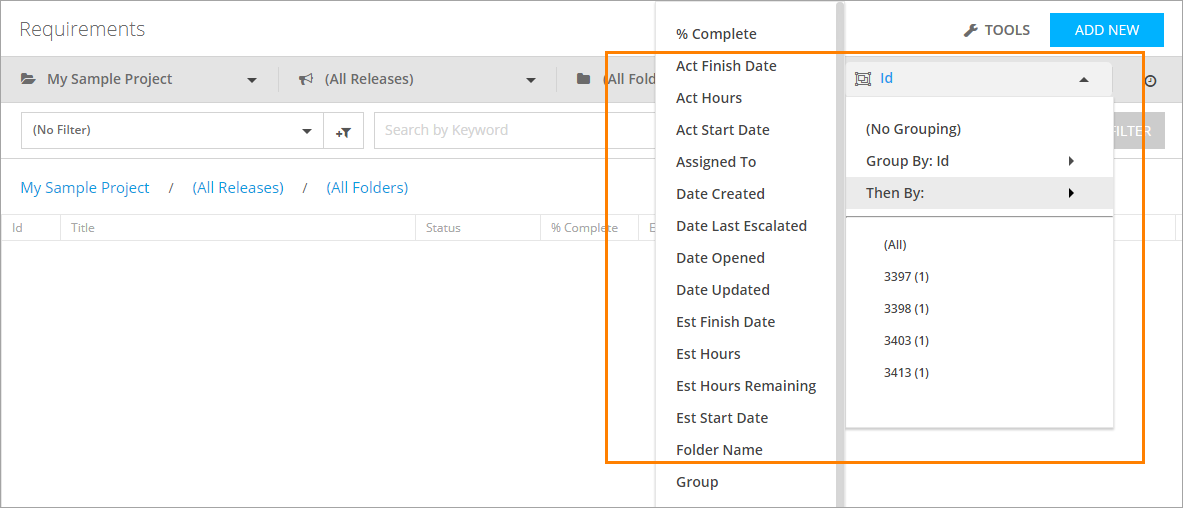
You can use the grouping feature to quickly sort requirements using up to three levels of grouping:

  1. On the item list screen, open the Group By drop-down list.

  2. Select level 1, level 2, and level 3 grouping.

    The Grouping feature

    Click the image to enlarge it.

  1. On the item list screen, switch to the Groups tab in the navigation panel on the left.

  2. In the Group By drop-down list, select level 1, level 2, and level 3 grouping.

    The Grouping feature

    Click the image to enlarge it.

  3. Switch between the groups by selecting the needed one in the panel.

Sort a list

By default, the item list is sorted by numeric identifiers of the items. There are multiple ways to sort the list:

  • Click the name of any column to sort the items by the values of that column in ascending order. Click twice to sort in descending order.

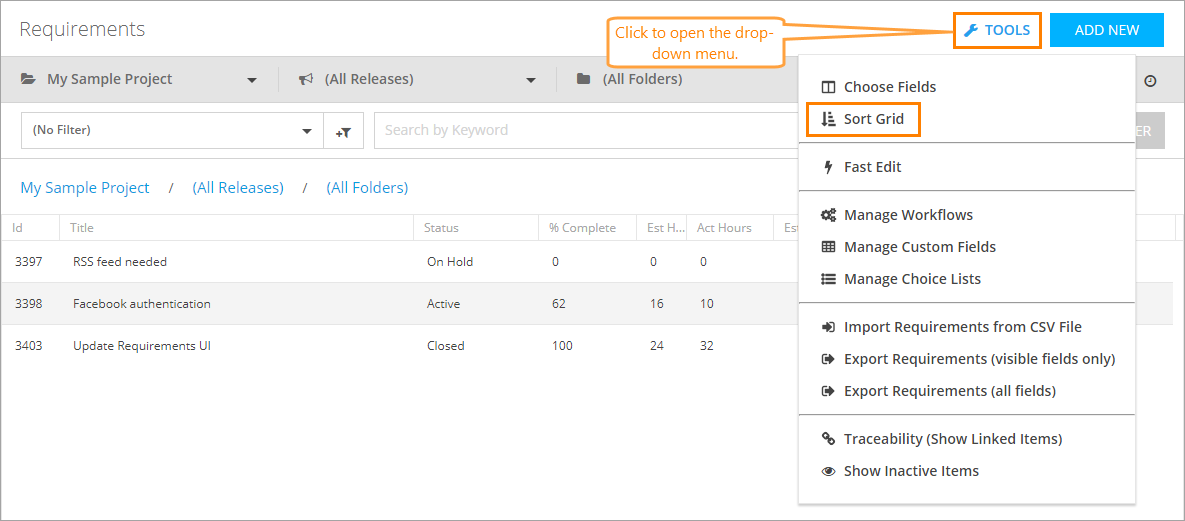
  • Click  Tools (Actions) and select  Sort Grid.

    The Sort Grid menu item

    Click the image to enlarge it.

    The Sort Grid menu item

    Click the image to enlarge it.

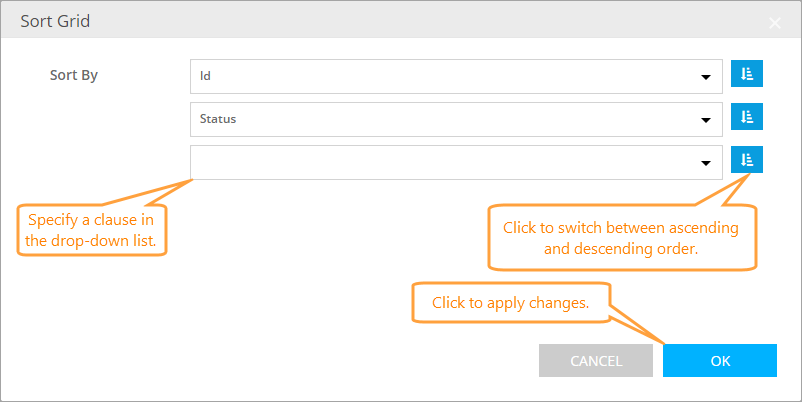
    On the Sort Grid form, specify up to 5 levels of sorting and select the type of the order for each clause.

    The Sort Grid dialog

    Click the image to enlarge it.

    The Sort Grid form

    Click the image to enlarge it.

    Click OK to apply the changes and sort the list.

See Also

Linked Items
Bulk Edits
UI and Tasks

Highlight search results