A UI test (or web test, or script) is a sequence of user actions that LoadNinja uses to simulate virtual user behavior on the tested web application. To view the contents of UI tests you create, use the LoadNinja UI test recorder.
Open the recorder
At design time
-
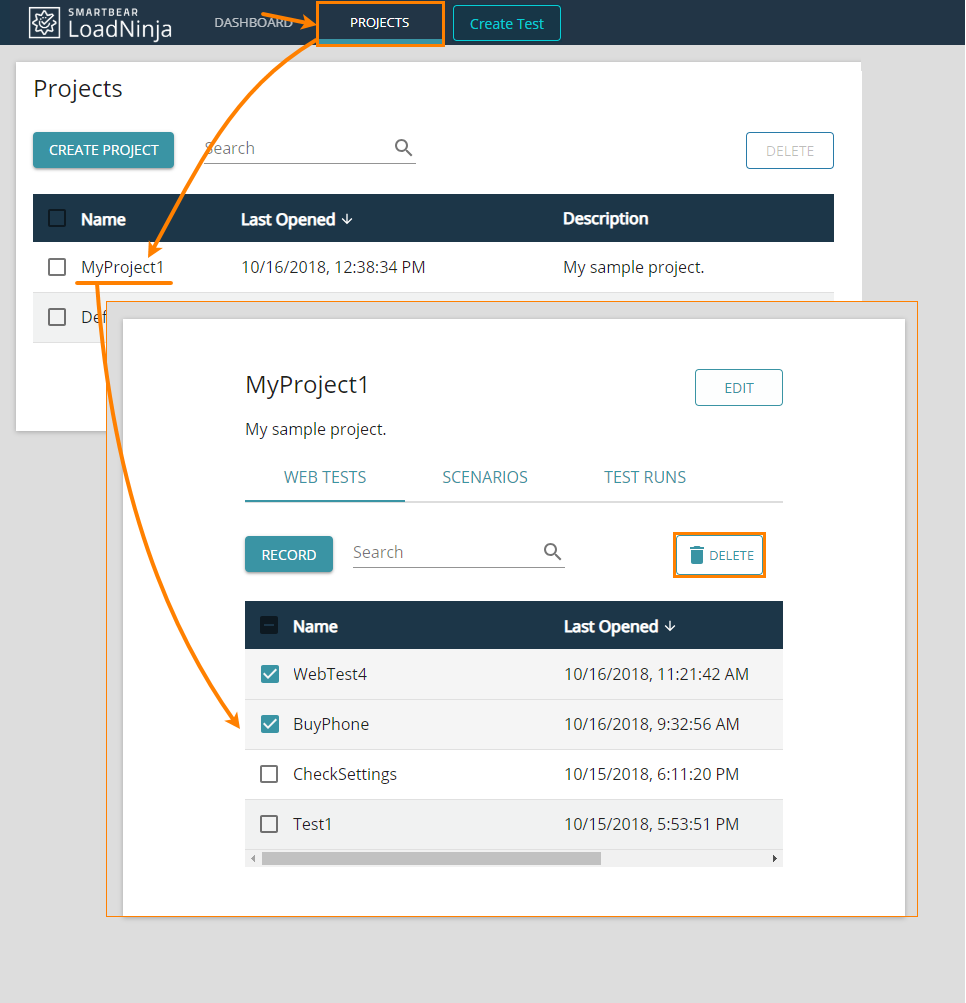
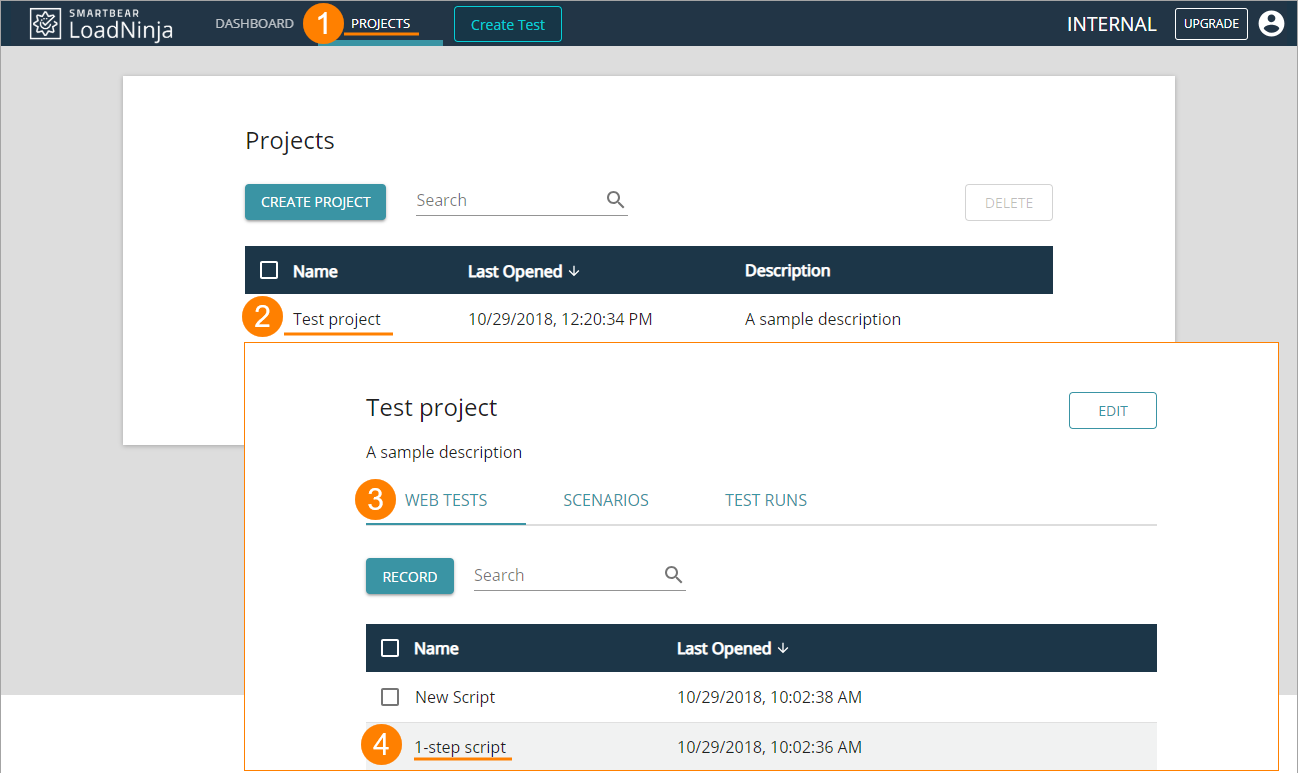
Click Projects at the top.
-
Click a project name to view all tests in that project.
-
Click the UI test name.
During recording
LoadNinja opens the test recorder automatically after you start recording. As you record actions in your web application, they will appear in the test recorder.
Recorder layout
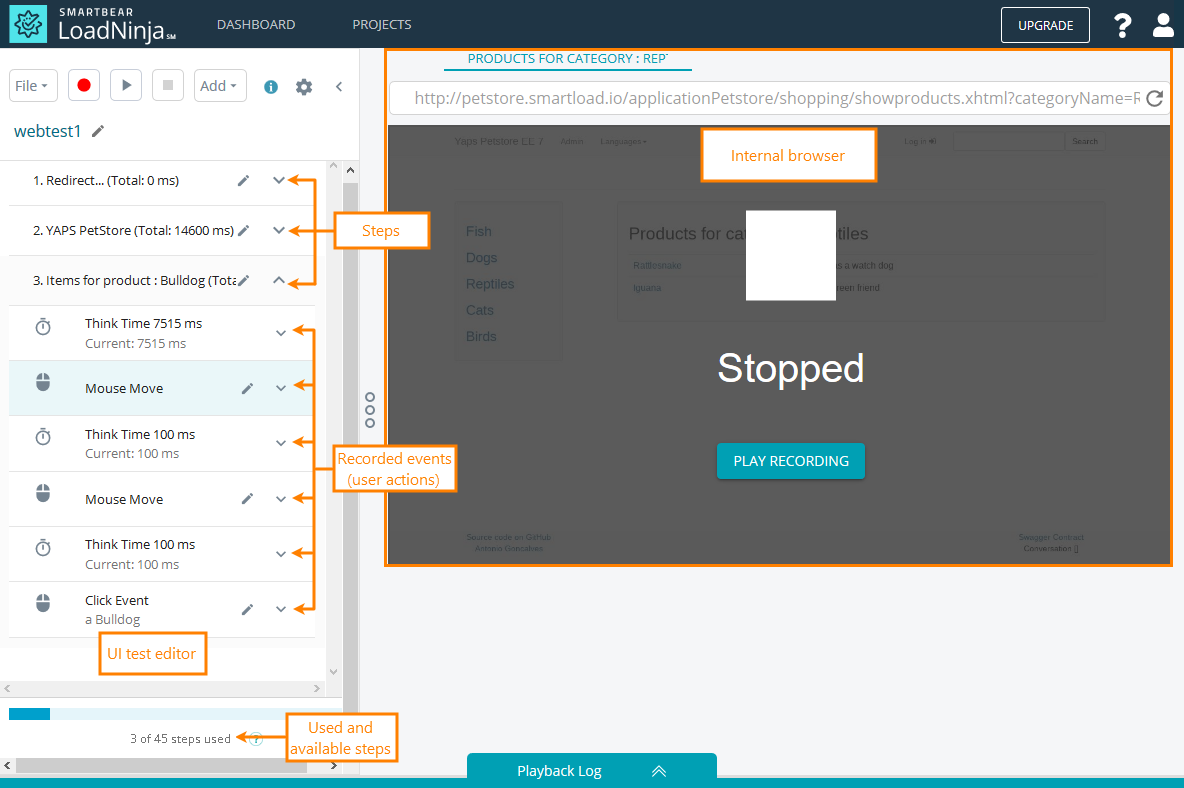
The test recorder consists of two parts. The left side displays your test, individual test steps and events. The right side is an embedded web browser, where you record actions against your web application, and where you watch it during the test playback.
A UI test consists of steps, which consist of events. Steps usually correspond to individual web pages in an application, and events correspond to user actions such as link clicks or keyboard input (see below).
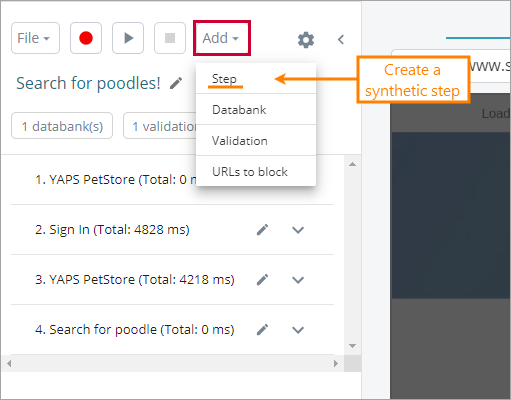
LoadNinja records a new step when the URL in the browser address bar is changed. To insert a new step manually, click Add > Step. This is especially helpful when recording tests for single-page applications (SPA) where the URL does not change.
| Note: | The maximum number of test steps for a load test scenario is 60 regardless of the plan you have. If a scenario uses several UI tests, the total number of their steps should not exceed this number. This limit means that a UI test can have 60 steps maximum. You can see the number of used and available steps during test recording at the bottom of the test editor. The total number of used steps is visible in the Scenario editor. |
Recorded events
LoadNinja records the following event types:
- Mouse movements
- Clicks of the left mouse button (clicks on links and buttons, or anywhere on a page)
- Clicks of the right mouse button
- Scrolling events
- Keyboard input events (including keystrokes of navigation keys and keyboard shortcuts, see below)
- File upload events (see Upload Files)
- “Think Time” events (they indicate pauses between user actions)
Notes:
-
For click events, LoadNinja records the text of the link or button you clicked. This text serves as an event label and helps you navigate through events in your test. You can change it later, if needed. See below.
-
LoadNinja records right-click events if they cause some further action like opening a page or popping up a dialog box. Right-clicks that open the context menu of a browser are not recorded.
-
The recorder detects pressing some navigation keys and keyboard shortcuts, provided that your web application supports them (both on Windows and on macOS):
For information on editing event parameters, see below.
Toolbar
| Item | Description |
|---|---|
| File |
The File drop-down menu includes the following commands:
|
| Record | Start recording a new UI test. |
| Playback | Run the recorded test. Note: If the test run completes successfully, you can run a load test based on the executed UI test from the Playback Results dialog. |
| Stop | Stop recording. |
| Add |
The Add drop-down menu includes the following commands:
|
| Settings | View or change the test settings. |
Record more actions
Watch this video:
To record more actions and append them to the test:
-
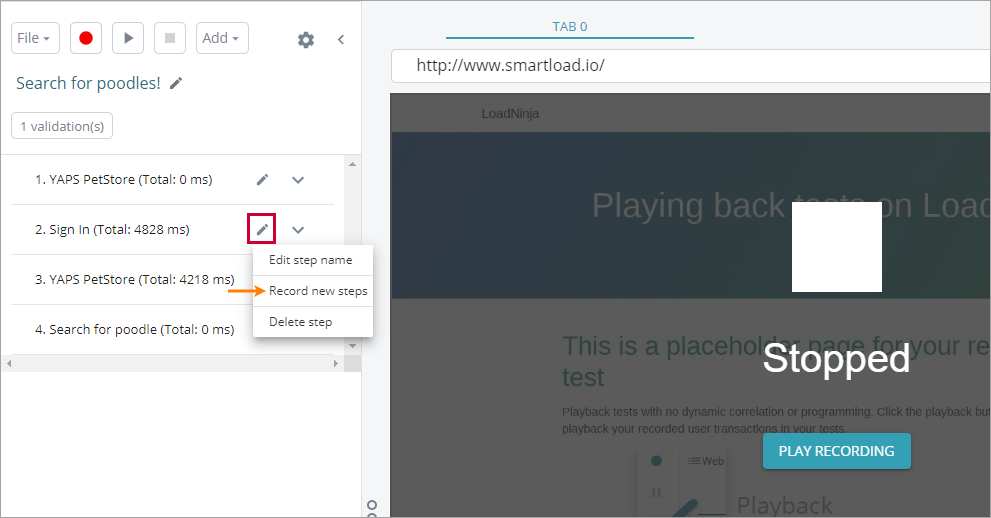
Locate the baseline item in the list on the Steps tab.
You can record actions and add them to test after or before:
- existing steps,
- Click events,
- Keyboard input events.
-
Click and select Record new steps (or Record new actions) from the drop-down menu:
-
In the subsequent dialog, choose whether you want to record a new action before or after the baseline item:
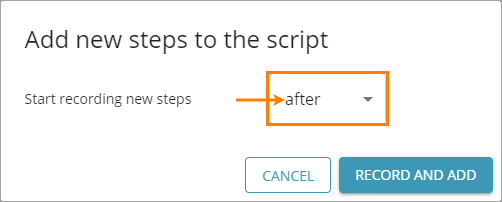

You cannot add a step before the first step. -
Click Record and Add.
-
LoadNinja will replay the UI test from the beginning until the playback reaches the required point.
-
Record the needed actions as usual.
-
Click Playback to run the modified UI test and see if it works correctly.
-
Select File > Save on the toolbar to save your changes.
Edit event parameters
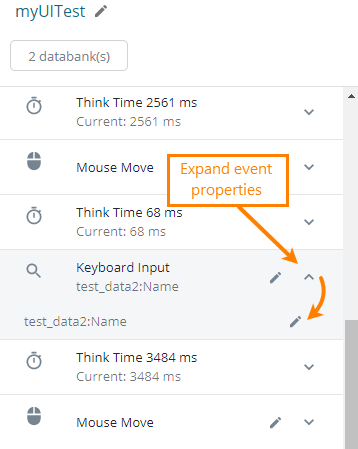
To view event parameters, simply expand the event item. Some events provide read-only access to their parameters. Some others support editing.
Think Time and Keyboard Input events
-
Find the needed event in the editor and expand its parameters.
-
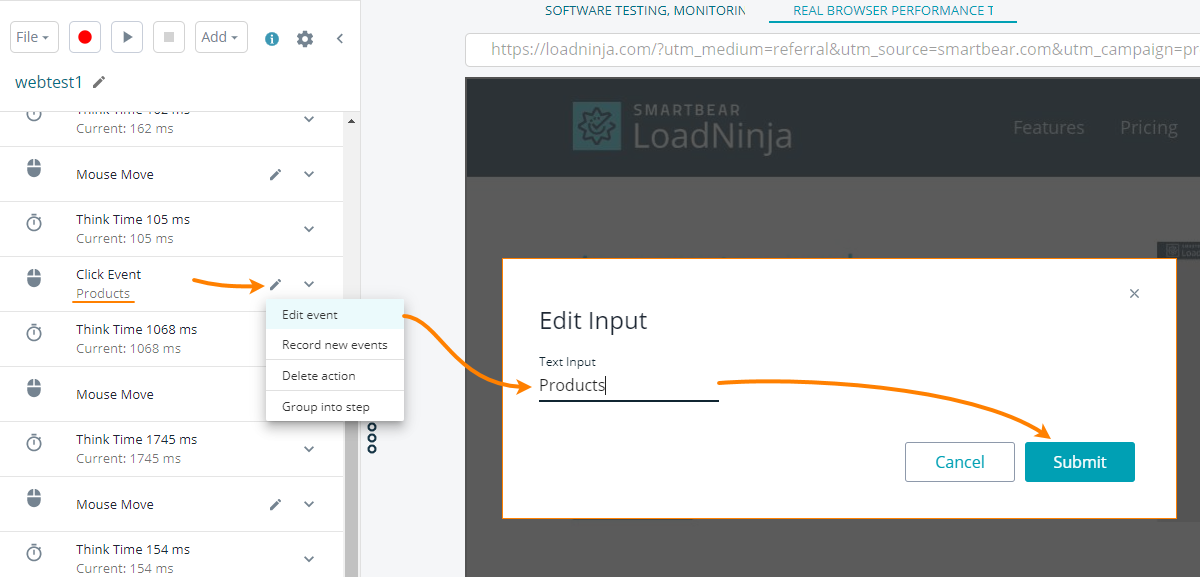
Click next to the parameter, enter a new value, then click Submit.
Tip: To map the value of a Keyboard Input event to an external databank, click Map to External Databank in the dialog.
Click events – Change target
-
Find the needed event in the editor and expand its parameters.
-
Select the preferable way of identifying the click target on the page.
To command LoadNinja to select the optimal method of object recognition using its AI capabilities, select the Let LoadNinja AI decide check box.

To enable the AI object identification for the whole UI test, click on the recorder’s toolbar. In the subsequent dialog, select Let LoadNinja AI decide in the Object identification drop-down list. To specify the target object manually
Select one of the following options:
-
Use XPath — LoadNinja identifies an object in the page’s DOM using an XPath expression that refers to the object's index within the document hierarchy.
For example, the following expression refers a link located in the header of a specific block element:
//html[1]/body[1]/div[2]/h1[1]/a[1] -
Use Optimized XPath — LoadNinja identifies an object in the page’s DOM using an XPath expression that refers to the object or its parent unique identifier (the
idattribute), where it is possible.For example, the following expression refers a link located in the header of the
sampleelement, specified by its ID://*[@id="sample"]/h1/a -
Use CSS Selectors — LoadNinja identifies an object in the page’s DOM using a CSS selector.
For example, the following expression refers a link located in the header of a specific block element:
:nth-child(4) > h1 > a -
Use Screen Coordinates — Use
xandzcoordinates of the object.The coordinate line consists of two numbers, for example:
(95, 105)The first number refers the
xaxis, the second — theyaxis.
-
Click events – Change label
Manage events and steps
Synthetic steps
There are cases when you need to group actions within your UI test logically. For example, the website you test might show a dialog window with a form. To logically separate the actions you perform while filling in the form from other actions, create a synthetic step — a logical block that combines the actions you perform with the form.
| Note: | It is also possible to create synthetic steps while recording a test, for example, to mark the difference between pages while testing against single-page applications. To learn more about this feature, see Test Single-Page Applications. |
To create a synthetic step during recording
-
Select Add > Step on the toolbar of the UI test editor:
-
In the subsequent dialog, name the step as you like:
 Another way to create synthetic steps is to group recorded events and actions. To learn more about this functionality, see below.
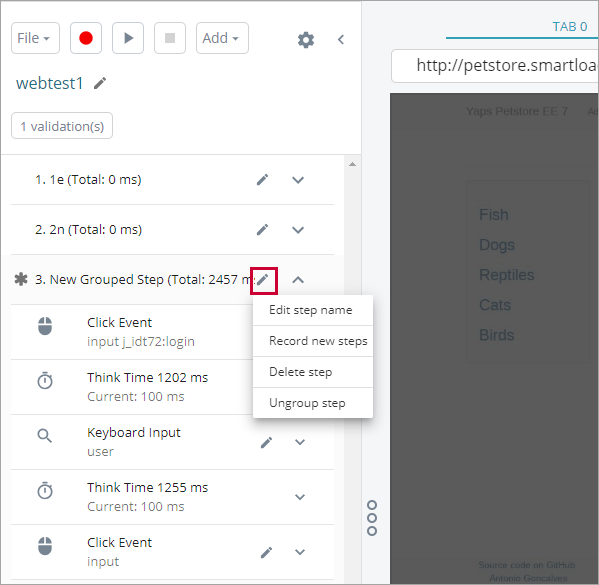
All synthetic steps are marked with the icon in the step list.
To group existing actions and events into a synthetic step
-
Locate one of the events you want to include in the synthetic steps, in the step list.
-
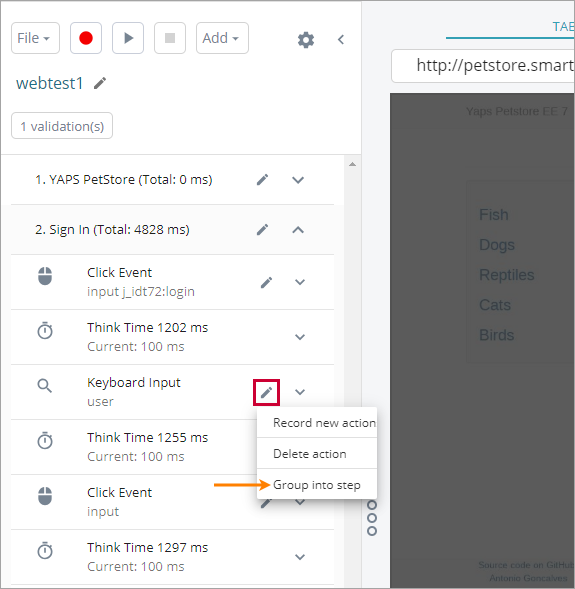
Select > Group into step:
-
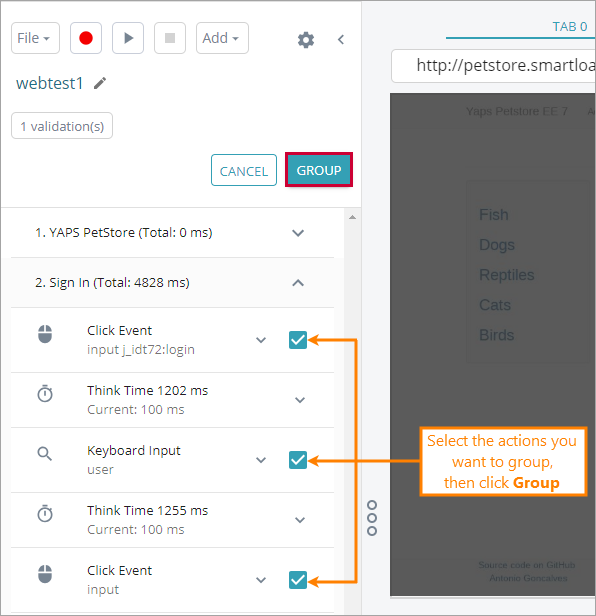
LoadNinja will enable the grouping check boxes. Select the ones near the events you want to group into step:
-
Click Group.
-
(Optional) To rename the step, select > Edit step name, specify a new name in the edit box, then press Enter.
| Note: | All actions and events within a specific step that you have not explicitly added to a synthetic step, LoadNinja will automatically collect into another synthetic step. |
To rename a synthetic step
-
Locate the synthetic step you want to rename.
-
Select > Edit step name.
-
Specify a new name in the edit box.
-
Press Enter.
To ungroup a synthetic step
By ungrouping, you remove the synthetic step from the step list. This action does not affect the events and actions that the step contains. All of them will be preserved and moved to the step above.
-
Locate the synthetic you want to ungroup, that is, remove from the step list.
-
Select > Ungroup step.
To learn how to delete a step completely, along with all actions and events it contains, see Delete events or steps.
Delete events or steps
Select > Delete next to the step or event you want to delete.
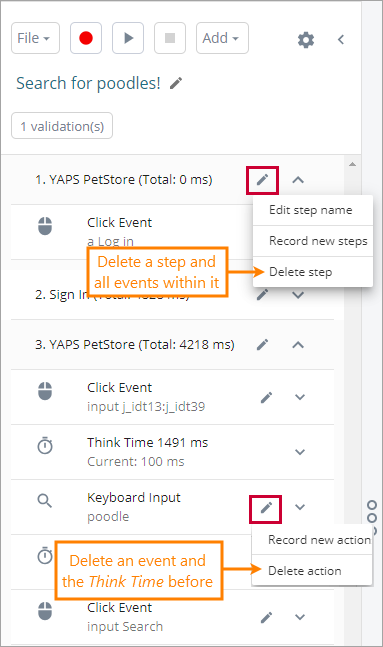
Notes:
-
Deleting a step deletes all events in it.
-
Deleting a keyboard or mouse event also deletes the Think Time command before it.
Upload files
In LoadNinja, you can upload files to your tested web application during test recording. This may be needed if, for example, your application requires that users upload some files to the application and you want to test this functionality. See Upload Files for more information.
Block URLs
You can command LoadNinja to block requests to certain resources while replaying UI tests in the recorder or during load test runs. These resources may include unwanted advertisement banners, tools you use to gather visitor statistics (such as Google Analytics), and so on.
To provide a list of such unwanted resources, select Add > URLs to block on the recorder’s toolbar. For more information, see Block URLs.
Playback log
You can find the log at the bottom of the UI test editor. You use it to check how the test engine simulates events during the test playback.
To learn more about the log, see Playback Log.
More actions
To rename a UI test
-
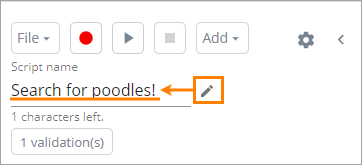
Click next to the test’s name.
-
Enter a new name for the UI test and press Enter:
To save a test under another name
-
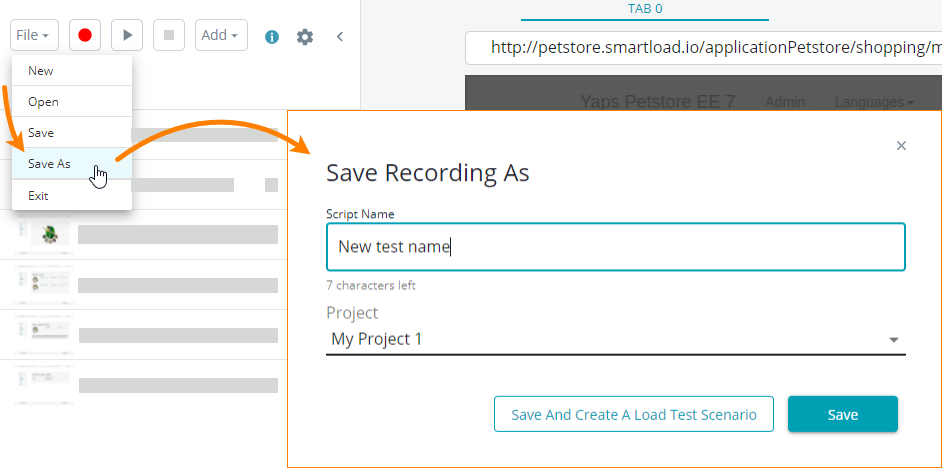
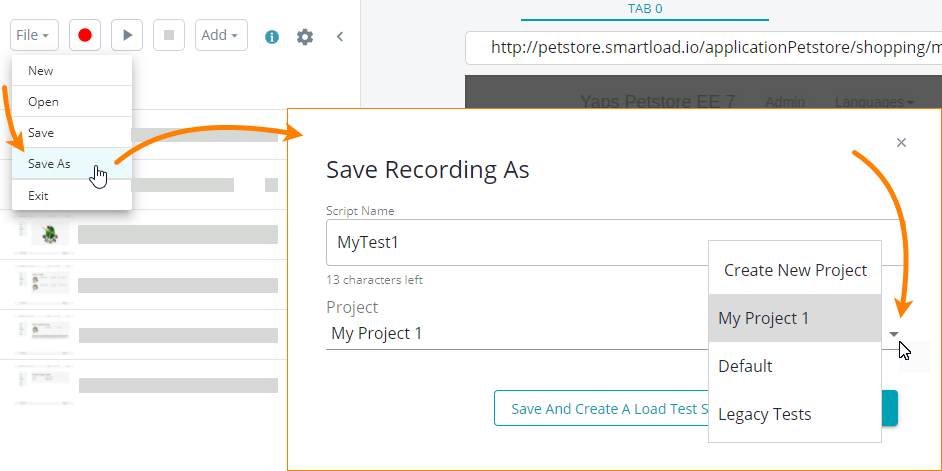
Select File > Save As on the toolbar.
-
Enter a new name for the test, and click Save:
To move a test to another project
-
Click File > Save on the toolbar.
-
Select the target project, optionally, enter a new name for the test, and click Save:
To delete a test
See Also
UI Tests (or Scripts)
Validations
Attach Databanks to UI Tests

 A list of supported keys and keyboard shortcuts