In this topic:
Why Recording Is Needed
LoadComplete simulates a user activity on the tested web application by simulating requests that a user’s browser sends to the tested web application.
To tell LoadComplete what requests to send, in what order and what parameters to use, you record the traffic between your browser and the tested server in form of a user scenario. LoadComplete then plays back the scenario to simulate user behavior on the tested web server. That is, scenario recording helps us easily get a sequence of requests that realistically emulates user activity on the tested web application.
How LoadComplete Records Traffic
During recording, LoadComplete acts as a proxy between your web browser and the tested web server. All the requests go through LoadComplete so that it is able to track and to record them. When you start recording, LoadComplete automatically configures your system to use the LoadComplete proxy to communicate with the network. LoadComplete will restore your system proxy settings after the recording is over.
Before Recording
Typically, recording traffic on a local computer does not require any special preparations. However, to record traffic on mobile devices, you need to prepare them for this. In certain cases, you may need to prepare your computer, web browser and LoadComplete for recording. For complete information, see Preparing for Recording.
Starting Recording
- Click Record New Scenario on the Start Page.
– or – - Select Test | Record Scenario from LoadComplete main menu.
– or – - Click
 Record User Scenario on the Test Engine toolbar (if the toolbar is hidden, right-click somewhere within the toolbar area and choose Test Engine from the ensuing toolbars list).
– or – - Right-click the Scenarios collection in the Project Explorer and select
 Record User Scenario from the context menu.
– or – - Press the shortcut specified by the Record setting in the Global Shortcut Options dialog. By default, the shortcut is Shift+F1.
Configuring Recording Settings
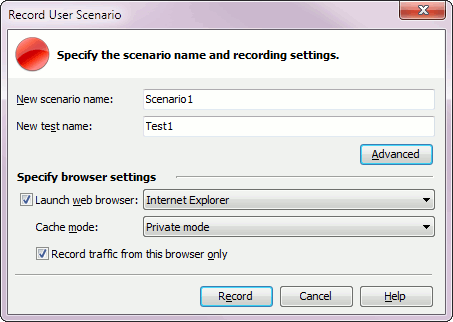
Any of the actions mentioned above will open the Record User Scenario dialog:

In the dialog, you specify a scenario that will store the recorded traffic and configure other recording settings –
 Configuring Recording Settings in the Record User Scenario Dialog
When you start recording, LoadComplete checks whether your recording settings match the recommended settings. If they differ, it displays a message informing you about this and suggesting that you set the recommended values and continue. You can start recording with your current settings, if needed.
During Recording
-
After you click Record in the Record New Scenario dialog, LoadComplete will switch to the recording mode and show the Recording toolbar on the screen:

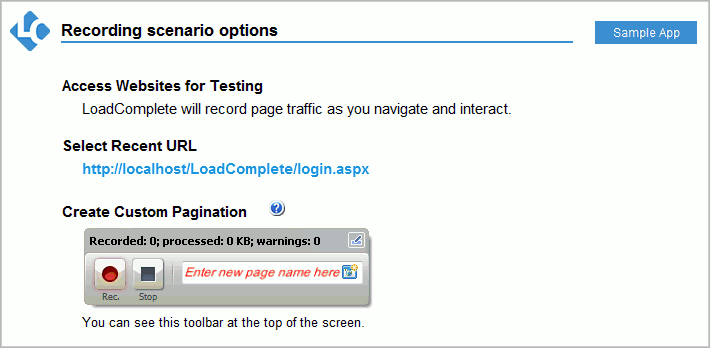
If you selected a web browser to start, LoadComplete will launch that browser and will open the Recording Scenario Options page in it (this page resides on your local computer and is not recorded):
Use this page as a helper for recording. On the web page, you can:
-
Navigate from it to the needed web page. Type the needed URL in the browser’s address bar.
-
Select one of the recent web pages for which you have recorded scenarios.
-
Navigate to the sample Web Orders application shipped with LoadComplete to record a scenario for the application. To do this, click Sample App.

We would like to pay your attention to the action you may need to perform after you see the “Recording Scenario Options“ page and before you start interacting with the tested web server. LoadComplete automatically organizes recorded requests and responses into pages. Automatic pagination is available only if you record traffic on the local computer. If needed, you can use custom pagination. To do this, before you start interacting with the tested web server, enter a name for a custom page in the Custom page name text box on the Recording toolbar. This will activate the custom pagination mode. LoadComplete will record subsequent requests as belonging to this page. If you need to create another page, enter its name again. For more information on this, see Recording Custom Pages.
-
-
To record a scenario, simply navigate to the tested web application in the browser on your computer or on your mobile device. Work with the application as a regular user will do this. When your operations are over, close the browser and stop recording (see below on how to do this).
-
If you have configured LoadComplete to record traffic to a new scenario, it will add a new scenario to the Scenarios collection of your project and will open the Scenario editor. Otherwise, it will open the existing scenario to which you append traffic.
-
As you record actions, you can see the recorded requests in this editor.
The Recording toolbar caption will show the following information:
- The number of recorded requests and WebSocket messages.
- The amount of request and response data processed (in kilobytes).
- The number of warnings detected.
Stopping Recording
- Click
 Stop on either the Recording or Test Engine toolbar.
– or – - Select Test | Stop from the LoadComplete main menu.
– or – - Press Shift+F2 (you can customize the shortcut in the Global Shortcuts dialog).
 |
To download a web page and its resources, modern browsers create several connections to the web server. Typically, browsers do not close connections after downloading a page. They keep them alive and use for subsequent downloads. Unlike browsers, LoadComplete closes connections when it stops traffic recording. Because of this, a browser that you have used for traffic recording may behave incorrectly. To avoid this, we recommend closing the browser before stopping the recording. |
After the Recording
If your recorded scenario includes dynamic parameters that LoadComplete correlate, LoadComplete will show the Correlate Request and Response Parameters wizard.
If the recorded scenario includes WebSocket traffic, LoadComplete will show a notification informing you that it has disabled all recorded server messages. See more on this.
Viewing Recorded Traffic
After the recording is over and after the parameters parameters are correlated, you can view the recorded traffic in the Scenario editor. See Viewing Recorded Requests and Responses.
By default, LoadComplete disables requests with 4xx and 5xx response codes in the recorded scenario. These response codes indicate client and server errors. Disabling the requests excludes them from traffic simulation. In this case, the recorded scenario will run successfully. To change the default behavior, configure the LoadComplete Recording settings.
Recording – Specifics
See Also
Recording User Scenarios
Recording Custom Pages
Recording Parallel Requests

