BitBar monitors run scripts on real mobile devices in BitBar. Each monitor runs a specific test run from your BitBar account, on one or more devices. You can configure the run interval and other settings. For a detailed guide on BitBar monitoring, see BitBar Mobile Monitoring.
| Note: | Only Admin, Co-Admin, and Power Users can change monitor settings. |
Common
Name (or Site Name in AlertSite 1.0)
The monitor name that appears in dashboards and reports. For example, Customer Login.
Monitor ID (in AlertSite UXM)
Read-only. The monitor ID that can be used in AlertSite APIs.
Enable Monitoring (or Monitoring Is in AlertSite 1.0)
AlertSite UXM
On the Main tab, select or clear the Enable Monitoring check box to enable or disable monitoring.
AlertSite 1.0
Set Monitoring Is to Enabled to enable the monitor or Disabled to disable it.
Monitor ID (in AlertSite UXM)
Read-only. The monitor ID that can be used in AlertSite APIs.
Name (or Site Name in AlertSite 1.0)
The monitor name that appears in dashboards and reports. For example, Customer Login.
Enable alerting
AlertSite UXM
Enable availability or performance alerts on the Alerts tab.
AlertSite 1.0
Set Notify on Error to Yes to enable availability alerts for this monitor or No to disable availability alerts. Performance alerts are configured separately by clicking the Performance Alerts button in the top row.
Custom Properties
This section shows custom properties defined for your monitor. You can select a value for each property from the predefined list.
Configuration
Basic
Measurement Plan (or Site Plan in AlertSite 1.0)
The monitoring plan used for this monitor.
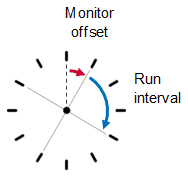
Run Interval (Minutes) (or Check Every in AlertSite 1.0)
How often the monitor runs your BitBar test run.
The offset from the beginning of an hour, when the run starts. Use offsets to spread the monitoring over an hour between the various devices you have, so that no two monitors try to access the same device at the same time. For a 120-minute monitor, offsets 1-60 mean it will run on even hours (8 AM, 10 AM, and so on), offsets 61-120 – on odd hours (7 AM, 9 AM, and so on).

Examples:
| Run interval, min | Offset, min | Monitor runs at ... |
|---|---|---|
| 60 | 10 | 9:10, 10:10, 11:10, ... |
| 20 | 5 | 5, 25 and 45 minutes past hour |
| 120 | 15 | 6:15, 8:15, 10:15, ... |
| 120 | 75 (1 hr 15 min) | 7:15, 9:15, 11:15, ... |
Allow AlertSite QA Testing (Disallow AlertSite QA Testing in AlertSite 1.0)
Before releasing AlertSite updates, SmartBear runs regression tests to make sure that both existing and new functionality work correctly. Select (or clear in AlertSite 1.0) this check box to include or exclude your monitor in SmartBear regression testing, so we can make sure your monitors will work correctly after AlertSite updates. Participation is voluntary.
AlertSite UXM
You can set the default value for new monitors in > Settings > Preferences > Monitor Defaults.
AlertSite 1.0
To set the default testing behavior for all new monitors, use the Default new devices to option in Account > Manage Account > Preferences.
BitBar Settings
Project
The name of the project that stores the test run.
Device Group
The device group selected to run the test run.
Framework
The framework used in the test run.
API Key
Your BitBar API Key.
Hostname
The host name of your BitBar host. For example, cloud.bitbar.com.
Run Configuration
Enter the BitBar test run configuration.
Monitor Alerts
You can configure availability and performance alerts for the monitor. To receive alerts, you need to have alert recipients configured. By default, the monitor sends alerts to all configured recipients, but you can target alerts to specific recipients by using recipient groups.
Recipient Groups (or Notifier Groups in AlertSite)
Select the recipient groups that will receive alerts from this monitor. The recipient groups must have been previously created in Alerts > Alert Recipients (or Notifiers > Notifier Groups in AlertSite 1.0).
 |
If the monitor is not assigned to any recipient group, it sends alerts to all the recipients configured in your AlertSite account. |
| Note: | Adding a monitor to the recipient group overrides any step-level associations for that recipient group. So if you want to add individual steps to a group, remove the monitor from that group first. |
Availability Alerts
Select this to send alerts when the monitor detects errors like timeouts or failed checkpoints. The monitor status turns red in these cases.
Alert Notes
Monitor-specific notes that can be included in email and JSON alerts (availability alerts only), up to 1000 characters long. To add these notes to alerts, you need to configure alert templates to include the $ALERT_NOTE variable. For details, see Adding Monitor-Specific Notes to Alerts.
Performance Alerts
Enable performance alerts if you wish to be notified when the monitor response time exceeds the specified value. See Performance Alerts for a description of available settings and to learn how to set up these alerts.
Notes:
-
In AlertSite 1.0, click the Performance Alerts button in the top left corner of the monitor configuration screen to view or change the performance alert settings.
-
For multi-step monitors, the response time thresholds should include the total response time for all test steps.
To learn how to configure availability and performance alerts in AlertSite 1.0, see Opt in to Availability and Performance Alerts.
See Also
BitBar Mobile Monitoring with AlertSite
BitBar Mobile Monitoring
