Get an On-premises License in Private Network
Important Notice for TestEngine Customers
Starting from ReadyAPI 3.62.0, VirtServer 3.29.0, and TestEngine 1.34.0, SmartBear Product Family has fully deprecated file-based licenses and transitioned to the ID-based SmartBear License Management (SLM) system. Any customers still using file-based licenses must complete their migration to SLM by September 30, 2025.
From October 1, 2025, existing and activated file-based licenses will continue to work for some time. However, SmartBear will no longer generate new file-based licenses or support activation and deactivation of file-based licenses in ReadyAPI, VirtServer, or TestEngine. All new and updated licenses are now issued in SLM only.
All technical support for file-based licenses has now ceased, and SmartBear no longer maintains the file-based licensing system. Any access or service issues will result in service disruptions that we will not be able to restore.
If you have not completed the process of migrating, contact your Account Manager or SmartBear representative today. Our teams are ready to assist you with smooth transition strategies. For additional support, log a request with our SmartBear Support.
For further information and timelines, refer to the File-Based License End-of-Support Policy page.
About
SmartBear offers a special license type – on-premises – that can be used on computers with no access to the SmartBear license servers. The word on-premises means the license is controlled by your licensing subsystems, not by SmartBear license servers available online.
To use an on-premises license, you can install the On-Premises License Server in your network. TestEngine will connect to this server and consume license seats from it. Below is a step-by-step instruction on this. If you are a licensed user (the person who runs and uses TestEngine), you will need assistance from your license administrator to perform some steps.
License administrator actions
Log in to the SmartBear Licensing Portal with your license administrator account.
Download, install, and configure the On-Premises License Server in your network. This server acts as your local Licensing Portal and operates separately from the SmartBear Licensing Portal, which connects to the internet.
Important
Your license must have no users assigned to it. Unassign all users before requesting conversion.
To download the license, click Export License to On-premise License Server.

Note
If you do not have an On-Premises License Server installed, click download and follow the on-screen instructions, or download it from the SmartBear Administration Downloads page.


After installation, open the server in a browser at: http://localhost:40892/#.
Log in with the System_admin account and select Add License in the On-Premises License Server.
Note
If this is your first login, create a password before proceeding.

Copy server fingerprint data to the clipboard or download it as a file.

The system downloads the fingerprint to your local machine.
Return to the SmartBear Licensing portal and click Export License to On-Premise License Server.

Note
If the Export License to On-Premise License Server option is not visible, enable it in Customer Settings.
Add the server fingerprint data and click Download License File.

The license gets exported.

Return to the On-Premises License Server and click Add License.

Drag the downloaded license file into the upload area, or click select it to browse for the file. Then click Add License to confirm.


You receive a notification that the license has been successfully added.

Choose how the server authenticates users and assigns license seats. The options are:
Access for Everyone: no authentication required.
LDAP or Kerberos: authentication required.
If authentication is enabled, TestEngine users must add an access key in the license installation panel. For details, see Configure On-Premise License Manager in the SmartBear License Management documentation.


If authentication is configured with LDAP or Kerberos, the license administrator must assign license to the TestEngine admin in one of the following ways:
Directly assign a TestEngine license to the TestEngine admin, or
Share a license link from the On-Premises License Server, which the TestEngine admin can click to accept.


The user clicks on the link to accept the license.

Note
The On-Premises License Server can manage multiple SmartBear licenses. If you already have it in your network, you can skip the initial setup and proceed with converting and activating licenses as needed.
User Actions
Start TestEngine.
Log in to the TestEngine WebUI.
The login URL for TestEngine depends on where TestEngine is installed, but typically follows this format:
http://localhost:8080/.In the TestEngine WebUI, click the User
 icon, and from the drop-down menu, select Manage License. Verify that no license is currently installed.
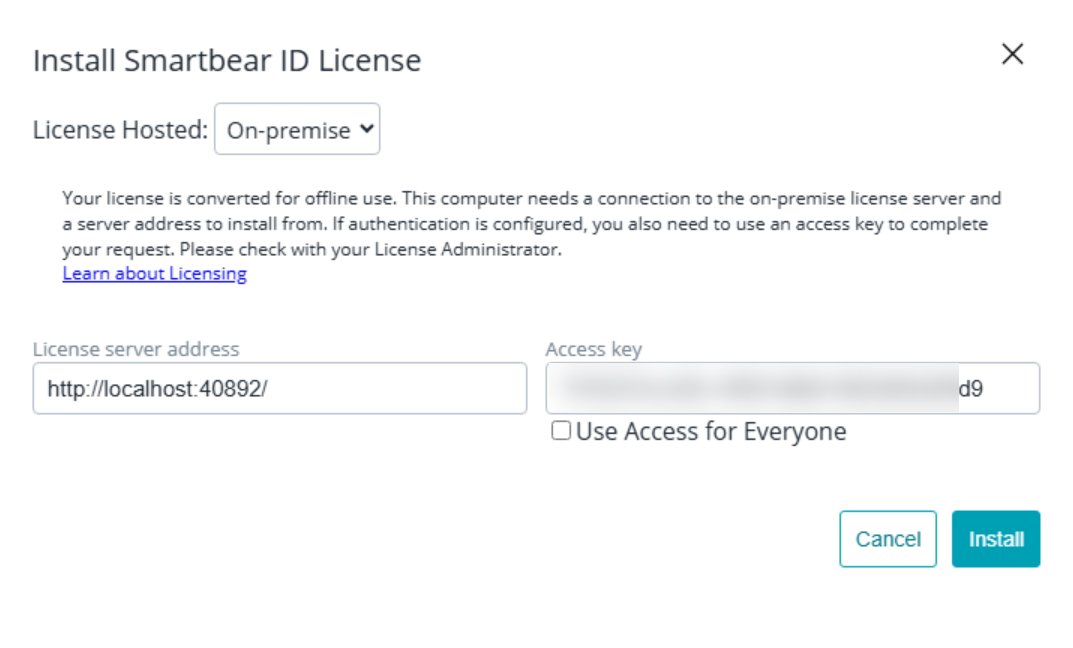
On the Manage License page, click Add License. The Install button remains disabled until you enter the required information.

From the License Hosted drop-down menu, select On-premise.
Depending on your license server’s configuration, follow one of the options below.
Option 1: Authentication required
Enter the license server address. The address typically follows this format:
license-server-address:port.For example:
http://localhost:40892/http://192.168.1.20:40892/
Note
The default port is
40892, but your administrator may use a different one. Make sure this port is open for TestEngine to connect.Enter the access key provided by your license administrator through the On-Premises License Portal.

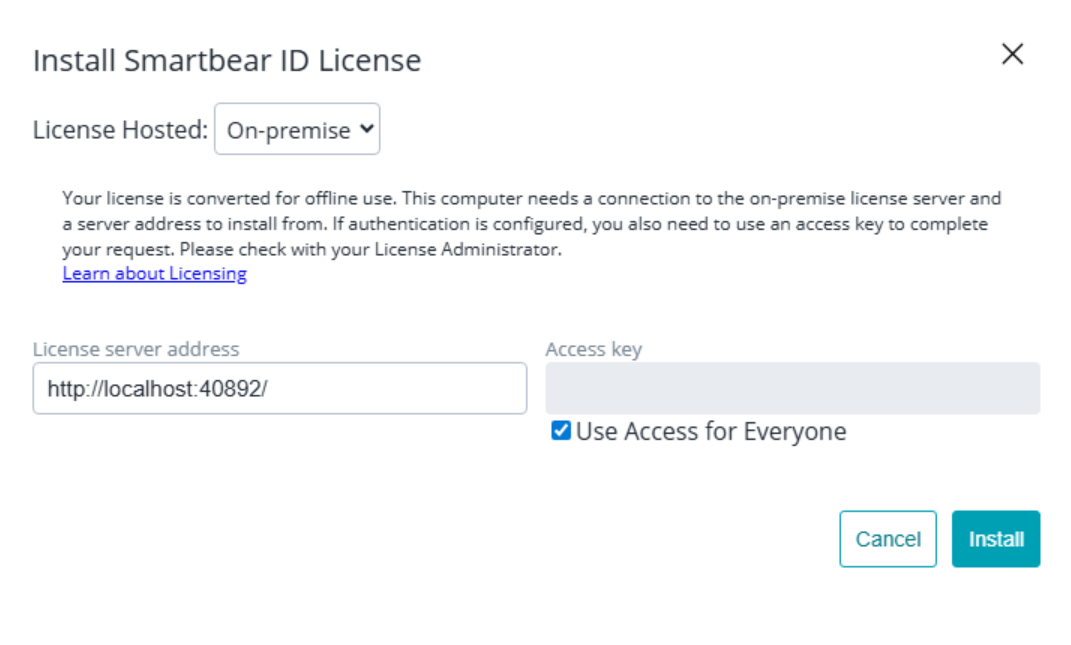
Option 2: Access for Everyone (no authentication required)
If your license server is configured for open access (Access for Everyone):
Select the Use Access for Everyone checkbox.
Enter the server URL or address provided by your administrator. The address typically follows this format:
license-server-address:port.For example:
http://localhost:40892/http://192.168.1.20:40892/

After entering the required information, click Install.
Note
If authentication is required, ensure that the TestEngine admin has already accepted the license or that the license administrator has already assigned the license.
TestEngine connects to the specified License Server and consumes a license seat.
Note
License binding: An on-premises license is tied to the computer running the On-Premises License Server, not to individual user machines.
Single license limit: TestEngine supports only one license at a time. To install a new license, uninstall the existing one first. This applies to renewals, upgrades, and downgrades.
Trial licenses: If you are working with a trial license, you can install a new trial or your production license over an installed trial license. This is why you will see Install license shown when a trial license is installed.
Uninstalling a license: To remove the current license, follow the uninstall instructions.
Grace period: In the event of any connection issues with the on-prem license server or if your license session is interrupted for some reason, we have introduced a grace period to ensure your tests can run without interruption. The grace period begins if the connection with the license server is lost or your license is uninstalled, and it keeps your virtual services running for up to 8 hours. If the connection with your license server or your license is not restored in this window, TestEngine uninstalls your license, and you must reinstall your license. You may need to engage with your license administrator to ensure you have a license available before you attempt another installation.
Managing License Installation and Uninstallation with the Command Line
Add your TestEngine license in manage.smartbear.com as outlined above. Do not assign the license until it gets imported into the SmartBear License Management On-Premise License Server.
Install and configure your SmartBear License Management On-Premise License Server, then import and assign your TestEngine license. For detailed instructions, see the Floating Licenses: On-Premise License Manager section of the SmartBear License Management documentation.
Use the CLI to activate or deactivate a SmartBear ID-based license. For setup details, see the Install an SLM license section on the TestEngine-CLI npm page. Make sure to specify the location of your on-premise license.