 If you are a novice user, we recommend that you first go through the Getting Started tutorial to get familiar with the tool:
 Testing Web Applications - Tutorial
About
Headless web browsers run without any GUI representation. This can be very handy for automated web testing because headless web browsers are faster, and their performance is higher than that of regular GUI browsers. Initially, web tests you create with TestComplete simulate actual user actions over a browser GUI and a web page opened in the browser. Therefore, running web tests in headless web browsers is not supported. However, you can run your TestComplete web tests in headless web browsers by using WebDriver.
-
You create a web test on a Windows computer in any of the browsers that TestComplete supports:
 Web browsers you can use for recording web tests
It does not matter which browser you choose. Your test will be compatible with headless browsers.
-
You modify the created test to connect to WebDriver controlling your web browser.
-
You run the test and get the test results in TestComplete.
Supported versions of headless browsers
You can run tests in any headless web browser that is WebDriver-compatible.
The appropriate version of the driver must be installed on the computer where the browser is running.
If you have the Intelligent Quality add-on for TestComplete and the Headless Web Browser support plugin is enabled, you can run tests in the following headless browsers out-of-the-box:
- Microsoft Edge 83 - 138 (Chromium-based, 64-bit version)
- Google Chrome 138 (64-bit version)
- Mozilla Firefox 91 - 115.10 ESR, 94 - 140 (64-bit version)
Requirements
To create tests
-
A Windows computer with TestComplete 14.40 or later installed. On this computer, you will create tests, control the test run, and get the test results. To learn about the requirements that the computer must meet, see System Requirements.
-
An active license for the TestComplete Web Module.
-
The Web Testing plugin and the Cross-Platform Web Testing plugin must be enabled in TestComplete.
-
One of the supported web browsers in which you want to record tests. The resulting test will be compatible with headless web browsers.
-
The web browser selected for test recording must be prepared for testing as described in Preparing Web Browsers.
To run tests
On a local computer
The driver appropriate for the web browser you are going to use must be installed on your local computer:
- ChromeDriver - To run tests in headless Chrome.
- GeckoDriver - To run tests in headless Firefox.
- MSEdgeDriver - To run tests in headless Edge.
If you have the Intelligent Quality add-on for TestComplete and the Headless Web Browser support enabled, TestComplete will install the necessary drivers automatically during the test run.
If it fails to install the drivers for some reason, for example, if your computer does not have access to the internet, install them manually. To do this, place the driver executable file in the following folder:
<ProgramData>\SmartBear\WebDrivers\<browser> (Usually, the ProgramData folder resides at C:\ProgramData.)
Also, you may need to rename the executable manually if your webdriver is not recognized. The name should include the major version you are using. For example, for version 126, suggested changes are:
-
chromedriver.exe to chromedriver_126.exe
-
msedgedriver.exe to msedgedriver_126.exe
1. Prepare your local computer for creating tests
You create your web tests on a local Windows computer using one of the browsers that TestComplete supports:
-
Internet Explorer
-
Microsoft Edge (Chromium-based)
Note: Recording web tests in the earlier versions of Edge is not supported.
-
Google Chrome
-
Mozilla Firefox
It does not matter which browser you choose. You will be able to run your test in a headless browser either way.
However, before you can start creating tests, configure the selected browser in a special way. To learn how to do it, please see:
2. Enable cross-platform test support
Before you start creating cross-platform web tests, make sure that your TestComplete project is configured to locate web objects by their XPath expressions and CSS selectors:
In existing projects
-
Open your TestComplete project to which you want to add tests.
-
Select Tools > Current Project Properties from the TestComplete main menu to open the Properties page of your project.
-
In the tree on the left, select Open Applications > Web Testing > General.
-
Make sure that the Use XPath and CSS selectors for web objects check box is selected:
When creating new projects
-
Create a new project in TestComplete. To learn how to do it, see Creating Projects and Project Suites.
-
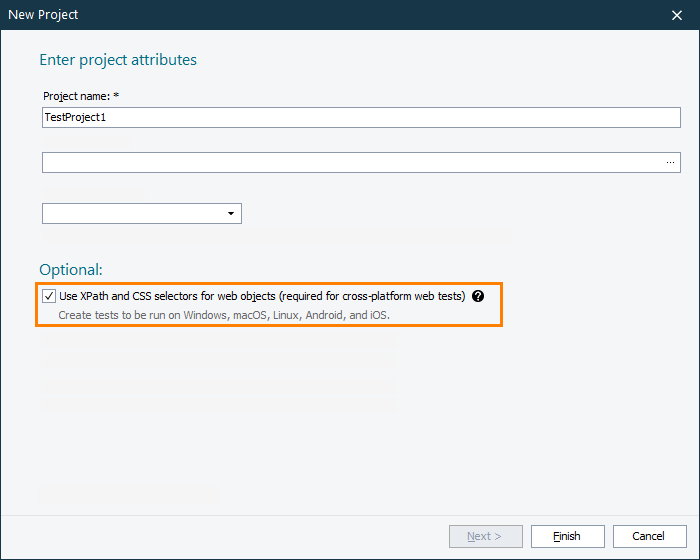
On the first page of the New Project wizard, make sure to leave the Use XPath and CSS selectors for web objects check box selected:
3. Create a headless-compatible web test
To create a test that you will run in a headless browser, you record required user actions, or you can create a test from scratch. The easiest way to create a test is to record it. You record your user actions on your local computer, where TestComplete is installed, in one of the browsers that TestComplete supports and that you have prepared for testing at the preceding step.
-
Start recording. To learn more about recording in TestComplete, see Recording Automated Tests.
-
Launch your selected and prepared web browser.
-
Interact with your tested application or web page as an end-user would: navigate through pages, click the links, input data into forms, and so on.
-
Stop the test recording.
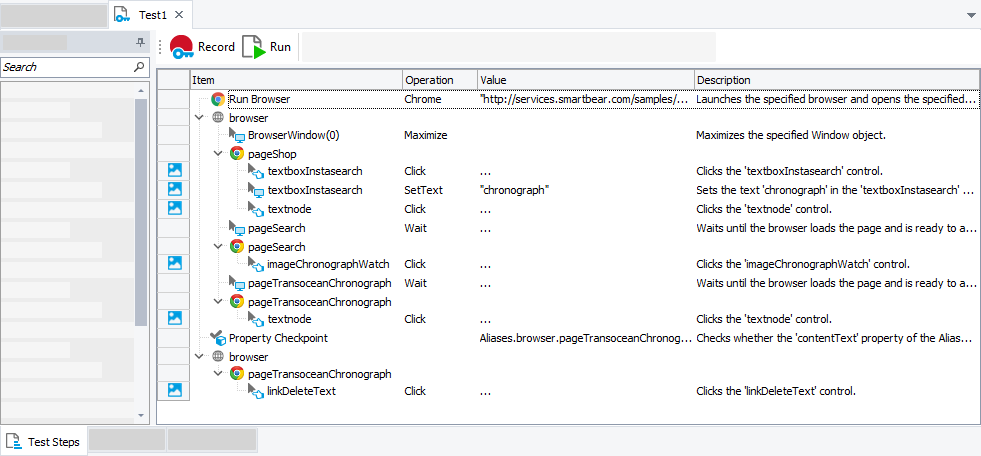
TestComplete will process the performed actions and generate a test. The test consists of the sequence of operations that define various interactions with objects in a web browser:
You can modify and enhance the recorded test in a number of ways to make it more flexible and efficient. For example:
-
Add new operations, reorder operations and modify their parameters.
-
Delete or disable unneeded operations (for example, superfluous recorded operations).
-
Insert checkpoints for verifying objects and values in the tested application.
-
Create data-driven tests that run multiple test iterations using different sets of data.
4. Configure the test to run in a headless browser
The recorded test interacts with the browser you used during the recording. To run the test in a headless browser, modify the test as follows:
To run the test in local headless browsers
Script test
-
Remove (or disable) all test commands that interact with the local browser you have used for test recording. For example, remove or comment out all script lines that use the
Browsers.Itemproperty. -
Write script code that will connect to your WebDriver and start the headless instance of your web browser. To do this, use the
Browsers.RemoteItem(HubURL, Capabilities).Runmethod:-
The HubURL parameter specifies the URL of the WebDriver you use to manage your headless web browser. If you have Headless Web Browsers support enabled, set the value to
localhost. -
The Capabilities parameter specifies the browser you want to use for testing. If you have the Headless Web Browser support enabled, only the following capabilities are required:
-
browserName- The name of the browser in which the test will run. Possible values are:chrome,edgeandfirefox. -
screenResolution- The screen resolution to set for the testing session.
Other capabilities are optional.
-
Example
The example below shows how to run a test in the headless version of Chrome running on a local computer:
JavaScript
function Test_Chrome_Headless()
{
var server = "localhost";
var capabilities = {
"browserName": "chrome",
"screenResolution": "1920x1080"
};
var url = "https://services.smartbear.com/samples/TestComplete15/smartstore/";
Browsers.RemoteItem(server, capabilities).Run(url);
…
}Python
def Test_Chrome_Headless():
server = "localhost"
capabilities = {
"browserName": "chrome",
"screenResolution": "1920x1080"
}
url = "https://services.smartbear.com/samples/TestComplete15/smartstore/"
Browsers.RemoteItem[server, capabilities].Run(url)
… -
-
All the test commands that follow the
Browsers.RemoteItem.Runmethod and that work with theBrowserobject will run in the specified headless browser.
As an alternative, you can orchestrate running your keyword tests in headless browsers in the execution plan of your project. See below.
Keyword test
-
Remove (or disable) all operations that interact with the local browser you have used for test recording. For example, disable or remove the Run Browser operation.
-
Add test instructions that will call the
Browsers.RemoteItem.Runmethod to start the headless browser instances (see above). To do this, you can use the Run Code Snippet or Run Script Routine operation. -
All the recorded operations that interact with a web browser and that follow the Run Remote Browser operation will be run in the headless browser.
As an alternative, you can orchestrate running your keyword tests in headless browsers in the execution plan of your project. See below.
5. Run the test in a headless web browser
After your test is configured as described above, run it. To learn how to run tests, see Running Tests.
TestComplete will connect to the specified hub, command it to start the headless browser, and execute test commands there.
Note: You will not be able to track your testing progress while the test is running.
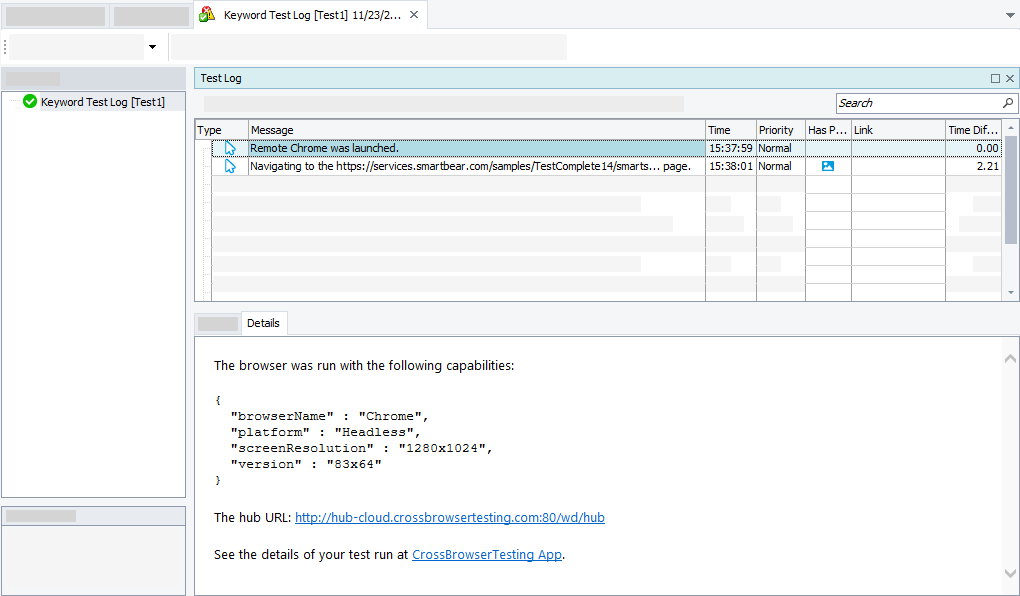
After the test run is over, you can view the test results in TestComplete:
Specifics and known limitations of running tests in headless browsers
-
By default, headless browsers use a temporary user profile. To specify another profile to use, you can use the
--user-data-dir=<ProfilePath>command-line parameter for Chrome and Edge or the-profilecommand-line parameter for Firefox. To run the browser with this command-line parameter, use thegoog:chromeOptions,ms:edgeOptions, andmoz:firefoxOptionscapability for Chrome, Edge and Firefox respectively.For example, the code snippet below shows how to run Chrome with a specific user profile:
JavaScript
function Test_Chrome_Headless()
{
var server = "localhost";
var capabilities = {
"browserName": "chrome",
"screenResolution": "1920x1080",
"goog:chromeOptions": {
"args": ["--user-data-dir=C:\\Users\\Tester\\AppData\\Local\\Google\\Chrome\\User Data\\Default"]
}
};
var url = "https://services.smartbear.com/samples/TestComplete15/smartstore/";
Browsers.RemoteItem(server, capabilities).Run(url);
// …
}Python
def Test_Chrome_Headless():
server = "localhost"
capabilities = {
"browserName": "chrome",
"screenResolution": "1920x1080",
"goog:chromeOptions": {
"args": ["--user-data-dir=C:\\Users\\Tester\\AppData\\Local\\Google\\Chrome\\User Data\\Default"]
}
}
url = "https://services.smartbear.com/samples/TestComplete15/smartstore/"
Browsers.RemoteItem[server, capabilities].Run(url)
# …You can get information on existing profiles:
-
In Chrome, on the chrome://version page.
-
In Edge, on the edge://version page.
-
In Firefox, on the about:profiles page.
-
-
If your tested website or web application behavior varies depending on whether your browser is in headless mode or not, for example, some resources are not available in headless mode, you may want to bypass this by overriding the
user-agentstring sent by your browser. To do this, you can use the--user-agentcommand-line parameter of Chrome and Edge.For example, the code snippet below shows how to run Chrome with a custom
user-agentstring specified:JavaScript
function Test_Chrome_Headless()
{
var server = "localhost";
var capabilities = {
"browserName": "chrome",
"screenResolution": "1920x1080",
"goog:chromeOptions": {
"args": ["--user-agent=Mozilla/5.0 (Windows NT 6.1; WOW64; Trident/7.0; rv:11.0) like Gecko"]
}
};
var url = "https://services.smartbear.com/samples/TestComplete15/smartstore/";
Browsers.RemoteItem(server, capabilities).Run(url);
// …
}Python
def Test_Chrome_Headless():
server = "localhost"
capabilities = {
"browserName": "chrome",
"screenResolution": "1920x1080",
"goog:chromeOptions": {
"args": ["--user-agent=Mozilla/5.0 (Windows NT 6.1; WOW64; Trident/7.0; rv:11.0) like Gecko"]
}
}
url = "https://services.smartbear.com/samples/TestComplete15/smartstore/"
Browsers.RemoteItem[server, capabilities].Run(url)
# … -
In headless mode, a browser may use language settings different from the settings that the regular (GUI) version of the browser uses. If in your tests you are facing issues caused by incorrect language settings, you can do any of the following:
-
In Chrome and Edge, use the
--langcommand-line parameter to set the language for the browser to use. To specify the language, use a 2-digit ISO-639 code.
– or –
-
Configure the headless browser to use a profile with the needed language settings configured. To learn about profiles, see above.
The code snippet below shows how to run Chrome using the Portuguese locale:
JavaScript
function Test_Chrome_Headless()
{
var server = "localhost";
var capabilities = {
"browserName": "chrome",
"screenResolution": "1920x1080",
"goog:chromeOptions": {
"args": ["--lang=pt"]
}
};
var url = "https://msdn.microsoft.com/";
Browsers.RemoteItem(server, capabilities).Run(url);
// …
}Python
def Test_Chrome_Headless():
server = "localhost"
capabilities = {
"browserName": "chrome",
"screenResolution": "1920x1080",
"goog:chromeOptions": {
"args": ["--lang=pt"]
}
}
url = "https://msdn.microsoft.com/"
Browsers.RemoteItem[server, capabilities].Run(url)
# … -


