Collaborator seamlessly integrates with the Perforce version control system. This section provides a general overview of integration preferences, ways to review files controlled by Perforce, and so on.
About Integration
Using the built-in Collaborator Perforce integration, you can quickly upload various files to the Collaborator server to create a review directly from the desktop client of your choice. The types of files you can upload include:
- Pending changelists.
- Submitted changelists.
- Arbitrary Perforce diffs.
- Files in branch.
- Differences between labels.
- Differences between dates.
Perforce integration uses Perforce client applications that are already installed on the client computer. That is, integration supports all protocols, authentication settings, proxies, and other configuration specifics. This includes configuration from environment variables, $P4CONFIG files, p4 set registry values, and so on.
Supported Versions
To enable the integration via GUI Client and Command-Line Client, you need the Perforce command line client (p4) to communicate with the server. We support all client and server versions later than 2002.1.
Eclipse Plug-in can use the Perforce plugin for Eclipse starting from version 2009.2.234487 and later.
It's recommended to use JDBC connector version starting from 8.0.27.
Ways of Integration
You can enable the integration between Collaborator and Perforce for GUI Client, Command-Line Client, Eclipse Plug-in, Collaborator server, or use the integration in the p4v and p4win client applications.
GUI Client
To enable the integration:
-
Start GUI Client.
-
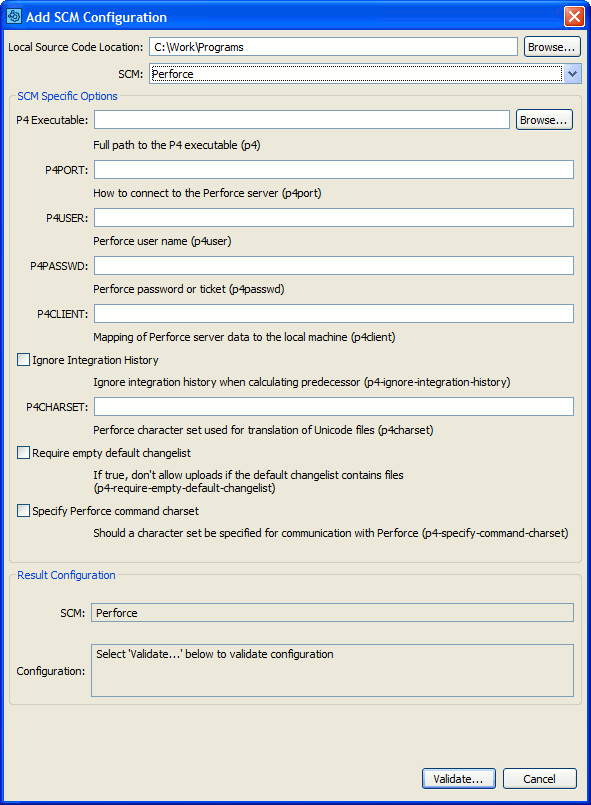
Click Add to create a new SCM configuration.
-
In the subsequent SCM Configuration dialog, specify the local source code location.
-
Select Perforce in the SCM drop-down list.
-
Several options will become available. These are specifically tailored to configure Perforce integration.
Option Description P4 Executable A full path referring the p4 executable. P4PORT A p4port required to connect to the perforce server. P4USER A user-name you want Collaborator to use on connecting to the Perforce server. P4PASSWD A password you want Collaborator to use on connecting to the Perforce server. P4CLIENT A mapping string used to transfer Perforce server data to the local machine. Ignore Integration History If selected, integration will ignore the integration history when calculating the predecessor changelist. P4CHARSET A Perforce character set used for translation of Unicode files. Require empty default changelist If selected, does not allow to upload if the default changelist contains any files. Specify Perforce command charset If selected, requires a character set to be specified on connecting to the Perforce server. -
Once ready, click Validate to make sure the integration is operational.
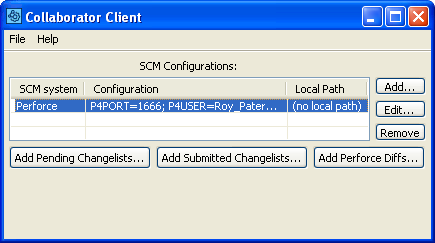
After that, a new configuration for Perforce will appear on the main screen of the GUI Client.
Select it, then click on the corresponding button depending on what you want to do next:
-
Add Pending Changelists – Upload files in a Perforce pending changelist to the Collaborator server and add these to a review.
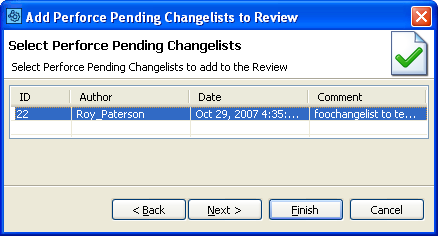
Note: You cannot upload the default changelist. -
Add Submitted Changelists – Upload files in a Perforce submitted changelist to the Collaborator server and add these to a review.
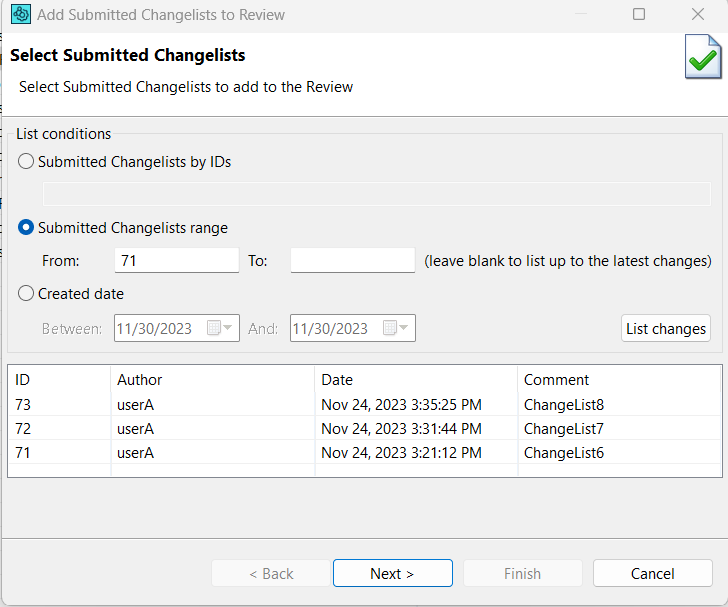
In the dialog, you can select whether you want it to display all available changelists, input IDs of specific changelists, changelists within a specific range or date interval.
Filter will return 100 newest changelists for ID and date range requests.
You can exclude and include the files from changelist upload by specifying filename(eg : "sample.txt"), file extension("*.txt","*.log"), or both.
-
Add Perforce Diffs – Upload arbitrary Perforce diffs to the Collaborator server and add these to a review.
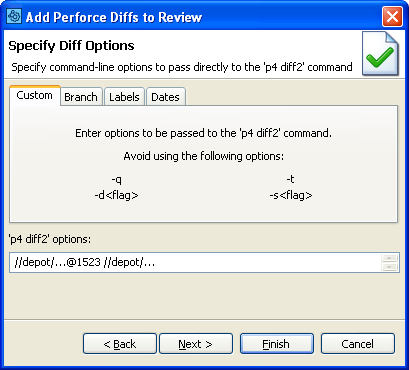
On the Branch tab of the dialog, you can upload the files in a branch.
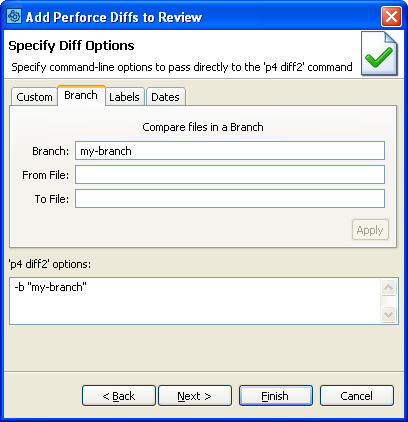
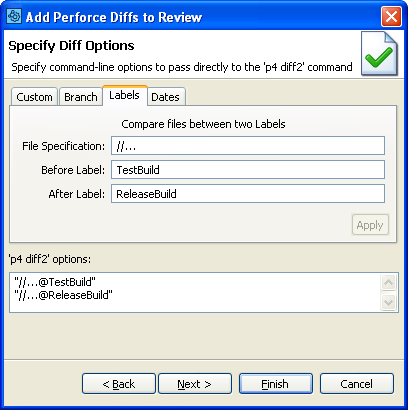
On the Labels tab of the dialog, you can upload the difference between two labels.
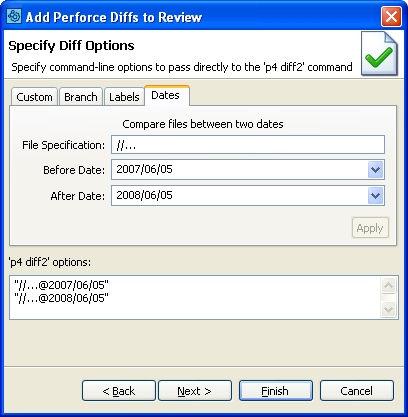
On the Dates tab of the dialog, you can upload the difference between two dates.
Command-Line Client
In the Command-Line Client, you can create a review for various activities and files controlled by Perforce.
Commands recommended for Perforce
ccollab addchangelist - Attaches an atomic changelist to a review.
ccollab addp4diffs - Uploads diffs generated from p4 diff2 command.
ccollab addversions - Attaches any 2 given versions to a review.
ccollab commit - Commit changes in the review.
ccollab addp4job - Adds all numbered local changes that fix a job to the review.
ccollab admin syncusers - Synchronizes the Perforce user list with the Collaborator server.
ccollab admin changelist update-id - Updates the changelist ID so Collaborator reflects the renumbered Perforce changelist ID.
The addchangelist command will upload Perforce changelists into Collaborator. You can upload changelists either before or after they are submitted, but you cannot upload the default changelist.
In most cases, the Command-Line Client can automatically detect your Perforce configuration. Try testing your configuration to verify the configuration is detected correctly.
If the Command-Line Client is unable to detect your Perforce configuration or you want to override the detected settings, you can manually specify Perforce settings using global options.
To manually configure the Command-Line Client to use Perforce, execute the following command:
Perforce-specific Options
|
Option |
Description |
|---|---|
|
--p4 <value> |
Full path to the P4 executable. |
|
--p4port <value> |
How to connect to the Perforce server. |
|
--p4user <value> |
Perforce user name. |
|
--p4passwd <value> |
Perforce password or ticket. |
|
--p4client <value> |
Mapping of Perforce server data to the local machine. |
|
--p4-ignore-integration-history <value> |
Ignore integration history when calculating predecessor. |
|
--p4charset <value> |
Perforce character set used for translation of Unicode files. |
|
--p4-require-empty-default-changelist |
If true, do not allow uploads if the default changelist contains files. |
|
--p4-specify-command-charset <value> |
Should a character set be specified for communication with Perforce. |
If your Perforce server requires ticket-based authentication (server security level 3), then the configured p4-password will be used to automatically issue the p4-login and acquire a new ticket as necessary.
If you want to ignore the integration history of files when determining the previous version of the file and look only at the path, you should set p4-ignore-integration-history to yes.
Note for Windows users: Sometimes Perforce server uses Windows machine host name as a default name, ignoring the real Perforce client name. To avoid that issue, specify the needed Perforce client name directly in the Collaborator with the --p4client <name> command.
Eclipse Plug-in
You can upload locally modified Perforce files to a review directly from Eclipse Plug-in. Right-click on any changelist entry in Eclipse, either before or after it is submitted.
To learn more, please see Add to Review Wizard.
P4V and P4Win Clients
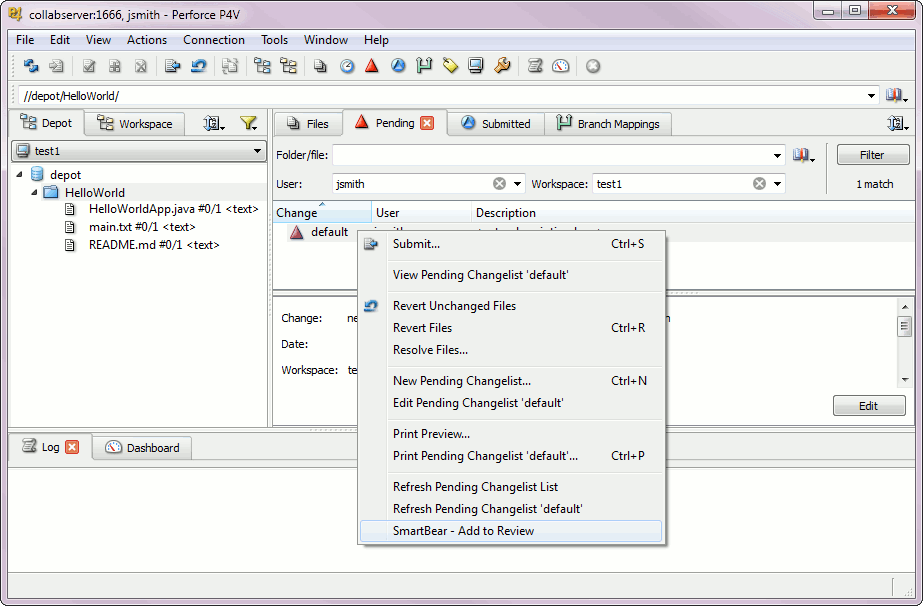
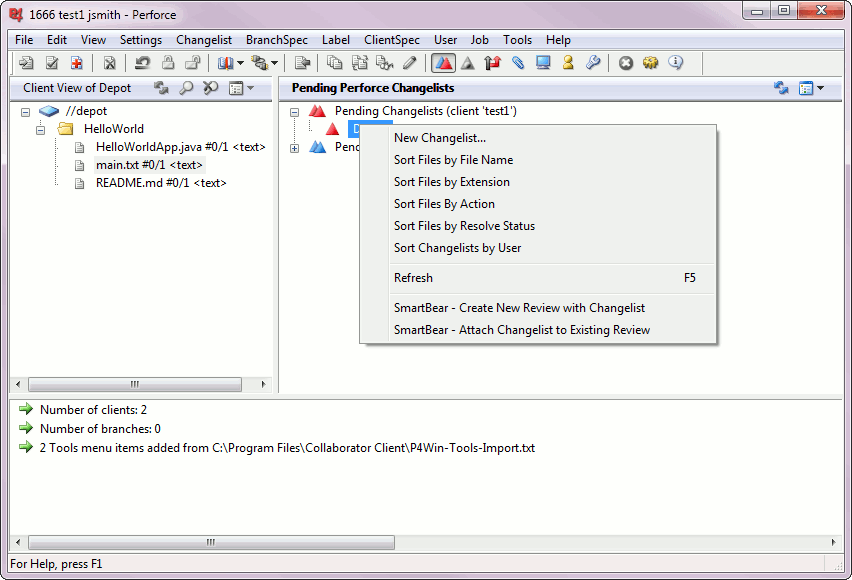
The Collaborator client installer includes an integration point with P4V and P4Win clients.
Once configured, integration allows to create Collaborator reviews for pending and submitted changelists directly from the P4V or p4Win client.
Configure P4V and P4Win Clients
If you installed the client yourself and decided to configure addons to Perforce visual tools, then you can skip the manual configuration of the integration. However, if the Collaborator client was installed by an administrator on your computer, or the configuration failed at install time, you can manually configure them.
In P4V
-
Go to Tools.
-
Click Manage Custom Tools.
-
In the subsequent dialog, click Import Tools.
-
Navigate to the Collaborator client installation directory and select one of the following files:
- P4V-Tools-Import.txt
- P4V-Tools-Import.xml
In P4Win
-
Go to Tools.
-
Click Import.
-
Navigate to the Collaborator client installation directory and select the P4Win-Tools-Import.txt file.
 |
The plug-ins will work only if the Perforce command-line tool (p4) is in your PATH environment variable. |
Multiple Perforce workspaces and servers
The P4V and P4Wind plugins are able to work with multiple Perforce workspaces and servers. All the Perforce connectivity parameters are taken from the UI, so whatever workspace, server, and authentication you are currently using when you right-click the item the plugin will be able to handle the integration automatically. None of this affects the behavior or configuration of the command line client, so you can freely use the plug-ins without disturbing that configuration.
Troubleshooting P4V and P4Win issues
For any issues with the P4V and P4Win plugins, provide a debugging log to the SmartBear support. To do this, edit the custom tool configuration (Tools > Manage Custom Tools > Edit), and add a --debug argument to the beginning of the arguments list. This will create a log file at the following location: ~/.smartbear/log/ccollab.log on Unix platforms and %USERPROFILE%/.smartbear/log/ccollab.log on Windows platforms.
Please contact our technical support and send the log file along with a full description of what you were trying to do when the error occurred.
Web Client
Collaborator administrator can configure the Collaborator server to communicate directly with Perforce repositories. Server-side integration allows users to upload committed atomic changelists from the Web Client without having to install and configure client-side tools.
To upload changelists:
-
Log in to Web Client.
-
Create a new review, or open an existing one.
-
Scroll to the Review Materials section of the Review Screen.
-
Click Upload button and then select the item corresponding to the desired repository.
Note: Item titles are specified by your Collaborator administrators and they will vary from those in the image below. 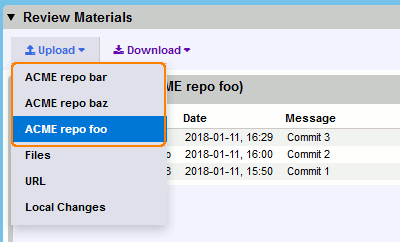
-
In the ensuing dialog, specify the IDs of desired changelists. Separate multiple IDs by space character.

-
Click Attach to upload the specified changelists to the review.
Configure Server-Side Integration
To enable the feature, your Collaborator administrator will need to perform the following actions:
-
Install and configure a Perforce client on the Collaborator server.
-
Log in to Collaborator server.
-
On the Collaborator main toolbar, click ADMIN, and then select Version Control from the tree on the left. Then switch to the Version Control Servers tab.
This tab lists available version control server configurations. They could be created manually, as described bellow, or could be created automatically when one of the client programs uploads files from a server that does not match any of the currently configured servers.
-
Select "Perforce" from the SCM System drop-down list and click Create.
-
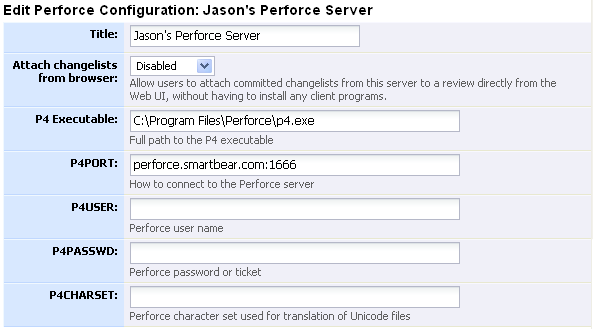
Specify the values for the following properties:
-
The Perforce protections section defines whether Collaborator will check access permission with your Perforce server whenever a user tries to access the content of a file managed by this server.

This feature assumes that the user's Perforce user-name is the same as their Collaborator login. If you decide to use Perforce protections, then specify the following properties:

Option Description Enforce Protections Defines whether to enable access permissions check-ups. P4 Protects Script If blank, Collaborator will call the
p4 -s protectscommand. Yet this command requires that the user specified in the P4USER field has the superuser permissions on the Perforce server.If specified, must contain a script to run instead of calling the
p4 -s protectscommand directly. In this case, the user specified in the P4USER field may have regular user permissions.The script must pass the following arguments:
"-p <p4port> -u <user> -h <host> <depotPath>".
The script must produce exactly the same stdin, stdout, and process error code as the p4 -s protectscommand. Also make sure the script runs as fast as possible, because it will be invoked every time any user tries to view the contents a file from this server.An example of script implementation as a Windows batch file:
@p4 -u admin -s -p %2 protects -u %4 -h %6 %7 -
Click Test Connection to verify that the connection between Collaborator server and your Perforce server is established successfully and is trusted. For example, you might need to generate the .p4trust file and copy it to Collaborator service profile folder (<Windows>/System32/config/systemprofile/ on Windows, and /etc/init.d/ on *nix).
-
The Client Configuration Mapping section defines correspondence between files uploaded by the various Collaborator clients and this server-side Perforce configuration.
Specify Java-style regular expressions to map changelists uploaded from our client tools to this Perforce server:

Option Description P4PORT Pattern Match on the client configured P4PORT. Using the Server Address Pattern is better, but clients before 5.0.5009 did not upload server address, so you can configure this as a fallback. Server Address Pattern Match on the server address returned from running p4 -p <p4port> infoon the client. This is generally more reliable than matching on the P4PORT, and works through Perforce proxy servers and other complications. When a version control server entry is created automatically, this is filled in with the server address obtained from the client. -
Press Save to create configuration and enable server-side integration with this Perforce repository.
Perforce Triggers
This section provides a reference on the triggers specific to Collaborator, added to Perforce by Collaborator Perforce Server integration package.
| Trigger | Description |
|---|---|
ensure-review-started |
Ensures that a review has been started (created in Collaborator) for the submitted changelist. |
ensure-reviewed |
Ensures that a review has been completed for the submitted changelist. |
ensure-content-reviewed |
Ensures that a review has been completed for the submitted changelist, and that the changelist was not changed after the review was over (that is, that the file contents and the file list are the same). |
ensure-diffs-reviewed |
Ensures that the difference between the current content and proposed content of each file is the same as the difference between the base and proposed content. |
update-changelist |
Appends or updates review-specific information in a changelist's description. |
create-review-with-reviewer |
Creates automatic reviews with reviewers if specified or updates a review based on changelist description in Collaborator. |
For general information on Perforce triggers, see Perforce System Administrator's Guide.
Perforce Changelist Renumbering
Perforce nearly always renumbers changelists upon submission, but when you are doing pre-commit reviews, Collaborator always has the pre-submit number. We have included a script you can customize that will ask Perforce what was a number of the changelist before it was submitted, and update changelists in Collaborator to have the new number. This requires a Collaborator client and server 5.0.5005 or better, and a Perforce client and server 2007.3 or later. This script is intended to be run periodically via cron or a similar task scheduler.
Perforce Changelist Renumbering Script (CTRL + click, or CMD + click to open in new window).
Support for Branch and Integrate
Collaborator fully supports file branching and integration semantics of Perforce.
-
If files in a changelist are marked for branching, they are not considered changed. The file content itself is not changed; only the file paths are being changed.
-
If files in a changelist are being integrated, this works just like a regular change. Many customers choose to review integrations especially carefully since the changes might interact in unexpected ways.
Support for Copy and Move
Collaborator fully supports file copy and move semantics of Perforce. If a file is copied or moved rather than added from scratch, it will show up that way in the various user interfaces.
Support for Directories
Collaborator partially supports Perforce directories and correctly handles the changes you apply to these.
All files underneath the directories in question will be scanned, uploaded, and represented properly in the GUI. The directories themselves will not be shown in any GUI.
Support for Shelvesets
Collaborator supports adding Perforce shelvesets to reviews.
Technical Details and Limitations
Review Screen, Diff Viewer, Eclipse Plug-in and Visual Studio Extension display atomic changelists in chronological order (from older to newer), regardless the order in which they have been uploaded to review.
Collaborator does not guarantee that Diff Viewer will display correct comparison results for the following cases:
-
If you have "gaps" while adding subsequent atomic changelists to the same review. For example, add changelists 1, 2, and 4, but forget to add changelist 3.
-
If you add pending changelists from different workspaces to the same review.
-
If you add several diffs (non atomic changelists) to the same review.
Known Issues
If you want to use the Mark for Delete on a file and add this file to the newly created Collaborator review, synchronize this file with the depot. Otherwise, this file can be absent from your Perforce workspace and Collaborator will return an exception.
More Details
- User can find the data saved for Perforce integration in file “com.smartbear.ccollab.client.txt" which can be found at:
- Windows: C:\Users\<user_name>\.smartbear
- Linux: /home/<user_name>/.smartbear
- Mac: /Users/<user_name>/.smartbear
- For a new configuration added, to save details in “com.smartbear.ccollab.client.txt” file, it can be done from command line. For example, to save p4user run command ‘ccollab set p4user <p4user>’. Replace <p4user>>with actual p4user.
- See Command-line Global Reference for Perforce-specific options which can be set using ccollab-set command.
See Also
Integration With Repository Hosting Services
SCM Configuration
Source Control Integrations

