
Before using the Collaborator extension for Visual Studio, you must configure it.
When you open the Collaborator View window and the extension is not configured yet, it will invoke a Getting Started wizard suggesting to configure connection to Collaborator server and environment settings.
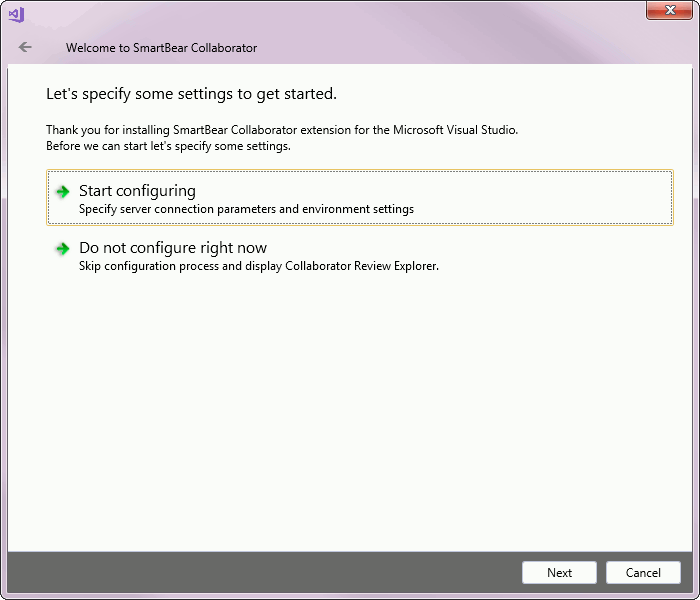
Click the image to enlarge it.
To change the extension settings afterwards (or if you have skipped the wizard), select Tools > Options from the main menu of Visual Studio and find Collaborator in the tree on the left:

Collaborator settings
Settings
The Collaborator extension includes the following settings:
Connection

Connection settings
|
Server URL |
Denotes which Collaborator server to use. The Server URL must include the correct port number and path if applicable. If your server uses HTTPS, you may need to install its certificate as described below. |
|
Username and Password |
Specifies user credentials. The Username and Password are the same as you use when logging into the web server. It is not recommended to use empty password. You can specify your password or login ticket. When single sign-on authentication is disabled, specify password. When single sign-on authentication is enabled, specify login ticket instead. |
|
Use Proxy |
Enable if you connect to the Internet via proxy server. If you use proxy and want to connect to a Collaborator server that is deployed on your local machine, then specify Server URL in the |
|
Proxy host and Proxy port |
The URL of a proxy server and its port number. |
|
Proxy login and Proxy password |
The login and password, if proxy server requires authentication. |
Click Test to check if you can connect to the specified Collaborator server with the user name and password entered.
Environment

Environment settings
|
Path to ccollab.exe |
The fully-qualified name of the Collaborator Command-Line Client executable. |
|
Local Cache Folder |
The fully-qualified path to a temporary folder, where the extension will keep review materials obtained from the server. |
Logger

Logger settings
This section controls what information will be displayed in the Visual Studio's Output window and in the debug log. You can toggle whether to display or not the information about exceptions, errors, warnings, debug messages or general information messages.
SCM

SCM settings
The Visual Studio Extension shares SCM configurations with GUI Client and Command-Line Client. In this section, you must select which of SCM configurations the extension will use to upload review materials. Optionally, in the subsections of this section, you may create new or modify existing SCM configurations.
|
Use Solution Path |
Specifies whether to treat path of current open solution as local SCM folder when uploading local changes. |
|
Configurations |
Lists the available configurations and displays their parameters. To specify which of SCM configurations the extension will use to upload review materials, select a configuration in the drop-down list and click Set as Default. |
To create a new SCM configuration, specify its parameters and click Add.
To modify an existing SCM configuration, select it in the Configuration drop-down list, change parameters and click Save. For TFS configurations, you can also click Test Connection to verify the connection parameters.
To delete an existing SCM configuration, select it in the Configuration drop-down list and click Remove.
Git

Git configuration
|
Configuration |
Lists the available Git configurations and displays their parameters. |
|
Repository Path |
Specifies the path of local source code location. |
|
Git Exe |
Specifies the full path to the 'git' command line client. |
Mercurial

Mercurial configuration
|
Configuration |
Lists the available Mercurial configurations and displays their parameters. |
|
Repository Path |
Specifies the path of local source code location. |
|
Mercurial Exe |
Specifies the full path to the 'mercurial (hg)' command line client. |
RTC

RTC configuration
To use RTC integration from Visual Studio Extension, you need to configure Collaborator server and client and RTC server
|
Team Repository URI |
The URI of the repository to work with. |
|
Username and Password |
Specifies user credentials on the chosen team repository. |
TFS

TFS configuration
|
Configuration |
Lists the available TFS configurations and displays their parameters. |
|
Server URL |
For self-hosted version of Team Foundation Server, specify the URL of Team Foundation Project Collection to work with. For SaaS version of Team Foundation Server, specify the URL of your Visual Studio Team Services account (without project or collection names). |
|
Local Path |
Specifies the path of local source code location. |
After specifying these values, you can click Test Connection to verify if the TFS server is available. If you are connecting to this server for the first time, a Visual Studio sign-in prompt will be displayed.
View

View settings
|
Group conversations by lines |
Controls how Code Viewer and Diff Viewer display comments and defects. If enabled, the Conversations Pane displays comments and defects that relate to a particular line. Otherwise, it displays the entire list of comments and defects. |
Configure HTTPS Connection
When your Collaborator server uses HTTPS connection and its certificate cannot be automatically verified, or server uses a self-signed certificate, then you will need to install the certificate manually.
Note on self-signed certificates: You have to use certificate signed with Certificate Authority (CA). It can be any CA - even yourself. And you must install that CA certificate in trusted authorities. You cannot use self-signed certificate directly.
Obtain Certificate
At first, you need to obtain the certificate from the Collaborator server administrator, or obtain it yourself as described below:
-
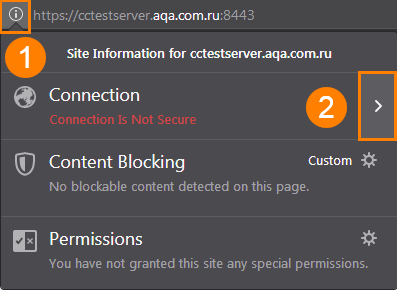
Launch Firefox browser and navigate to Web UI of your Collaborator server.
-
Click the info button to the left of a web page's address.
-
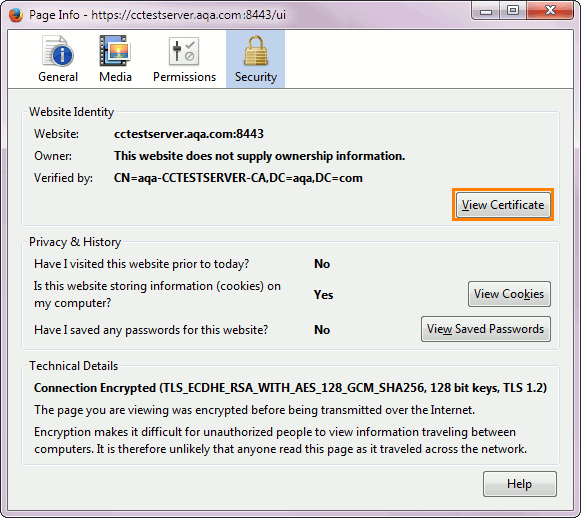
Click the More Information button in the next prompt. This will open the Page Info window.
-
Switch to the Security panel and click the View Certificate button.
-
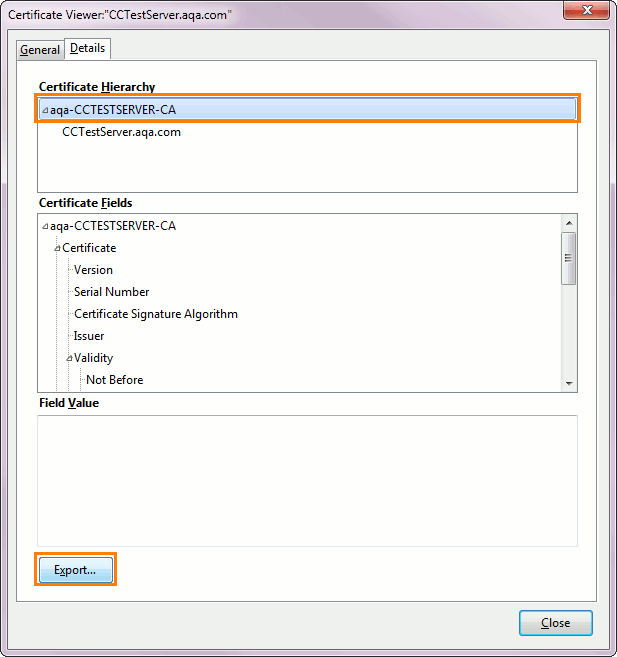
In the ensuing Certificate Viewer dialog, switch to the Details tab.
-
Select the topmost certificate in the hierarchy and click Export button.
-
Specify a path where to save the certificate in a standard Save File dialog.
Install Certificate
-
Double click the certificate. This will open the Certificate Information window.
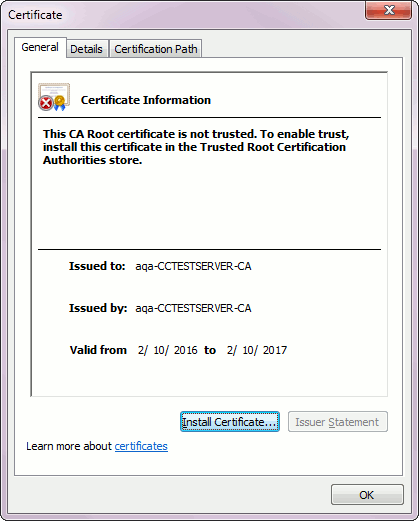
-
Click Install Certificate button.
-
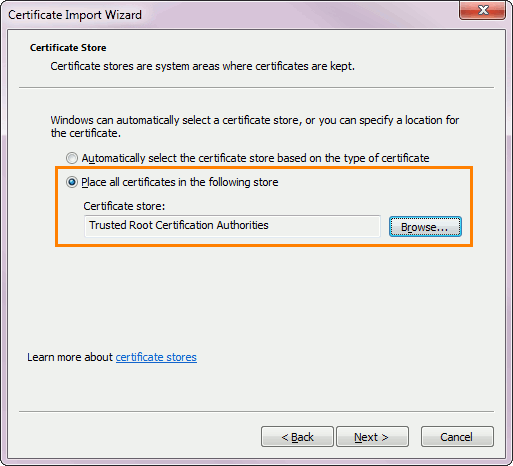
In the ensuing Import Certificate Wizard, click Next to proceed to the Certificate Store page.
-
Select the Place all certificates in the following store option, click Browse and select the Trusted Root Certificate Authorities store.
-
Click Next and Finish.
-
For self-signed certificates, a Security Warning will be displayed. Click Yes to confirm certificate installation.
Now Visual Studio Extension is properly configured for HTTPS connection.