The round-trip email monitor tests the end-to-end functionality of your email server, that is, the actual email sending and retrieval. This monitor does the following:
-
Sends a test email from your (or our) SMTP server to an email address,
-
Logs in to the POP3 server to access that email address's inbox,
-
Finds the test email and marks it for deletion on the POP3 server.
Requirements
-
Use a dedicated email address for this monitor type. If you use multiple round-trip email monitors, please make sure that each monitor uses its own email account.
-
POP3 access must be enabled on your tested mail server. Some hosted mail services, such as Microsoft Exchange Server, have POP3 access disabled by default, and you need to enable it manually.
-
Your firewall must allow POP3 and SMTP access to your mail servers from the IP addresses of AlertSite locations you are monitoring from.
Create a Round-Trip Email monitor
AlertSite UXM
-
On the AlertSite UXM Dashboard, hover over + Add New and select Monitor.
-
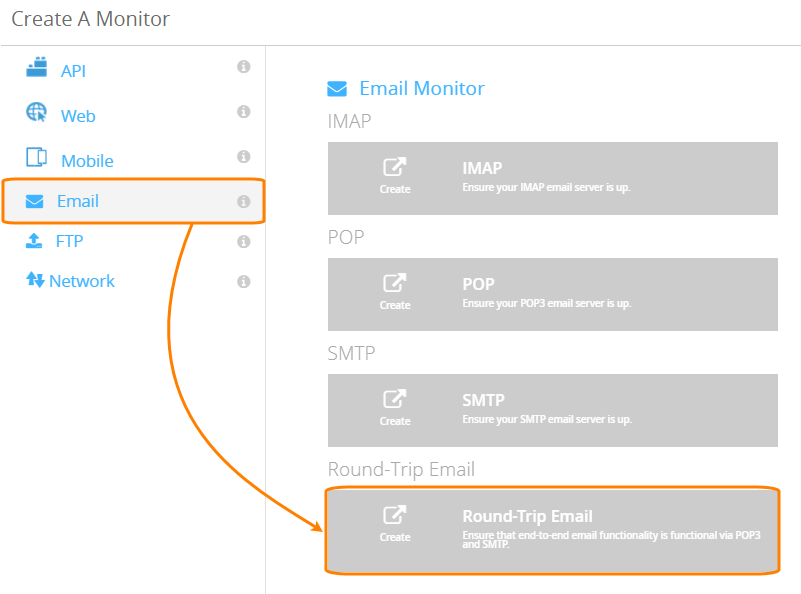
Select Email on the left and click Round-Trip Email.
-
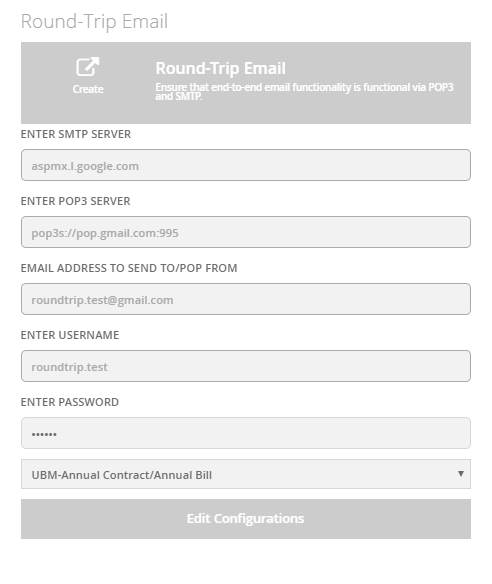
Specify your mail servers and the email address for the round-trip test.
-
SMTP Server – (Optional.) The mail server to send the test message from, such as smtp.example.com (using default port 25) or smtps://smtp.example.com:465 (for SSL connection). This is not necessary the same server as the one that hosts the Email Address. The SMTP server must not require authorization. Leave blank to send the test email via AlertSite mail server.
-
POP3 Server – The mail server to access the inbox of Email Address to Send to / POP Form. For example, mail.example.com (using default port 110) or pop3s://mail.example.com:995 (for SSL connection).
-
Email Address to Send to / POP Form – An email address on the POP3 server.AlertSite will send an email to this address, then access the mailbox, find and delete the test email. This must be a dedicated email address used only for this test.
-
Username – The user name to access the Email Address to Send to / POP Form on the Enter POP3 Server. The user name is usually either the same as the email address or the part before @.
-
Password – The password to access the Email Address to Send to / POP Form on the Enter POP3 Server.
-
Select a billing plan for this monitor. If you have private locations and wish to run the monitor only at private locations, select the VM Node, InSite, or PrivateNode EndPoint plan, depending on the type of your private locations.
-
Click Edit Configurations.
-
-
Configure other settings:
-
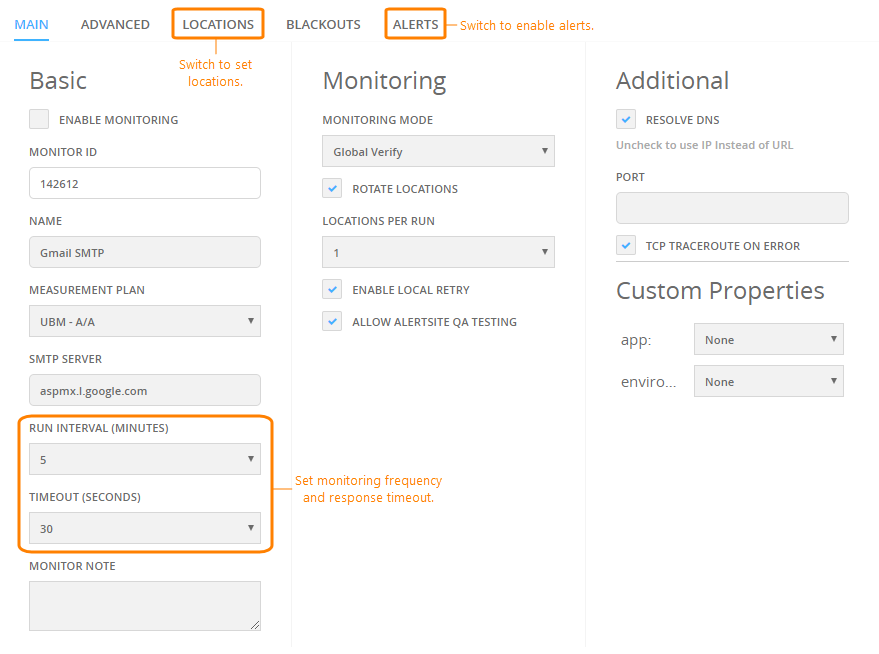
Timeout – Select the maximum value, usually 300 seconds.
-
Run Interval – How often the email test will run. This value must be greater than the Timeout.
-
Locations – Select the monitoring locations to run the email test from. The default locations for all new monitors can be configured in your account settings.
-
Alerts – Enable alerts to receive alerts when the email test fails.
-
-
Click Start Monitoring Now!
-
Run a test on demand to verify the monitor configuration. The results will be displayed on the screen. If there are errors, review the monitor settings. See the Troubleshooting tips below.
AlertSite 1.0
-
In AlertSite 1.0, go to Configure > Sites and click Add a new site:
This will open the monitor configuration screen.
-
Specify the monitor settings:
Option Description Site Type Change to Roundtrip Email (POP/SMTP) Email Address The email address for the roundtrip test. AlertSite will send an email to this address, then access the mailbox, find and delete the test email. This must be a dedicated email address used only for this test. POP3 Server The mail server to access the inbox of Email Address. For example, mail.example.com (using default port 110) or pop3s://mail.example.com:995 (for SSL connection). Userid and Password The user name and password to access the Email Address on the POP3 Server. The user name is usually either the same as the email address or the part before @. SMTP Server Optional. The mail server to send the test message from, such as smtp.example.com (using default port 25) or smtps://smtp.example.com:465 (for SSL connection). This is not necessary the same server as the one that hosts the Email Address. The SMTP server must not require authorization.
Leave blank to send the test email via AlertSite mail server.Timeout Select the maximum value, usually 300 seconds (5 minutes). Check Every How often the round-trip email test should be run. This value must be greater than the Timeout. Site Name The monitor name that will be displayed in AlertSite dashboards, alerts and reports. Site Plan The billing plan for this monitor. If you have private locations and wish to run the monitor only at private locations, select the VM Node, InSite or PrivateNode EndPoint plan, depending on the type of your private locations. Notify on Error? Select Yes (recommended) to be alerted when the email test fails. -
Click Submit in the top right corner. AlertSite will create the monitor and display additional settings.
-
(Optional.) Click Locations in the top right corner and select the locations the monitor will run from. The default locations for all new monitors can be configured in your account settings.
-
Click Test on Demand to test your monitor. The results will be displayed on the screen. If there are errors, review the monitor settings. See the Troubleshooting tips below.
Your monitor is now ready and will run the round-trip email test at the configured intervals. You will see the first results on AlertSite dashboards in a few minutes.
You can change the monitor settings at any time later if you wish. See Round-Trip Email Monitor Settings for a description of applicable settings.
| Note: | In AlertSite 1.0 (classic interface), only some of the displayed settings apply to round-trip email monitors. |
Example: Gmail Round-Trip Test
In Gmail:
-
Create a mailbox for testing.
-
If the mailbox has 2-Step Verification enabled, create an application-specific password for AlertSite. You will specify this password in the AlertSite monitor instead of the account password.
-
Enable access for “less secure apps” on this page: https://myaccount.google.com/lesssecureapps.
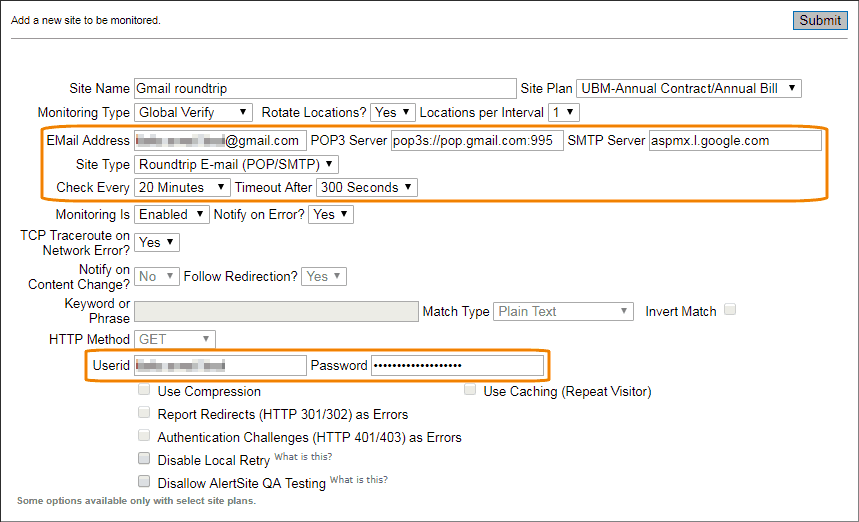
In AlertSite, use these settings for your round-trip email monitor:
| Option | Value |
|---|---|
| POP3 Server | pop3s://pop.gmail.com:995 |
| Email Address | The Gmail email address you created. |
| Userid and Password | The user name and password for this email address. The user name is the part before the @. |
| SMTP Server | aspmx.l.google.com – this is Gmail’s restricted SMTP server, which allows sending mail only to Gmail and G Suite users. Or, leave empty to send the test email via AlertSite mail server. |
What’s next
Troubleshooting
Common error codes
Monitor status 0 indicates a successful test, and any other statuses are errors. The following table lists common error statuses for round-trip email monitors. For a complete list, see AlertSite Status Codes.
| Status | Description |
|---|---|
| 1 - TCP connection failed | Possible reasons:
|
| 2 - Test timed out | Possible reasons:
|
| 3 - Invalid response from server |
Possible reasons:
|
| 6 - No response from server |
We could not connect to the specified SMTP Server. If your SMTP server supports different ports, try a different port. Or, leave SMTP Server blank to send the email via AlertSite SMTP server instead. |
| 51 - Unable to resolve IP address | We could not resolve your POP3 and SMTP host names to IP addresses. Make sure POP3 Server and SMTP Server specify correct host names. |
Troubleshooting tips
-
Review the requirements and make sure they are met.
-
The email address for the round-trip test should be a dedicated email account. If somebody else uses this address, their email client can read messages from the mailbox faster than the monitor, and the test will fail.
-
Use the maximum timeout, which is 300 seconds.
-
If your SMTP server requires authentication, leave the SMTP Server option blank to send the test email via AlertSite SMTP server instead.
-
If your round-trip email monitor was working fine and stopped, log in to the email address and delete all messages from the inbox.
View diagnostic log
When troubleshooting round-trip email errors, use the diagnostic log to view the debug messages from the monitor. The diagnostic log is only available for regular monitor runs and not for tests on demand.
To view the log:
-
In AlertSite UXM, go to Monitors > Summary and select your monitor.
-
On the Availability History chart, click a time period. This opens a scatter plot where each dot corresponds to a monitor run.
-
Click a dot, then click View Detail Report.
-
In the report, click the
 icon in the table.
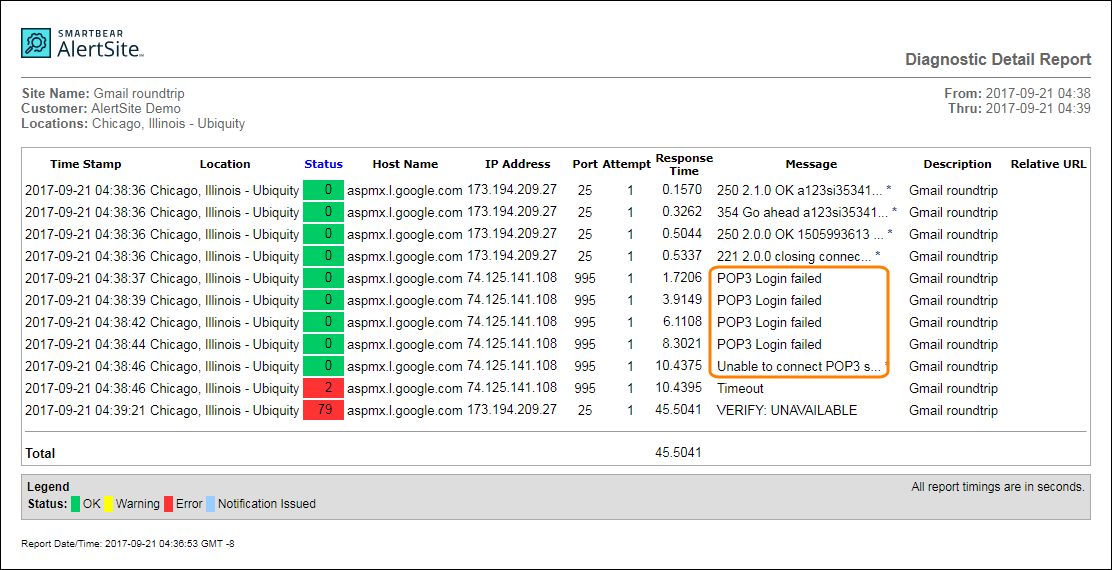
Below is a sample diagnostic log. The Message column contains the debug messages related to the SMTP and POP3 connections. Check the last few messages to see if any problems occurred before the error was triggered.
See Also
Round-Trip Email Monitor Settings
Email Server (POP/SMTP/IMAP) Monitors


 Configure Alert Recipients