
In LoadComplete, you can simulate recorded traffic on Amazon cloud computers. In your project, you use Amazon Image items to specify Amazon cloud computer instances where you want to run load tests. You then assign the instances to virtual users in your load test. When the test starts, LoadComplete will automatically launch the needed instances to simulate web traffic on them.
For detailed information on LoadComplete support for Amazon Elastic Computer Cloud, see About Load Testing on Cloud Computers.
In this tutorial, we will describe how you can create a load test that simulates recorded traffic on Amazon cloud computers.
 2. Modifying the Recorded Traffic
3. Verifying the Recorded Scenario
4. Creating an Amazon Image Item
5. Configuring the Amazon Image Item
Video Tutorial
Watch this video to see how to create load tests on cloud computers with LoadComplete:
The video was recorded with LoadUIWeb Pro.
Requirements
-
You must have an Amazon Web Services (AWS) account. If you do not have one yet, visit http://aws.amazon.com and sign up for AWS.
-
Your Amazon Web Services (AWS) account must have a user with an active access key assigned and with all required permissions. See Load Testing on Cloud Computers - Requirements.
-
 Your tested web server must be accessible from the Amazon EC2 environment.
Note: Do not use applications residing in your local network or on your local computer (for example, the Web Orders application that is installed along with LoadComplete) for this tutorial, unless your Amazon cloud computers have access to your network or to your computer, for example, if you have VPN established between the cloud computers and your network.
1. Recording a Scenario
-
Start recording by clicking
 Record User Scenario on the Test Engine toolbar.
 -
In the Record User Scenario dialog specify the name of the scenario that will store the recorded traffic and the name of the load test. Specify additional browser settings.

-
Once recording starts, open pages of your tested web server in your web browser and perform the desired actions.
Important: Make sure to record your scenario for a web server that will be accessible from the Amazon EC2 environments. -
Stop recording.
For more information on recording traffic, see About Scenario Recording.
2. Modifying the Recorded Traffic
After you record a scenario, you can modify the recorded traffic in the Scenario Editor.

Click the image to enlarge it.
You can parameterize requests, change the tested server or think time for web pages. For more information on modifying traffic, see Editing Scenarios.
3. Verifying the Recorded Scenario
It is a good practice to verify your scenario to make sure it works correctly before running the load test. See Verifying Scenarios and Tests to learn how to perform verification.
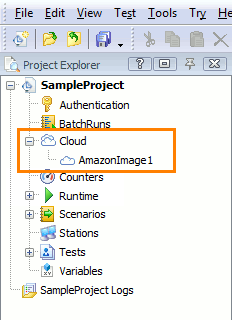
4. Creating an Amazon Image Item
To simulate the recorded traffic on Amazon cloud computers (instances), you first need to create an Amazon Image item. It will describe the cloud computer instances that LoadComplete will launch.
To create a new Amazon Image item, right-click the Cloud node in the Project Explorer and select Add AmazonImage Item from the context menu. LoadComplete will add a new Amazon Image to your project:
5. Configuring the Amazon Image Item
-
LoadComplete will automatically open the created Amazon Image item in the Amazon Image editor. To open the created item manually, double-click it in the Project Explorer or right-click it and select Edit from the context menu.

Click the image to enlarge it.
-
In the Amazon Image editor, enter the Access Key and the Secret Access Key of your AWS user that you will use to connect to Amazon EC2 from LoadComplete and run tests. These keys are credentials required to access Amazon cloud computing services from LoadComplete. For information on how to obtain the Access Key and the Secret Access Key, see the Amazon EC2 documentation.
Note: As an alternative, you can specify the keys in the Accounts dialog of LoadComplete and then select the Use common account check box of the Amazon Image item. -
The Image field of the editor specifies the Amazon Machine Image (AMI) that will be used to launch instances where the traffic will be simulated. The default value set in the field is SmartBear LoadComplete Remote Agent Image. It is a free public image provided by SmartBear for load testing.
Leave the default value in the Image field.
Note: You can also select your own custom Amazon machine images. Your custom image must be prepared for load testing and have Remote Agent installed. For more information, see Creating Custom Amazon Machine Images for Load Testing. -
In the Type drop-down list, select the type of the instance to launch. We recommend that you leave the default c3.xlarge value.
-
In the Region drop-down list, select the geographical region in which the instance will work.
-
In the Network drop-down list, select a Virtual Private Cloud (VPC) in which instances will work. You can leave the default EC2 Classic platform (if your account supports it) or you can select a VPC assigned to your Amazon account. Select a VPC that includes a public subnet and has an Internet gateway specified. Otherwise, LoadComplete will not be able to connect to it. To learn how to configure such a VPC, see the Amazon EC2 documentation —
http://docs.aws.amazon.com/AmazonVPC/latest/UserGuide/VPC_Scenario1.html -
If you use a VPC, in the Subnet list, select the needed subnet.
If you use the EC2 Classic platform, in the Zone list, select the availability zone that belongs to the selected region.
-
Leave the default value for the Placement group property: No placement group.
-
The Max VU number property specifies the maximum number of concurrent virtual users (up to 2000) that can be simulated on each instance. Leave the default value (400).
-
Leave the Use public IP property enabled.
-
Save the changes.
-
Click
 on the editor’s toolbar to verify whether LoadComplete will be able to launch cloud computer instances using the specified settings.
6. Creating a Load Test
You can create a new load test to simulate the recorded traffic or you can use the test created by default for the scenario you recorded:
-
Double-click the corresponding test node in the Project Explorer to open the test in the Load Test editor.
-
In the Virtual Users table, specify virtual users you want to use in tests. In the Scenario column, assign the recorded scenario to the created users.
-
In the Workstation column, select the created Amazon image in the drop-down list.
-
Specify other virtual user properties, for example, you can select the web browser in which virtual users will work or specify a start delay for virtual users. At the bottom of the editor, there are tabbed pages that allow specifying additional parameters, like a workload profile of virtual users, service level agreement (SLA) criteria, and so on. For more information on parameters you can set for a load test, see About Load Test Editor.

Click the image to enlarge it.
7. Specifying the Number of Virtual Users
The User Count column of the table specifies the number of virtual users that will simulate the recorded traffic.
Enter the needed number of users in the column:
-
You can enter any number of users in the column. If the entered number exceeds the Max VU number value of your Amazon image (see above), LoadComplete will automatically launch extra instances to simulate all the users.
For example, if the Max VU number value of the machine image you specified in the Amazon Image editor is set to 400, you assign 2500 virtual users to that image in your load test, LoadComplete will launch 7 instances. LoadComplete will simulate 400 users on each of the six instances and 100 users on the seventh instance (400 * 6 + 100 = 2500).
-
The total number of virtual users you simulate in your test cannot exceed the number of virtual users your license allows.
8. Running the Load Test
-
To run the load test, simply click
 Run This Load Test on the Load Test editor’s toolbar.
 -
By default, LoadComplete will display the Cloud Test Price dialog with information about the cost of using cloud machines:
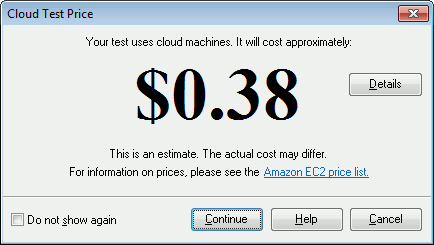
The price is approximate. LoadComplete calculates it depending on the number of cloud machines to be used in your test and on the length of the scenarios to be simulated (see Estimating the Cloud Test Price). Click Continue to start the test.
-
Once the test starts running, LoadComplete automatically launches cloud computers and simulates traffic on them.
-
You can monitor traffic simulation on the GraphMessages and Progress pages the same way you do this during usual load testing:

Click the image to enlarge it.
-
After the test run is over, LoadComplete will show the test results.
-
If the Simulating > General > Terminate cloud instances option is enabled (by default), LoadComplete will terminate the instances.
Important
If LoadComplete fails to terminate the instances at the end of the test run (this can happen if the test fails to start, is aborted or is terminated unexpectedly, or the connection to Amazon EC2 is lost), the instances launched from the default SmartBear LoadComplete Remote Agent Image will continue running for approximately 30 minutes and will then be terminated automatically.
If the Terminate cloud instances option is disabled, or you cloud computer instances were launched manually from LoadComplete IDE or they were launched from custom Amazon Machine Images (AMIs), the instances will continue running until you terminate them manually.
We strongly recommend that you check whether all the created instances are closed after the test run is over, especially if the load test was unexpectedly terminated or the connection to the Amazon cloud service was lost during the test run.