
AlertSite Management API is a RESTful API that lets you interact with the AlertSite platform programmatically and automate operations. Use this API to:
-
create, edit, and delete monitors
-
manage monitor and recipient blackouts
-
manage alert recipients and recipient groups
-
send test alerts to recipients
-
configure performance alerts for monitors
-
run tests on demand
-
get the Site Status report
Base URL
The base URL for all API requests is:
https://api.alertsite.com/api/v3
For example, POST /access-tokens means a POST request to https://api.alertsite.com/api/v3/access-tokens.
All requests are sent over a secure HTTPS connection.
Operations reference
See AlertSite Management API Reference for a list of available operations and details about each operation.
We also have an interactive API console where you can browse the available operations and test the API calls.
JSON format
AlertSite Management API uses JSON as the data format for requests and responses. POST and PATCH requests containing a request body must include the Content-Type header:
Content-Type: application/json
Authentication
Most API requests require authentication with an access token. The access token must be sent in the Authorization request header as follows:
Authorization: Bearer ACCESS_TOKEN
To get an access token, use POST /access-tokens.
Access tokens expire after 1 hour. An attempt to use an expired token will result in the 401 Unauthorized response. You can get a new access token by calling POST /access-tokens again.
Single sign-on considerations
AlertSite APIs do not support single sign-on and require a regular username and password for authentication. If your company uses single sign-on, we recommend that you create a separate AlertSite user for API access and enable the Allow login without Single Sign-On option for this user.
User permissions
Most operations require a user account with the Admin, Co-Admin or Power User role. If the user’s role is not allowed to perform the requested action, the API returns a 403 Forbidden response.
Resource IDs
Most operations use numeric IDs to identify the resources. Below are some tips on where to find these IDs in AlertSite.
Monitor IDs
You can see monitor IDs:
AlertSite UXM
-
In monitor settings:
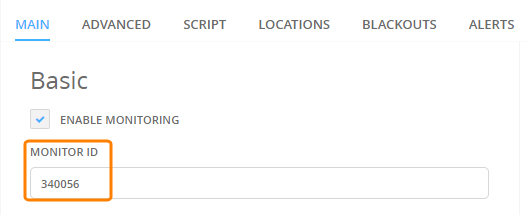
-
In the table on the Monitors > Overview > Config screen.
AlertSite 1.0
-
In the browser address bar of the monitor configuration screen:

Click the image to enlarge it.
You can also get a list of all your monitor IDs by calling the Get Monitors operation of AlertSite JSON API.
Location IDs
Location IDs of public AlertSite locations are listed on this page:
 https://www.alertsite.com/cgi-bin/helpme.cgi?page=monitoring_locations.html
Private locations display their IDs in the location’s Control Panel (for Private Node Server and InSite) or in the PrivateNode EndPoint application.
Alternatively, you can use the Get Locations operation of AlertSite JSON API to get all available location IDs.
Date and time
Unless stated otherwise, API operations use timestamps in the YYYY-MM-DD HH:MMformat. These timestamps use the time zone specified in your AlertSite account settings.
Filter response fields
Some GET operations support the select parameter to return just a subset of available data fields. This reduces the response size, network transfer time and response parsing time, which can help improve the performance of your API client application.
select accepts a comma-separated list of field names:
?select=field1,field2,...
The field names are case-sensitive. Nested fields such as admin_contact.email are not supported in the select parameter.
Example
GET /slas?select=monitor_name,availability,uptime,response_time
will return SLA data with the specified four fields only:
{
"metadata": {
...
},
"results": [
{
"availability": 98,
"monitor_name": "Home page",
"response_time": 2.5,
"uptime": 99.5
},
{
"availability": 97,
"monitor_name": "Login/logout",
"response_time": 5,
"uptime": 99
}
]
}
Pagination
By default, GET requests to collection resources return all existing items. To get just a subset of items, you can use the offset and limit query parameters, for example:
| Request | Description |
|---|---|
GET /recipients |
Get all recipients. |
GET /recipients?limit=10 |
Get the first 10 recipients. |
GET /recipients?offset=10&limit=5 |
Get recipients 11..15. |
To paginate through all existing items, check the metadata.resultset.count value in the response. If count equals limit, repeat the request again with offset increased. Otherwise, you have reached the end of the result set.
The following pseudo-code illustrates the idea:
LIMIT = 10 // page size - change as required
OFFSET = 0
do {
response = GET /recipients?limit=LIMIT&offset=OFFSET
process(response.results)
OFFSET = OFFSET + LIMIT
} while (response.metadata.resultset.count == LIMIT)
HTTP status codes
AlertSite uses HTTP status codes to indicate the success or failure of an API call. In general, codes in the 2xx range mean success, 4xx codes mean an error in the request data, and 5xx codes mean AlertSite server errors.
The following table contains some common response codes:
| HTTP Status | Description |
|---|---|
| 200 OK | A GET, POST, or PATCH request succeeds. |
| 204 No Content | A DELETE request succeeds. |
| 400 Bad Request | Invalid request data. For example, missing query parameters or request body fields, invalid parameter values, malformed JSON in the request body, and so on. |
| 401 Unauthorized | The request is missing the Authorization: Bearer ACCESS_TOKEN header or the specified access token has expired.
|
| 403 Forbidden | The user role does not allow this action to be performed. |
| 404 Not Found | The resource with the specified ID was not found, or the request URL is malformed. |
| 500 Internal Server Error | Something went wrong on AlertSite’s end (this is rare). |
If you get a 4xx status code, the response body will contain the errors list, for example:
{
"errors": [
{
"code": 400,
"message": "invalid_request - User authentication failed."
}
]
}
or
{
"errors": [
{
"code": 400,
"fields": [
"from_date"
],
"message": "requires a valid date and time in the YYYY-MM-DD HH:MM:SS format"
},
{
"code": 400,
"fields": [
"note"
],
"message": "length is greater than the max length of 255"
}
]
}
OpenAPI definition
An OpenAPI (Swagger) definition for AlertSite Management API is available at:
https://api.alertsite.com/api/v3/swagger.
You can use it with a variety of tools to integrate AlertSite API into your existing workflows and systems. For example, you can load it into Swagger Editor to generate a client library of your choice.
Interactive API console
We have an interactive API console at https://api.alertsite.com/swag/ where you can browse the available operations and make the API calls directly from your browser.
 |
The API console uses your real, production data. Be careful when updating or deleting data. |
Start by clicking Authorize and enter your AlertSite login and password.

Click the image to enlarge it.
Upon successful login, an access token will be displayed at the top right. Subsequent requests will be made using this token.
Expand the operation you want to call, enter the parameter values, and then click Try it out. The response from the API will be displayed below, along with the actual request URL and the cURL command that corresponds to the request you just sent.

Click the image to enlarge it.
When calling POST or PATCH operations, you can switch to the Example Value panel and click the example to auto-populate the request body.

Click the image to enlarge it.
API last access time
Admin and Co-Admins can see which users accessed AlertSite APIs and when they did it last on the Manage Users screen.