You can create property checkpoints in several ways:
 Create Quick Checkpoints for most commonly used properties during test recording (only for desktop and web applications)
Quick Checkpoints
-
Start recording your test.
-
Make sure that Quick Checkpoints are enabled:

-
During the test recording, TestComplete highlights UI elements, with which you are interacting, with a red frame. It also shows the
 icon near your mouse pointer.
Move the mouse pointer to the object that you want to verify and wait until the red frame appears.
-
Stop moving the mouse pointer and wait until the
 icon becomes opaque. Move the mouse pointer to the icon:
-
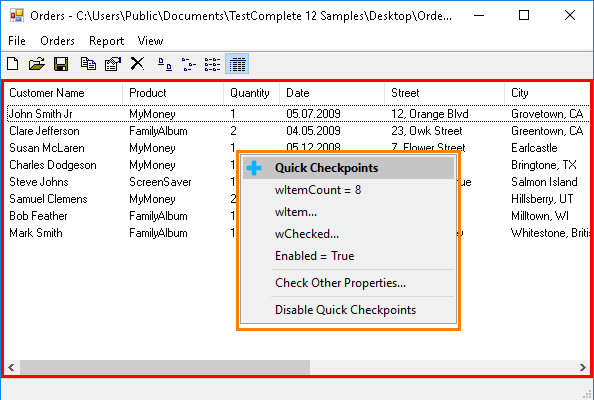
TestComplete will show the list of the most commonly used properties for which you can create Quick Checkpoints:
-
Select the property you want to check.
If the property is indexed, TestComplete will show the Select Data to Check page where you can select the index of the property’s value column.
If the needed property is not on the list, click Check Other Properties. TestComplete will show the Select Data to Check page. The page lists all properties of the underlying object. Select the property (or properties) to check, verification parameters and the expected value:
-
Select the property you want to check from the list.
To find the needed property faster, you can type its name or value in the Search box. The wizard will filter out the property list according to the text you are typing.
-
Select the Selected check box for the property you want to check.
-
In the Condition column, select the needed verification condition.
-
In the Value column, enter the expected value of the object property. By default, it holds the current property value.

The object property value and the expected value should be of the same type. If the compared values are of different types, TestComplete will try to convert the object property value to the type of the expected value and then perform a verification. In this case, the comparison may be performed incorrectly.
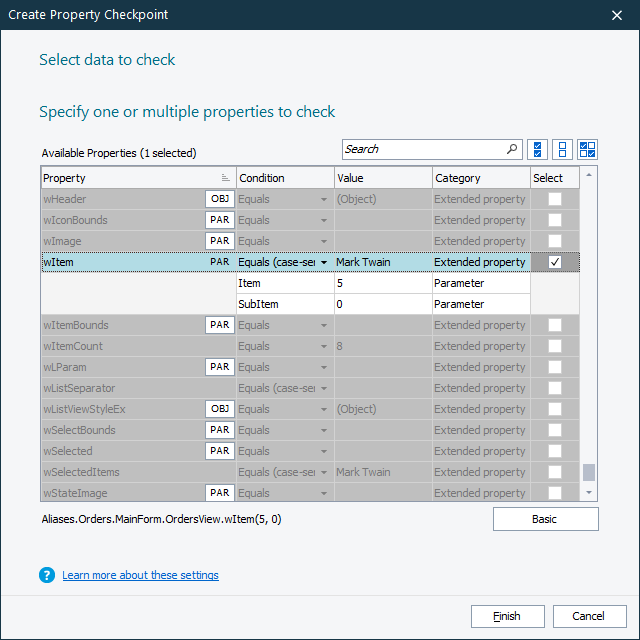
Click Finish to complete the checkpoint creation.
-
-
TestComplete will add a checkpoint to your test and show a notification about it:

Create Checkpoints by Using the Checkpoint Wizard
 2. Specifying a Control, Window, or Object to Check
Note for Mobile Testing: To create a property checkpoint for an object in a mobile application, you can select the object on the Mobile Screen. Make sure that the Mobile Screen window is not hidden when you launch the checkpoint wizard.
In addition, note that the application under test and the mobile device, where it is running, must be prepared for testing in order for TestComplete to be able to access the application’s objects.
Connecting to Mobile Device Clouds and Opening Testing Sessions
Preparing for Android Testing (Legacy Mobile Support)
1. Launching the Wizard
The way you open the wizard depends on the test creation mode:
-
If you are recording a test–
-
Click Add Check on the Recording toolbar.
-
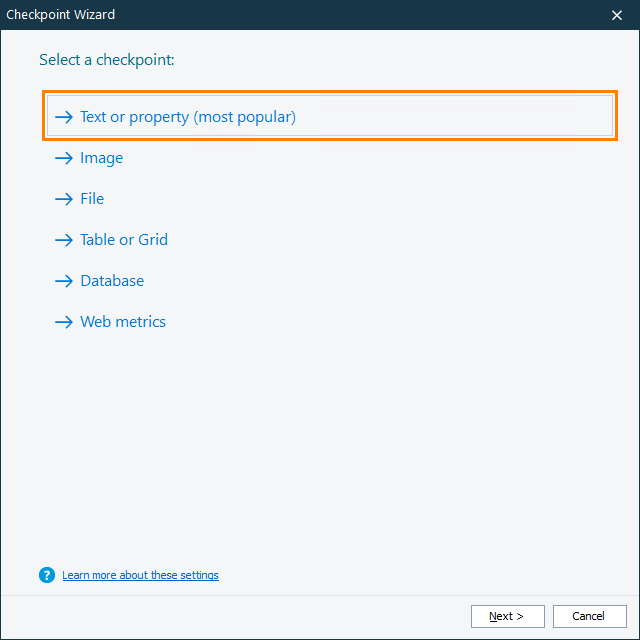
In the Checkpoint Wizard, select Text or property, and then click Next.
-
-
If you are editing a keyword test –
-
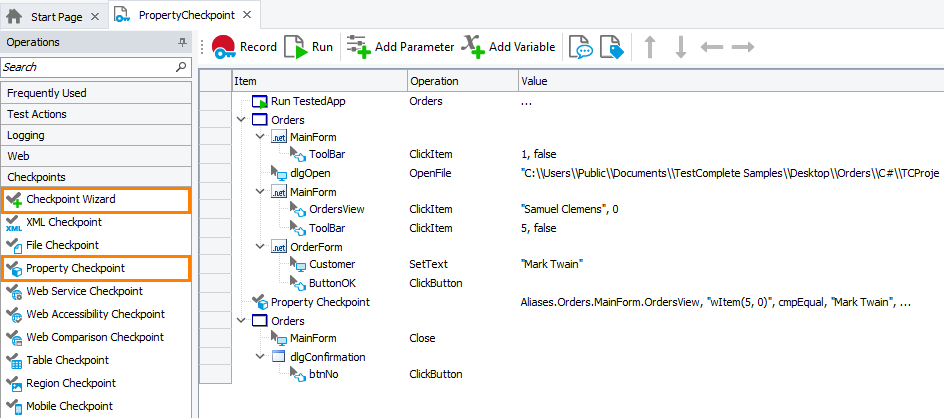
Select the Checkpoints category in the Operations panel of the Keyword Test editor.
-
Find the Checkpoint Wizard operation in the list and drag it to your test. In the Checkpoint wizard, click Text or property.
– or –
Find the Property Checkpoint operation in the list and drag it to your test.
-
-
If you are editing a script –
-
Open the script to be edited.
-
Click
 on the Code Editor toolbar:
-
In the Checkpoint Wizard, select Text or property, and then click Next.
-
2. Specifying a Control, Window, or Object to Check
Select a control (for example, a button, a text box, a list view, and so on), or a window, or any other object whose property you want to check.
You can specify the object in one of the following ways:
-
Pick the object with the target icon (
 )
)Watch video: Selecting Objects: 'Drag the Target...' Mode
-
Select the object and press a shortcut (
 )
)Watch video: Selecting Objects: 'Point and Fix' Mode
-
Enter the object name manually
Enter the full name (or full mapped name, or alias) of the desired object into the Object box.
For web objects: If your project is configured to use XPath expressions and CSS selectors to locate web objects, the dialog will show the list of available locators (if any) for the specified web object. You can select the needed locator from the drop-down list.
Tips for selecting objects:
Using the second approach may be more convenient if you need to manipulate the application before selecting an object. For example, you can open and point to popup windows, tooltips, and other objects that are hidden when being inactive.
To select a non-onscreen object, such as a process, enter the object name manually.
Instead of selecting the object, you can copy its name from the Object Browser, Object Spy, keyword test, or script code beforehand and paste it into the Object box.
Despite the way you specify the object name, you can change or correct it directly in the Object box.
TestComplete will display the name of the selected object in the Object box and show the object image in the Preview area.
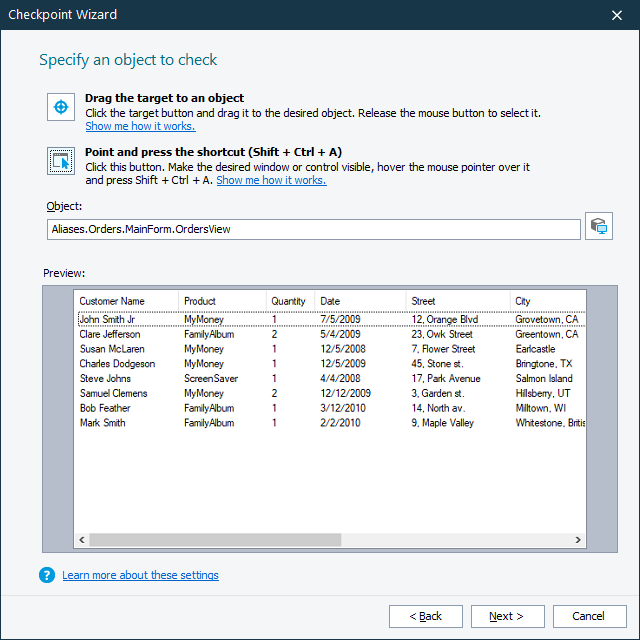
If the Map object names automatically option is selected, TestComplete automatically adds the specified object to the Name Mapping repository (if it is not there already). Your tests will take the object alias from the repository.
After you selected the object, click Next to proceed.
3. Selecting an Object Property or Field to Verify
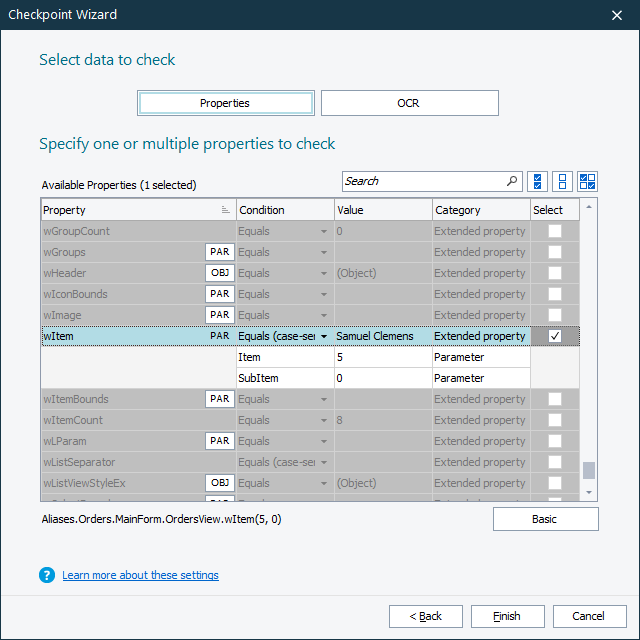
On the Select data to check page of the wizard, click Properties to view the list of object properties and fields. (If you are configuring the Property Checkpoint operation, the wizard will show the property list automatically.)
Select one or several properties or fields to check, verification parameters and the expected value:
-
Select the property you want to check from the list.
By default, the wizard shows only the suggested properties. To view all the available properties, click More Properties.
To find the needed property faster, you can type its name or value in the Search box. The wizard will filter out the property list according to the text you are typing.
-
Select the Selected check box for the property you want to check.
-
In the Condition column, select the needed verification condition.
-
In the Value column, enter the expected value of the object property. By default, it holds the current property value.

The object property value and the expected value should be of the same type. If the compared values are of different types, TestComplete will try to convert the object property value to the type of the expected value and then perform a verification. In this case, the comparison may be performed incorrectly.
5. Closing the Wizard
Click Finish to exit the Checkpoint wizard. TestComplete will add the checkpoint statement for the specified property to your test.
If you are creating a property checkpoint while editing a test script, then the generated checkpoint code will be displayed in the Copy Text to Clipboard dialog. You will be able to copy this code to the clipboard and then paste it to the desired place in your script.
See Also
Property Checkpoints
About Property Checkpoints
Checkpoint Wizard
Mobile Screen Window
Selecting an Object on the Mobile Screen (Android Testing)
Select an Object on the Mobile Screen (iOS Testing)

 See instructions