
On this page of the Record Test wizard, you can specify the tested application and its launch settings:

Click the image to enlarge it.
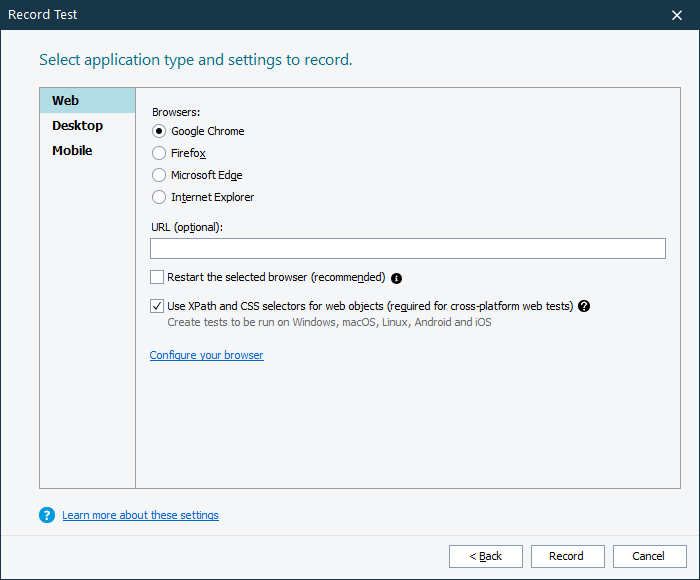
 Web
WebWeb
Select Web to test web pages that are shown in one of the supported web browsers.
Requirement: the Web module.
-
Select the browser you want to use for recording (the browser must be installed on your computer).
-
Google Chrome
-
Firefox
-
Microsoft Edge
Note: The legacy non-Chromium version of Edge is not supported.
-
Internet Explorer
-
-
In the URL text box, enter the URL of the web page to start testing from. TestComplete will open this page when you start recording, and the first command in your recorded test will be the command that navigates to this page.
If you keep this text box empty, the test will start from your browser’s start page, or from the currently open page (not recommended, see below why).
-
We recommend that you select the Restart the selected browser check box (it is visible if TestComplete detects the supported browser is running).
In order for the recorded test to run successfully, the state of your web application at the beginning of the test run must be the same as it was at the beginning of test recording.
Note: TestComplete will restart the selected browser only. The other browsers will continue running.
-
The Use XPath and CSS selectors for web objects check box (selected by default) controls whether your project uses XPath expressions and CSS selectors to locate objects on web pages.
 If you are planning to record a cross-platform web test that you will run in remote environments managed by Selenium Grid, keeping this check box selected is compulsory. See About Cross-Platform Web Tests.
Clear the check box to configure TestComplete to use identification properties to locate web objects.
See Understanding Web Object Identification and Object Models.
-
To start recording a test, click Record. TestComplete will display the web browser and open the specified URL in it. You can then work with the page as usually: enter text, click links, and so on. TestComplete will record your actions as test commands.
Related topics of interest
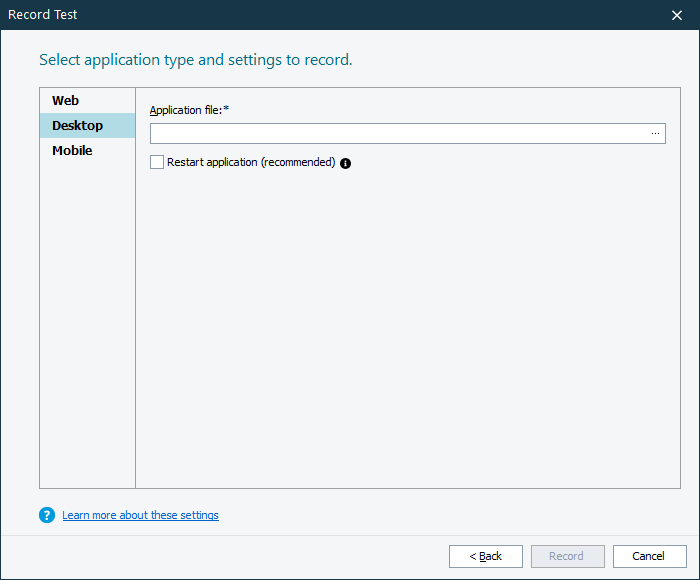
Desktop
Select Desktop to test regular Windows applications that run on your computer.
Requirement: the Desktop module.
-
In the Application file text box, specify the application to be tested:
-
You can type the application name or its path manually. TestComplete will search for the application in the list of installed applications and display matches in the drop-down list,
– or – -
You can click the ellipsis button (
 ) and browse for the executable in the subsequent dialog.
-
-
We recommend that you select the Restart application check box.
In order for the recorded test to run successfully, the state of your tested application at the beginning of the test run must be the same as it was at the beginning of test recording.
-
If the specified application is a generic Windows application, if needed, in the Command-line parameters text box, enter command-line arguments that will be used to launch your application.
-
If the specified application is a Java application:
-
Specify the Java Virtual Machine (JVM) launcher that will be used to run the application.
-
If your .jar file does not have a startup class defined in the manifest, select the Specify application’s entry point check box and enter the name of the application class to be invoked.
You can also click Configure class paths and specify the list of locations where the launcher will search for classes.
-
If needed, specify command-line arguments to pass to the Java Virtual Machine in the Environment Options text box.
-
If needed, in the Command-line arguments text box, enter command-line parameters to pass to your application.
-
-
If needed, in the Working folder text box, specify a working folder for the application run. You can either type the desired folder name, or click the ellipsis button and browse for the desired folder in the resulting Browse for Folder dialog.
-
To start recording, click Record. TestComplete will minimize its window and launch your tested application. You can then simulate user actions on it, and TestComplete will record them as test commands. See Recording Automated Tests for more information.
The application you specified will be added to the list of tested applications of your project. This will help you start your tested applications and configure their start parameters (like the command line) easier. For example, TestComplete can start tested applications automatically every time you start test recording.
Related topics of interest
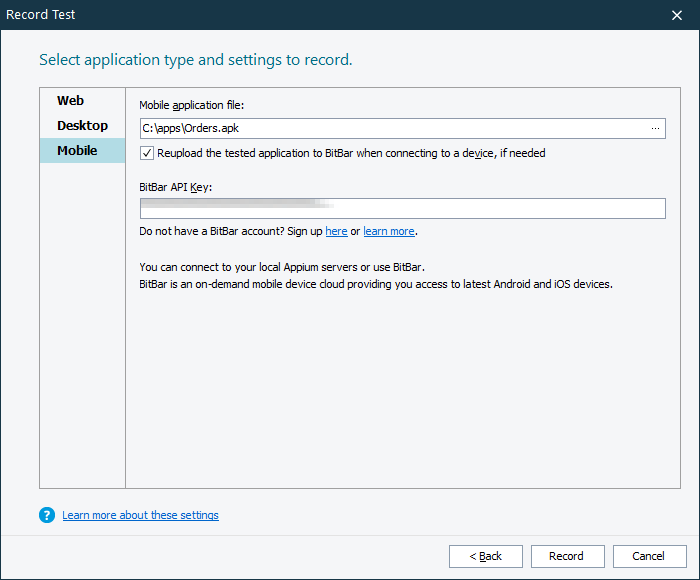
Mobile
Select Mobile to record a test for a mobile application.
Requirements:
-
An active license for TestComplete Mobile Module.
-
The Appium Support plugin must be enabled in TestComplete. You can check the plugin state in the File > Install Extensions dialog in TestComplete. You can find the plugin in the Mobile group.
-
Access to the server that manages your mobile devices. It can be one of the following:
-
A mobile device cloud provided as a service by BitBar.
If you do not have a BitBar account, you can sign up for a free trial on the BitBar website:
To access the cloud from TestComplete tests, use the API key assigned to your BitBar account. See the Prerequisites section.
– or –
-
A private server managed by the Appium framework. It can run on your current computer or on a remote computer in your local network. The supported Appium version is 1.18.2.
To learn how to install and configure one, please see Set up Appium Server.
Note: Selenium, Selendroid, and other frameworks are not supported.
For iOS testing: the XCUITest driver must be installed on your Appium server. See Intro to Appium Drivers.
For Android testing: the UIAutomator2 driver must be installed on your Appium server. See How to Install the UiAutomator2 Driver.
Note: Other automation drivers for iOS and Android are not supported.
-
-
In the Mobile application file text box, specify the package of your tested Android application (.apk) or an iOS archive file (.ipa). You can type the path to the file manually, or you can click the ellipsis button and browse for the file in the subsequent dialog.
If you use BitBar, upon opening a testing session in the BitBar device cloud, TestComplete can check if the version of the application file added to the Tested Applications collection differs from the application version that the BitBar Files Library stores. If it does, TestComplete can reupload the application file to BitBar. To command TestComplete to do this, select the Reupload the tested application to BitBar when connecting to a device, if needed check box.
-
In the BitBar API Key text box, enter the API key assigned to the BitBar account you will use to run automated mobile tests in the BitBar device cloud.
If you want to record a test on a mobile device controlled by a private Appium server, skip this step.
-
To start recording a test, click Record.
-
TestComplete will show the Select BitBar Device dialog where you can select a mobile device on which you want to record a test.
In the dialog, select the device and click OK.
 Learn how to get the API key
 to copy your API key to the clipboard.
TestComplete will connect to the selected device, deploy the specified application to it, and open a testing session. Then, it will show the Mobile Screen window where you can record user actions over the application.