
The Stores > Files collection contains files used for comparison and verification in tests (see About File Checkpoints and PDF Checkpoints). In the Files editor, you can view and modify the list of files added to the collection.
Below is a sample view of the editor:

Click the image to enlarge it.
Opening the Editor
To open the editor, do any of the following:
-
Right-click the Stores > Files node in the Project Explorer (if it is hidden, select View > Project Explorer from the main menu of TestComplete) and choose Edit from the context menu.
-
Double-click the Files node in the Project Explorer.
-
In your keyword test, right-click the File Checkpoint operation whose checkpoint data you want to modify in the editor and select Edit Checkpoint Data from the context menu.
About the Editor
File List
For each file in the list, you can view the following:
| Column | Description |
|---|---|
| Name | The name used to refer to the file from scripts or keyword test operations. |
| File Name | The actual full name of the file (including the path).
Note: This column is hidden by default. |
| Size | The file size in bytes. |
| Date | The date the file was last modified. |
| Update | If this check box is selected and the Tools > Options > Engines > Stores > Update files option is enabled, the Files.Compare and File.Check methods, as well as file checkpoints (or PDF checkpoints) will replace the stored file with the specified one instead of performing file comparison. This feature lets you automatically update stored files during test execution. See Updating Stored Files for details. |
You can customize the layout of TestComplete panels and editors to meet your needs better. For example, you can change the Files editor size, position and docking, hide the editor or make it visible. To learn how to customize the TestComplete interface, see Customizing TestComplete.
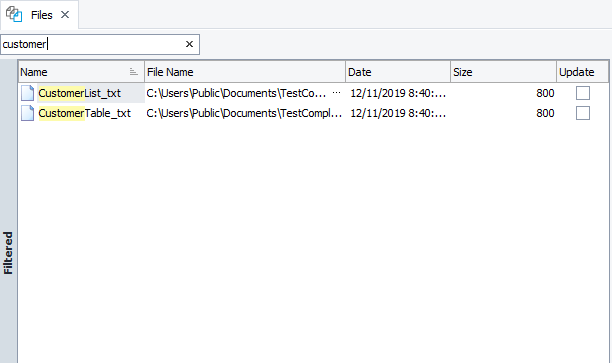
Filtering Files in the Editor
The Files collection can contain a great number of files. To search for a file in the collection quickly, start typing the file name in the Quick Search edit box at the top of the editor. The editor will filter out the items in the list according to the text you are typing:
To remove the filter, clear the text you have typed, or click the  button.
Preview Section
The Preview section on the right displays the contents of the currently selected file with the file name in its header.

The Preview section allows you to view file contents. For information on how to modify file contents, see Modifying Stored Files. For information on how to update file contents, see Updating Stored Files.
Working With the Editor
 Creating Files by Copying Properties of Existing Elements
Changing to What Files Collection Elements Refer
Enabling and Disabling File Update
Searching for Elements in the Collection
Adding New Files
- Right-click somewhere in the editor, and then click
 New Item.
 - In the resulting Add File dialog, select the file to add.
- When adding a PDF file, choose whether you want to add it as a binary file or as a text file. In the latter case, TestComplete will recognize the file's text content, convert it to a text file, and add the created file to the collection.
 To recognize and store the text content of PDF files, you must have the Intelligent Quality add-on installed and enabled in TestComplete and the PDF to Text plugin installed.
Creating Files by Copying Properties of Existing Elements
- In the Files editor, select the file that you would like to copy and then choose
 Cut or
  Copy from the context menu.
 - Right-click somewhere in the editor and select
 Paste from the context menu. TestComplete will create a new element that will refer to the same file to which the copied element refers.
Renaming Collection Elements
- Select the Name column of the desired record in the Files editor, then either choose Edit from the context menu or press F2 and type the desired name in the ensuing in-place editor.
Changing to What Files Collection Elements Refer
-
In the Files editor, select the File name column of the desired collection element and press the ellipsis button.
-
In the ensuing dialog, browse for the desired file and click Open.
Enabling and Disabling File Update
To enable file updating, select the Update check box of the desired file in the Files editor.
In order for TestComplete to update the file, the global Tools > Options > Engines > Stores > Update files option must be enabled as well.
To disable file updating, clear the Update check box of the desired file in the editor.
For more information on updating files, see Updating Stored Files.
Searching for Elements in the Collection
-
Type a part of the sought-for collection element’s name if the Quick Search edit box of the editor.
-
The Files editor will filter out the files according to the text you are typing.
To remove the filter, clear the Quick Search edit box or press the button.
Viewing the Contents of Collection Elements
-
Select the desired element in the Files editor.
-
The contents of the file to which the element refers will be displayed in the Preview section of the Files editor.
Deleting Collection Elements
-
Select the desired file in the Files editor (you can use Ctrl- and Shift-click for multiselection).
-
Right-click the selected file (or one of the selected files) and choose
 Delete from the context menu or press Delete.
For more information on deleting files, see Deleting Files From the Files Collection.
Saving Changes
To save the changes you have made to the Files collection, select File > Save from the TestComplete main menu.
To close the editor without saving the changes, close the editor’s tab and answer “No” when TestComplete asks you to save the changes.