
About the Tunnel
When developing web applications, it is a common practice to implement their interim work-in-progress versions in local environments. Usually, these environments are restricted from the global Web to prevent unwanted external access from outside the organization.
To run load tests against these applications, they must be accessible to LoadNinja, that is, they must be accessible from the outside of the organization. Typically, this is done by assigning a public IP address to the tested server and configuring proxies and firewalls running in your network to allow traffic from LoadNinja’s load generators. Often, configuration actions require assistance from system administrators.
To create and validate your load tests while system administrators are preparing your environment for external access, you can use the SmartBear SecureTunnel – a lightweight desktop utility that provides a private connection between the LoadNinja engine and the tested web app. You can download this utility right from the LoadNinja settings (see below).
After you set up the utility, all the traffic from load generators to the tested server and backward will go through it. If your tests use a large number of virtual users, the utility’s bandwidth might be not enough for the traffic. It’s not recommended using the Tunnel for tests with more than 15 virtual users. In most cases, this is enough to create and validate load tests before real runs.
Set up the tunnel
-
Log in to LoadNinja, and go to > Settings > Tunnel.
-
Download the installation package to your computer. LoadNinja offers the utility versions for popular operating systems:

Click the image to enlarge it.
The utility is lightweight and can work on almost any computer (even on relatively “weak” one). You can find system requirements below.
-
Unpack files from the downloaded page to some folder on your hard drive. Run the LoadNinja Tunnel executable.
Depending on security settings active on your computer, the operating system can ask your approval to run the utility. Allow the run.
-
Once the utility starts, enter the email address and password of your LoadNinja account, and click Connect:

Click the image to enlarge it.
-
Once the tunnel has been set up, you will see
Connectedon the screen:
Click the image to enlarge it.
You can then minimize the utility and leave it running in the background.
Notes:
-
Proxies and firewalls running in your network should allow the tunnel utility to connect to the Web.
Also, depending on the security settings of your operating system, you may need to permit the utility to access the Internet.
-
To command the utility to connect to the Web via another proxy, select Connect using proxy on the utility’s main screen, then specify the connection settings: the IP address or hostname, port, user name, and password.
System requirements
-
Operating system:
- 32-bit or 64-bit Windows: Windows 10, Windows 8.1, Windows 7, Windows Server 2012, or Windows Server 2008 R2.
- 32-bit or 64-bit Linux distribution: Ubuntu 14.04 or later, Debian 8 or later, openSUSE 13.3 or later, Fedora Linux 24 or Later.
- 64-bit macOS Mavericks 10.9 or later.
-
For Windows and Linux: An SSE2-capable Intel Pentium 4 processor or higher.
-
160 MB of free disk space.
Check if the tunnel is active
To check whether the tunnel is on or off:
-
Open the minimized LoadNinja Tunnel utility (if you have started it) and see it shows Connected.
– or –
-
Log in to LoadNinja, go to > Settings > Tunnel and check the Status label:

Click the image to enlarge it.
Record UI tests for local web apps
-
Open LoadNinja.
-
Start the tunnel utility, sign in with your LoadNinja account and wait until the tunnel is up and running:

Click the image to enlarge it.
If you have not set up and configured the utility, do this as it is described above.
-
Select Create Test > UI Test on the LoadNinja toolbar.
-
In the subsequent dialog, enter the URL of your local website and select the This website is not publicly available check box:

Click the image to enlarge it.
Click Start Recording.
-
LoadNinja will check if the tunnel is set up and running:
-
If everything is OK, LoadNinja will start recording automatically.
-
If this is not the case, LoadNinja will suggest downloading and configuring the tunnel:

Click the image to enlarge it.
If LoadNinja fails to find an active tunnel, click Retry at the top of this dialog box.
-
-
Record a UI test as usual. Work with the pages as a regular user would normally do this: click links, input texts, scroll the pages, and so on. See also 2. Record UI Test.
Launch load tests against internal web apps
-
In LoadNinja, go to the scenario creation form.
-
Add a UI test you have recorded against your local web app.
-
Add up to 15 virtual users.
Note: Running a load test with more than 15 virtual users is not recommended. See below. -
Specify the remaining settings as needed.
-
Launch the test as usual.
 If you use the tunnel, you cannot specify server locations. In this case, LoadNinja uses the default location: US East (N. Virginia).
15-VU limit
The tunnel utility is a “passageway” for requests coming from LoadNinja load generators to the tested server, and responses going backward. It’s not recommended using the tunnel for load tests simulating more than 15 virtual users — the simulated traffic can be too large for the utility bandwidth. This may result in delays in data transfer, so the accumulated test results will not reflect the real productivity of the tested app.
If you try running a load test with more than 15 virtual users, LoadNinja will show a message to warn you:
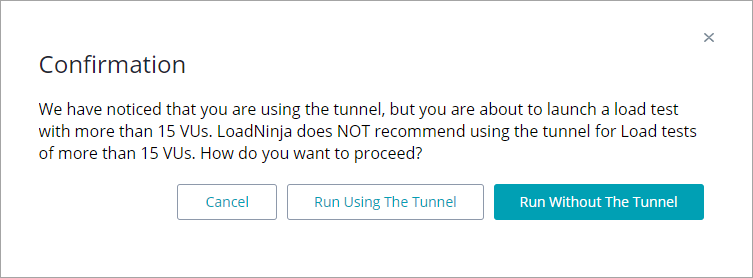
You can choose to continue using the tunnel or run the text without it. Please note that if you decide to use the tunnel, the test execution may differ from what you expect, and the test results can be inaccurate.
Increase the load
To load test your local applications with more than 15 virtual users involved, you need to make the tested web server publicly available:
-
Assign a publicly available IP address to the tested web app to allow virtual users to access your app. Ask your system administrators for assistance, if needed.
-
In LoadNinja, go to the scenario editor.
-
On the Load Configuration panel, select the Display load generator IPs before starting the test check box.
-
Start the test run as you normally would.
You will see the IP addresses of all the load generating instances before the test run starts.
Modify the rules of your proxy or firewall to allow traffic from these IP addresses. Contact your network administrator for assistance, if needed.
Static IPs
To make testing of your local applications even more convenient, consider purchasing a static IP for the load generator. You can then configure your proxy settings to allow traffic from this static IP to your network, so you will not need to check the load generator IPs every time you launch a load test.
To learn more, send an email to [email protected] or call us at +1 617 684 17 47.
To be able to record and run load tests, allow traffic from the IPs specified on the Settings > Static IP tab.