
Scenarios define all settings of a load test: the number of virtual users to be simulated, the UI tests (scripts) or API tests these virtual users will run, the test duration, error handling procedures, and so on.
Let’s create a new scenario that will use the UI tests we recorded on the previous step. If you have skipped this step for some reason, please go back and record a UI test.
-
After recording the UI test, LoadNinja suggests running it for test purposes. After this run, it displays the dialog box with brief results. To create a scenario, click Save and Run Load Test. This will invoke the dialog where you need to specify the name for the recorded UI test:
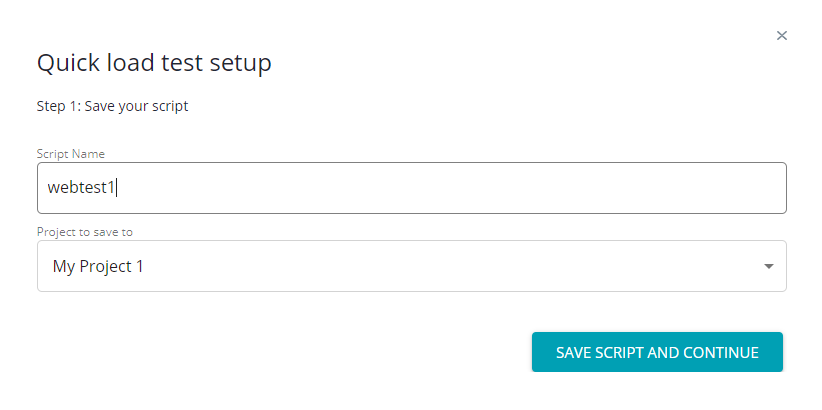
Keep the name that LoadNinja generates automatically or enter a new one and click Save Script and Continue.
-
LoadNinja will display another dialog box, where you can specify the number of concurrent virtual users to run the script and the overall duration of the load test. These basic settings are enough to run the load test immediately.

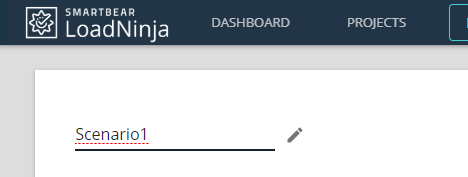
For the purposes of this tutorial, we will check the advanced settings. Click More config options. LoadNinja will open the scenario editor. Here, you can configure scenario settings.
-
In the editor, assign some descriptive name to your scenario:
-
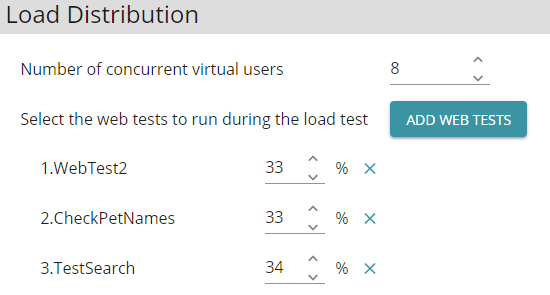
In the Load Distribution section, specify the number of concurrent virtual users (VUs) to be simulated. Let’s set 10 in this field:

Click the image to enlarge it.
-
In this setting, you also need to specify the scripts that virtual users will run. Click Add Web Tests and select the script we recorded:

Click the image to enlarge it.
In our example, we have only one script, and all 10 virtual users will run it. In your projects, you may record and use multiple scripts. You add them to the scenario by clicking that Add Web Tests button, and then you specify the percentage of virtual users that will run each of scripts. Here is how the settings could look:
Note: On this step, you can also configure how the load generation should be distributed geographically. Skip this step for now — to learn more about it, check the scenario settings description. -
In the Load Configuration section, you need to select the load test type: duration-based or iteration-based —
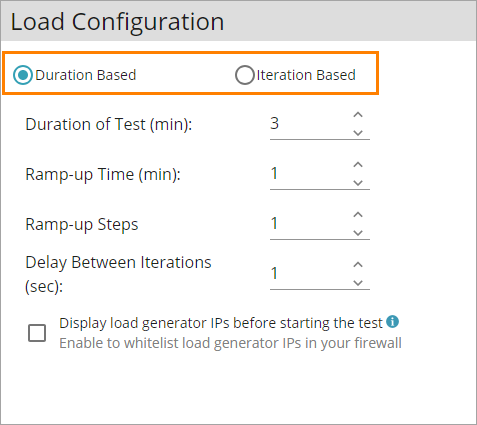
Duration-based means that LoadNinja will simulate the requested number of virtual users for the specified period of time. Typically, it will run each virtual user multiple times: when the script of some virtual user is over, LoadNinja will run the script again (in LoadNinja, we use the term iteration to define a separate script within the whole load test). When the specified duration of the load test is over, LoadNinja simply does not start new iterations. At the same time, it does not force running virtual users to stop, it allows them to work to the end.
The Iteration-based type means that LoadNinja will run each virtual user for the specified number of times.
In our example, let’s select the Duration Based type and set 3 minutes in the Duration of Test field (see the image above).
-
Another setting we will use in our tutorial is Ramp-up Time. If it is greater than 0, it means LoadNinja will not simulate all the virtual users from the test start. It will start with 0 virtual users and will add virtual users gradually during that ramp-up period to the requested number of VUs.
Let’s set 1 minute in this field. This means that, in our example, the load will reach the level of 10 concurrent virtual users 1 minute after we start the test.
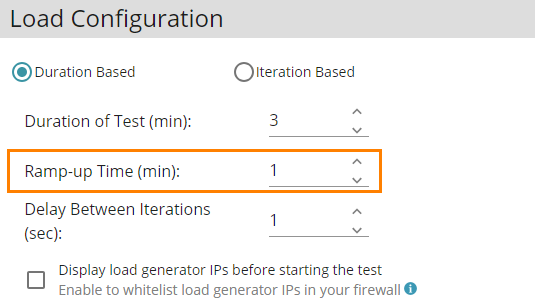
Note that the Duration of Test value does not include the Ramp-up Time. That is, the total test time will be the sum of Ramp-up Time and Duration of Test.
-
In the scenario editor, we can also specify other settings:
-
The delay between VU iterations.
-
An option to view the IP addresses of cloud machines that will simulate virtual users (this is needed when testing web applications working in your local network).
-
Think Time settings (how LoadNinja should simulate pauses between user actions).
-
The error-handling policy, and more.
We will not cover these settings in this tutorial. Leave their default values.
For more information on them, see Scenario Settings.
-
OK, now, we can run the scenario. To do this, you can click Save and Run in the scenario editor. Let’s do this on the next step.
If you want to save the changes made to the scenario settings without running a test, simply click Save in the scenario editor.