
The Add Area dialog is used to create either profiling, class-level or stack areas. Depending on the currently selected profiler, the dialog may have one of the following captions: Add Profiling Area, Add Class-Level Area or Add Stack Area. The caption indicates the type of the created area. For more information on the available area types, see About Areas.
Calling the Dialog
The Add Area dialog is called when you do one of the following:
- Select Add Area from the context menu of the Setup panel.
- Press
 Add Area on the Setup toolbar.
 - Select Add Selected to Setup > Add to New Area from the context menu of the Report panel.
- Select Project > Add Area from AQTime's main menu.
| Note: | Depending on the selected profiler, the mentioned context menu and toolbar items may have slightly different captions indicating the type of the created area. For instance, if you create a profiling area, the corresponding menu and toolbar items are called Add Profiling Area, Add Selected to Setup > Add to New Profiling Area and so on. |
Description of the Dialog
As it has been said above, the caption of the dialog and some of its elements may change depending on the currently selected profiler. The sections below describe all of the possible options in detail:
 Add Profiling Area Dialog
Add Profiling Area Dialog
The image below is a sample view of the Add Profiling Area dialog.
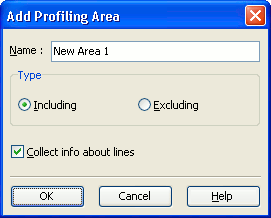
This dialog allows you to create a new profiling area, give it a name, define it as including or excluding and set its profiling level: routine or line. To enable line-level profiling, simply select the Collect info about lines check box. Otherwise, the created area will have the routine-level type.
If the dialog is called for the Function Trace profiler, it has an additional setting - Retrieve parameter values.
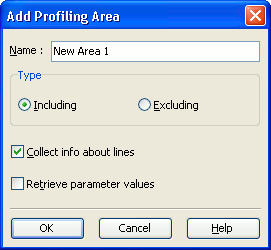
Use this setting to enable the Function Trace profiler to log the actual parameter values of the routines included in the area. See, Tracing Function Call Parameters and Result Values for details.
Add Class-Level Area Dialog
The image below is a sample view of the Add Class-Level Area dialog.
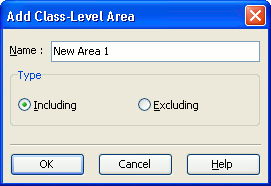
This dialog allows you to create a new class-level area, give it a name, define it as including or excluding.
Add Stack Area Dialog
The image below is a sample view of the Add Stack Area dialog.
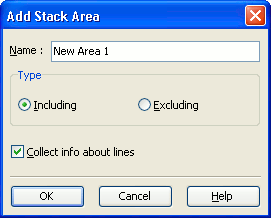
This dialog allows you to create a new stack area, give it a name, define it as including or excluding and set its level: routine or line. To enable line-level collecting of stack information, simply select the Collect info about lines check box. Otherwise, the created area will have the routine-level type.
To close the dialog and create an area with the specified parameters, click OK. To close the dialog without creating an area, click Cancel.
| Note: | If the dialog was called from the Report panel’s context menu, pressing OK will create a new area and add the procedures selected in the Report panel to it. |