After you deploy Private Node Server in your VM environment, you may need to change some network settings. For example, you may need to set a static IP address, configure a proxy server or mail relay. You can do this through the Private Node Server web interface that is called the Control Panel.
This topic describes the most common settings that you will likely need. For a detailed description of all the available settings, see Private Node Server Control Panel.
| Note: | The information below assumes that your Private Node Server is already registered it AlertSite. |
Access the Control Panel
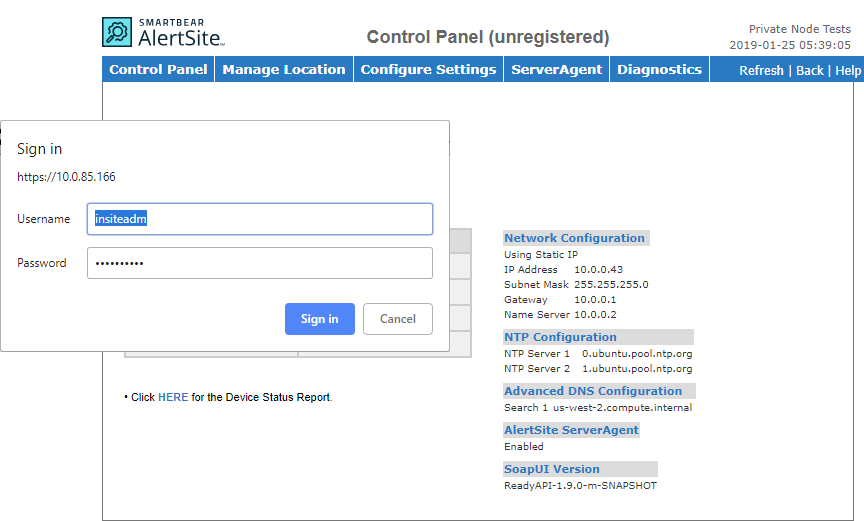
You can access the web interface (Control Panel) of Private Node Server from a computer on the same local network by entering the node's local IP address in a browser:
https://<ip address>
Use https:// for Private Node Server 2.x and http:// for earlier versions.
The default login and password are:
- insiteadm / 1nSitePa$$ for Private Node Server 2.0 and later
- admin / password for earlier versions
SSL certificate
By default, Private Node Server uses a self-signed SSL certificate.
You can ignore this warning, but if you want to avoid it, you need to get your own SSL certificate for Private Node Server. For example, if you have the organization's Root CA that is trusted by all workstations in your domain, you can generate your own certificate using this Root CA.
To install your certificate on Private Node Server, do the following:
-
Contact Customer Support and provide the following information:
-
Your SSL certificate file.
-
Your Private Node Server location name (it is displayed in the Control Panel.
-
Your company name and customer ID from the Settings > Account screen in AlertSite UXM.
-
-
Open Remote Access on Private Node Server to have the certificate installed.
You will be informed when the certificate is in place.
Firewall rules
See Network Connectivity for a list of ports that should be open in your firewall in order for Private Node Server to work properly.
Change the Admin Password
For security purposes, we recommend that you change the default password to your own password.
-
In the Control Panel, go to Manage Location > Change Web Password.
-
Enter the current password, then a new password along with the confirmation and click Apply Changes.
Set a static IP address
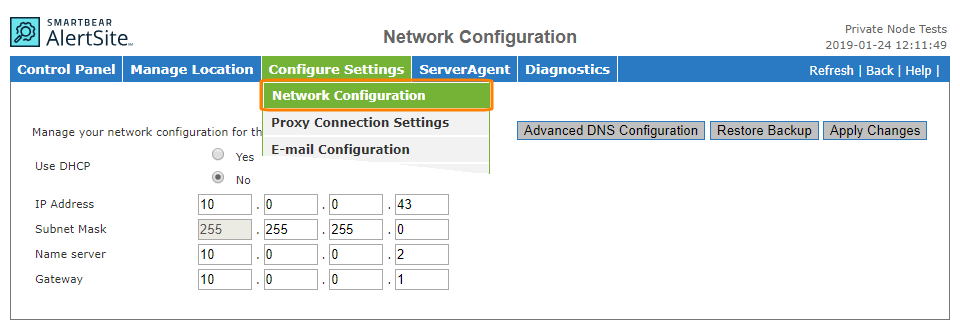
Private Node Server is configured for DHCP by default. If you want to use a static IP address, you must manually configure the IP address and other network parameters:
-
Go to Configure Settings > Network Configuration.
-
Change Use DHCP to No.
-
Enter the IP address to be used for this Private Node Server, as well as the subnet mask, server name and gateway.
-
(Optional.) To configure multiple DNS servers, click Advanced DNS Configuration, add the DNS servers and click Apply Changes to return back to network configuration.
-
Click Apply Changes.
 |
You need to reboot the VM in order for these changes to take effect: |
-
Go to Manage Locations > Reboot Device.
-
Click Reboot.
Configure the proxy server
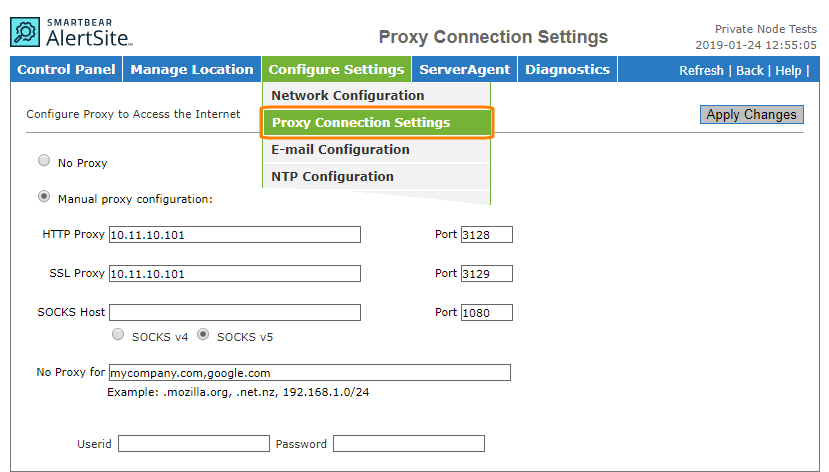
If Private Node Server needs a proxy server to access the Internet from behind your firewall, you must configure the proxy manually:
-
Go to Configure Settings > Proxy Connection Settings.
-
Select Manual proxy configuration.
-
Specify the proxy server and port for both HTTP and SSL. Check with your network administrator for the correct proxy hosts and port numbers.
-
In Private Node Server 2.1 and later, proxy can be specified either by host name or IP address. Earlier versions require IP addresses for the proxy.
-
Some proxy servers handle HTTP and SSL on the same port, and some use different ports for HTTP and SSL. Make sure you specify the correct proxy port numbers, otherwise your private node will not be able to connect to AlertSite.
-
-
(Optional.) In the No Proxy for field, enter any URL proxy exceptions separated by commas.
-
If the proxy requires authentication, enter the Userid and Password. If the Userid includes a domain name, such as DOMAIN\user, you need to use a double backslash: DOMAIN\\user.
-
Click Apply Changes.
There is no need to reboot the VM after setting the proxy.
Test the proxy
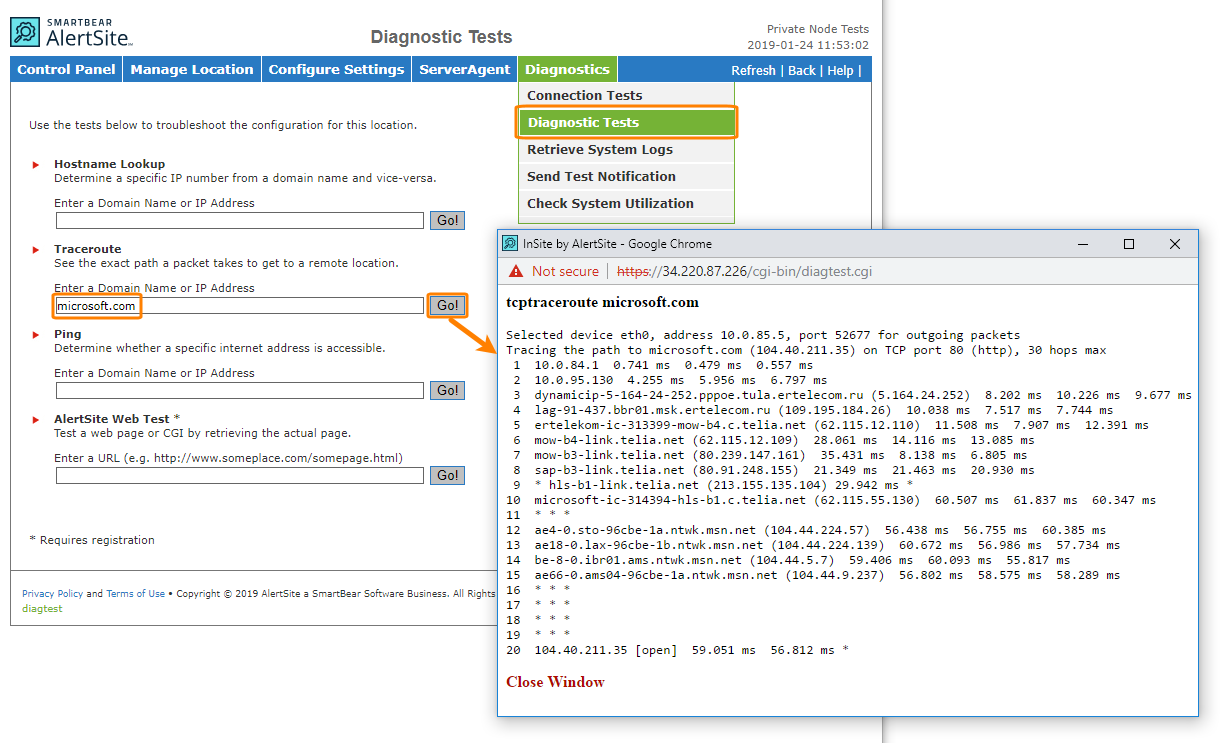
To test outbound communication from Private Node Server to the Internet through the proxy:
-
Go to Diagnostics > Diagnostic Tests.
-
Under Traceroute, enter any public website that is not in your proxy exceptions list and click Go.
-
The traceroute results appear in a new window. Verify that the connection goes past the proxy server.
Configure a mail relay
You can configure Private Node Server to forward email to a central mail relay server rather than sending email directly to the Internet. This lets you accumulate the mail logs on one server. Also, the firewall only needs to allow outgoing SMTP (port 25) traffic from the designated mail server rather than from all your private nodes.
To specify a mail relay:
-
Go to Configure Settings > E-mail Configuration.
-
Enter the Relay Host (the IP address or hostname) and Relay Port (if it differs from 25).
-
Click Apply Changes.
| Note: | If your mail relay host requires authentication or if it works over SSL (like Gmail), please contact SmartBear Support for assistance. |
Test the mail relay
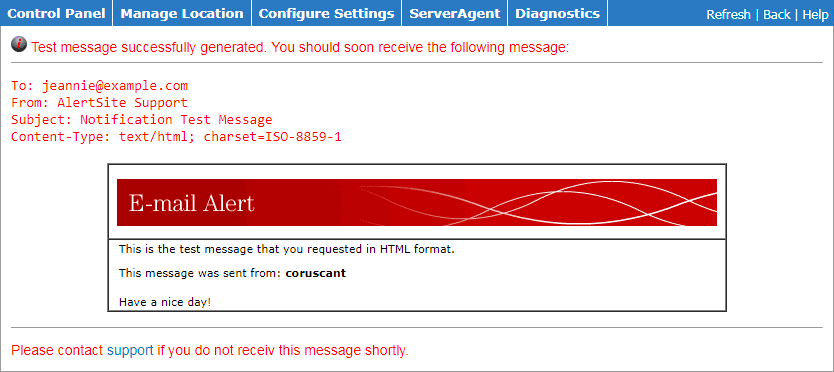
You can send a test alert from Private Node Server to verify that the mail relay is configured properly. This works only after Private Node Server has been registered.
-
First, verify that you have email recipients configured in AlertSite. To do that, in AlertSite UXM, go to Alerts > Alert Recipients and make sure you have at least one email recipient configured. Add email recipients, if needed.
-
In the Control Panel, go to Diagnostics > Send Test Notification.
-
Click any recipient to send a test message to that email.
-
You will see the contents of the sent test alert:
-
If the test alert does not arrive shortly, please contact SmartBear Support.
Test the connection (v.2.0.2 and later)
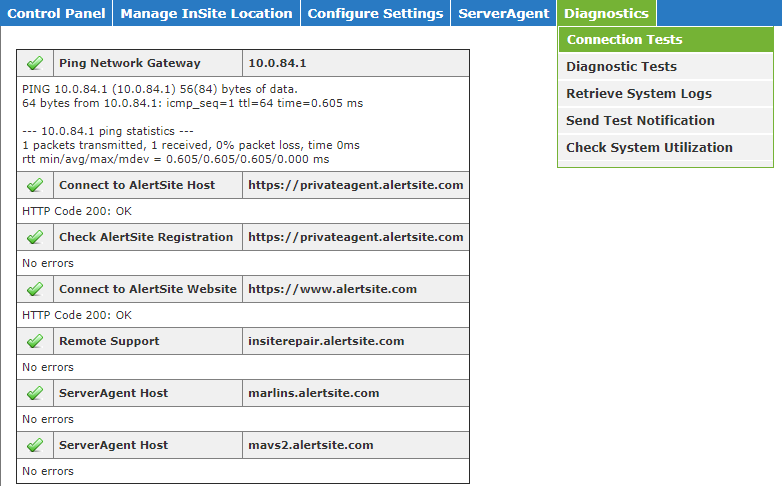
To test the connectivity using the specified network settings, open the Diagnostics > Connection Tests page in the Control Panel and wait for the results. If there are errors, make sure your firewall allows traffic to the hosts and ports listed in Network Connectivity.
Configure ServerAgent
ServerAgent is a component of Private Node Server that monitors the health of your private location and alerts if an outage or missed monitor is detected. ServerAgent is not enabled by default. It needs to be configured manually. For instructions, see Configuring ServerAgent for Private Node Server.
See Also
Private Node Server Overview
Private Node Server Control Panel (Web Interface)
Configuring ServerAgent for Private Node Server

