In this tutorial, we will use JUnit to run our TestLeft test code.
1. Create a Test Method
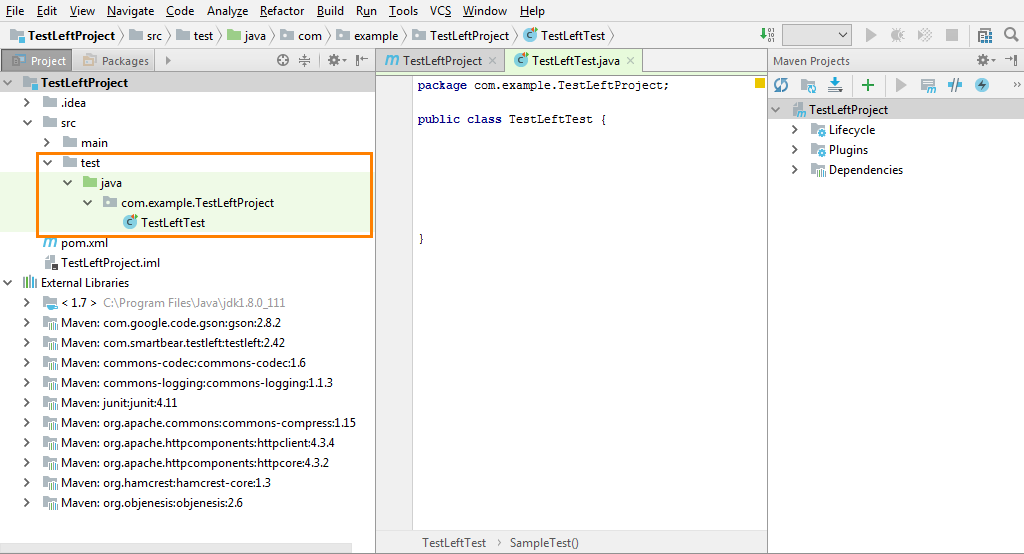
We will add a JUnit test class and a test method to our project. The test method will run our TestLeft test code:
-
Add a new JUnit test class to your project:
Note: Make sure that the location to which you add your test class is marked as Test Sources Root. -
Add a new test method to the created class:
Java
…
import org.junit.Test;
…
public class TestLeftTest {
@Test
public void SampleTest() throws Exception{
}
}
Now, let’s write our TestLeft test code.
2. Import the Needed Classes
The TestLeft library, reference to which we have added to our project, declares classes that provide support for various testing actions and application technologies. We need to make those classes available in our test package. Import the following classes to your package:
Java
…
import com.smartbear.testleft.Driver;
import com.smartbear.testleft.LocalDriver;
import com.smartbear.testleft.Log;
import com.smartbear.testleft.testobjects.TestProcess;
import com.smartbear.testleft.testobjects.TopLevelWindow;
import com.smartbear.testleft.testobjects.TextEdit;
import com.smartbear.testleft.testobjects.WindowPattern;
…
| Note: | If your Java IDE is configured to import the needed classes automatically as you reference them in your code, you can skip this step. |
3. Create a Driver Object
To create test code, first, you create an object of the com.smartbear.testleft.Driver class. The object will provide access to the TestLeft engine. It also provides access to the hierarchy of objects in tested applications and allows performing various test-related operations. To learn more, see About Driver Objects.
Write a code that creates an object of the com.smartbear.testleft.Driver class:
Java
public class TestLeftTest {
public Driver driver;
@Test
public void SampleTest() throws Exception{
driver = new LocalDriver();
}
}
We use the LocalDriver class. This way, we access the TestLeft test engine on the local computer. To access a TestLeft test engine running on a remote computer, use the RemoteDriver class.
4. Simulate User Actions
-
In this tutorial, we will work with the Notepad application. Let’s create code that will run Notepad at the beginning of the test:
Java
TestProcess process = driver.getApplications().run("notepad.exe");
We use the
driver.getApplications.runmethod to run Notepad and keep a reference to the launched application in theprocessvariable. To learn more about running a tested application from tests, see Running Applications From Tests.Note: We do not specify the path to the Notepad executable because its location is set in the PATH environment variable. To start your tested application, you may need to specify the path to it. To make your tests portable, use environment variables in the path (like %PROGRAMFILES%or%APPDATA%). -
Create code that will access Notepad window and simulate text input to it:
Get an object
The
driverobject has a number of methods you can use to get access to an object in a tested application. However, the easiest way to create code that will get the needed object is to use the TestLeft UI Spy:-
If TestLeft UI Spy is not running yet, start it.
-
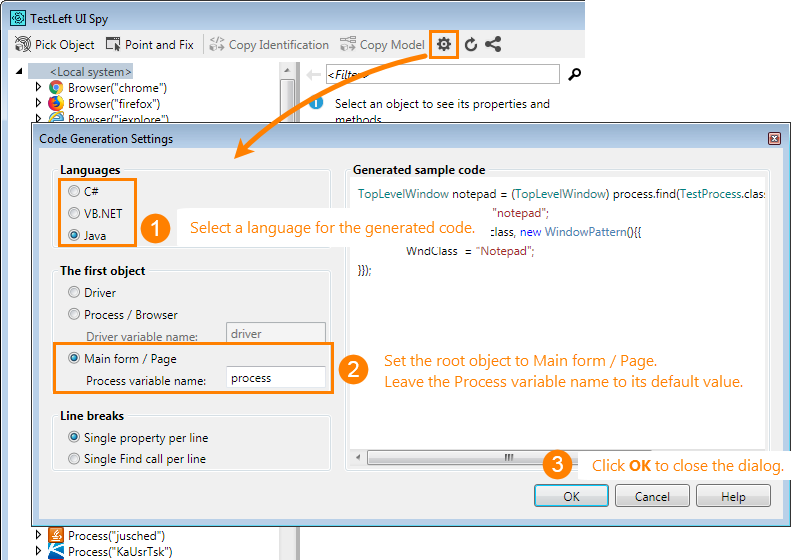
Click
 on the TestLeft UI Spy toolbar and configure the code generation settings:
The generated code will search for test objects starting from the application main window. To get the tested application, it will use the
processvariable, which we declared earlier. -
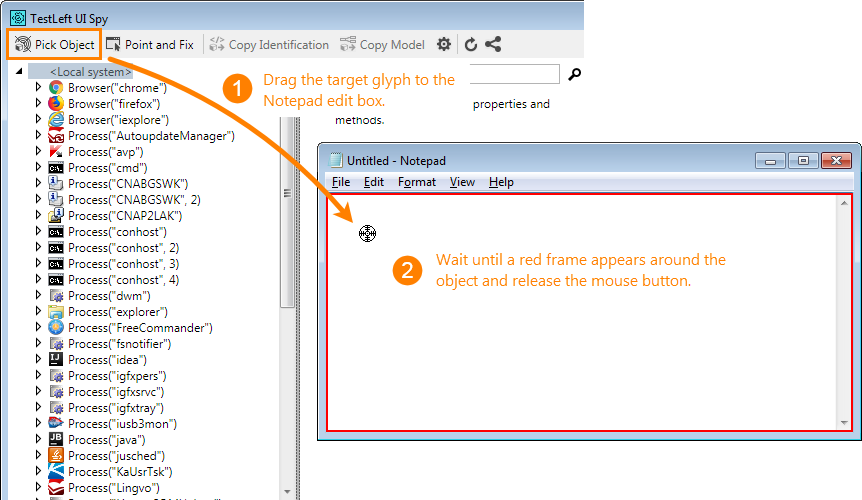
Pick the edit box on the screen with the Pick Object tool:
TestLeft UI Spy will capture the control and select it in the object tree.
Note: It may take several seconds for TestLeft to capture the needed object and to display a red frame around the object. Please wait. -
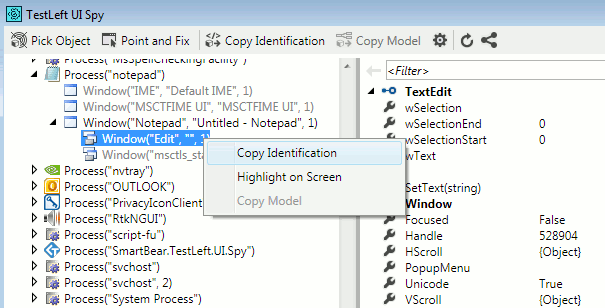
Right-click the object in the object tree and then click
 Copy Identification.
The TestLeft UI Spy will generate code to access the needed object and will copy the code to the clipboard.
-
Insert the code from the clipboard to your test method:
Java
TextEdit edit = (TextEdit) process.find(TopLevelWindow.class, new WindowPattern(){{
WndClass = "Notepad";
}}).find(TextEdit.class, new WindowPattern(){{
WndClass = "Edit";
}});
Note: Another approach to getting objects in a tested application is to use object models. Object models are classes that describe the object hierarchy in the tested application and that you map to an actual tested application to easily access the needed objects. See Mapping Test Objects. To work with processes, windows, and controls of tested applications, TestLeft uses the appropriate classes declared in the TestLeft library. TestLeft casts a window or control in a tested application to an object of the proper class and then uses the object methods to simulate user actions over the window or control. The class TestLeft uses to work with a window or control depends on the window or control type.
In our case, TestLeft recognizes the Notepad edit box as an object
TextEditclass. This class is declared in thesmartbear.testleft.testobjectspackage, so we should add this package to our code. The code that gets the edit box uses the object of theWindowPatternclass to specify the search criteria.Simulate user actions on an object
You can use an object methods to simulate user actions over the control. If your IDE supports code auto-completion, it will show the list of methods available to the object:
To simulate a mouse click in Notepad text editor, we will call the object’s
clickmethod. To simulate text input, we will call the object’ssetwTextmethod:Java
edit.click();
String inputText = "test";
edit.setwText(inputText); -
5. Check Object State
In your tests, you often may need to check the state of an object to make sure that the application under test functions properly. To do this, you can create code that compares object properties against the expected values.
In this tutorial, we will create code that will check whether the text input has been simulated successfully. We will compare the actual text that Notepad text editor contains (returned by the getwText method) against the expected text:
Java
import static org.junit.Assert.assertEquals;
…
assertEquals(edit.getwText(), inputText);
If the assertion fails, the test will stop and all further test instructions will not be executed.
6. Save Test Results
During the test run, TestLeft saves information on all the test actions it simulates over the tested application (mouse clicks, button presses and so on) to the test log. If the test fails, you can view the test log and learn what happened during the test run and what caused the test failure.
You can post custom messages to the TestLeft test log. Let us post a screenshot of Notepad’s edit box and a custom warning message to the TestLeft test log:
Java
driver.getLog().screenshot(edit, "Notepad edit box screenshot");
driver.getLog().warning("A warning message");
By default, TestLeft stores its log to a temporary folder and deletes it after the test run is over. You can command TestLeft to export test results to an external file (MHT or HTML) to view and analyze it after the test run.
Add code that will create a folder and store the test log to that folder:
Java
…
import java.utils.Date;
import java.text.SimpleDateFormat;
import java.io.File;
…
String logPath = System.getProperty("user.dir") + "\\" + new SimpleDateFormat("yyyy_MM_dd_HH_mm_ss").format(new Date());
new File(logPath).mkdir();
driver.getLog().save(logPath, Log.Format.Html);
You can find more information on posting custom messages to the TestLeft test log and exporting the log in the Working With TestLeft Test Logs section.
Final Code
The overall test code is as follows:
See Also
Your First Test With TestLeft - Java Tutorial
Working With TestLeft Test Logs
Running Applications From Tests

 Get an object


 Example
 Example
 Prev
Prev