
Script extensions can display custom forms to ask the user to input some data or to display this data. Our sample keyword test operation will use a form to provide users with access to its fields. Earlier, we created an empty form named laEditForm in our TestComplete project. On this step, we will design this form.
1. Add Controls to the Form
-
In the Project Explorer panel, double-click the UserForms | laEditForm item. This will open the form in the form designer.
-
In the Properties panel, specify the Log Attributes value of the
Captionproperty. This string is the form title. -
In the Components panel and activate the Helpers category. Click the
TcxLabelcontrol in the panel, and then click somewhere within the form to add the control to the form. -
In the Properties panel, set the following property values:
Property Value NamelblMessage CaptionMessage Style.Font.Style.fsBoldTrue Properties.LineOptions.VisibleTrue -
Add the following controls to the form and configure their properties as described in the table:
Control Purpose Position Property Value TcxComboBoxHolds the list of options for the font color of test log entries. Below the lblMessagetext label.NamecbFontColor Properties.SortedTrue Properties.DropDownListStylelsEditFixedList TcxLabelA label for the cbFontColorcombo box.Below the lblMessagetext label, on the left of thecbFontColorcombo box.NamelblFontColor Caption&Font
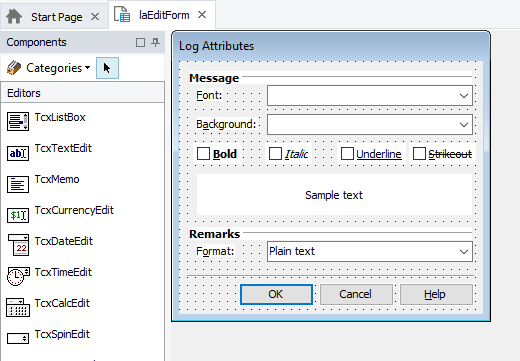
(the ampersand indicates the hot key)FocusControlcbFontColor TcxComboBoxHolds the list of options for the background color of test log entries. Below the cbFontColorcombo box.NamecbBackColor Properties.DropDownListStylelsEditFixedList Properties.SortedTrue TcxLabelA label for the cbBackColorcombo box.Below the lblFontColortext label, on the left of thecbBackColorcombo box.NamelblBackColor Caption&Background FocusControlcbBackColor TcxCheckBoxA check box that toggles the bold font style. Below the lblBackColortext label.NamechkBold Caption&Bold Style.Font.Style.fsBoldTrue TcxCheckBoxA check box that toggles the italic font style. On the right of the chkBoldcheck box.NamechkItalic Caption&Italic Style.Font.Style.fsItalicTrue TcxCheckBoxA check box that toggles the underline font style. On the right of the chkItaliccheck box.NamechkUnderline Caption&Underline Style.Font.Style.fsUnderlineTrue TcxCheckBoxA check box that toggles the strikeout font style. On the right of the chkUnderlinecheck box.NamechkStrikeout Caption&Strikeout Style.Font.Style.fsStrikeOutTrue TcxLabelA sample text with the specified font and color settings applied. Below the chkBold,chkItalic,chkUnderlineandchkStrikeoutcheck boxes.NamelblSample CaptionSample text AutoSizeFalse Style.ColorclWhite Style.Font.ColorclBlack TcxLabelA label for settings of extended log messages. Below the lblSampelabel.NamelblRemarks CaptionRemarks Style.Font.Style.fsBoldTrue Properties.LineOptions.VisibleTrue TcxComboBoxHolds the list of formats for the extended text of log messages. Below the lblRemarkstext label.NamecbRemarksFormats Properties.DropDownListStylelsEditFixedList Properties.ItemsHTML
Plain textTcxLabelA label for the cbRemarksFormatscombo box.Below the lblRemarkstext label, on the left of thecbRemarksFormatscombo box.NamelblFormat Caption&Format FocusControlcbRemarksFormats TcxButtonThe OK button. Below the bvlline.NamebtnOK CaptionOK DefaultTrue ModalResultmrOK TcxButtonThe Cancel button. On the right of the btnOKbutton.NamebtnCancel CaptionCancel CancelTrue ModalResultmrCancel TcxButtonThe Help button. On the right of the btnCancelbutton.NameHelp Caption&Help -
Arrange and resize the controls on the form so that it looks like the following image:
2. Create Event Handlers
Now we can create event handlers for the form and its controls. The handlers will enable the form and controls to perform certain actions in response to user actions.
Let’s start with the handler for the form’s OnShow event. This event occurs when the form is displayed on screen. The event handler will set the input focus to the Font combo box.
-
Click somewhere in the form.
-
In the Properties panel, click
 Events to open the list of the form events.
 -
To create an event handler, click the ellipsis button of the
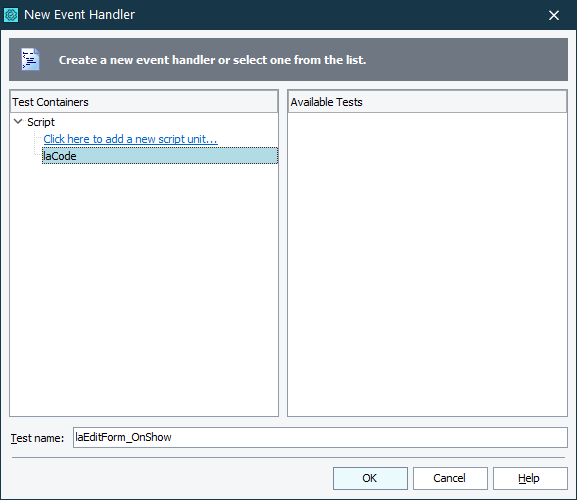
OnShowevent. This will invoke the New Event Handler dialog. -
In the dialog:
-
Select laCode in the Test Containers list.
-
Specify laEditForm_OnShow in the Test name box.
-
Click OK.
TestComplete will create the specified routine in the laCode unit and will open the unit in the Code Editor.
-
-
Enter the following code for the
laCode_OnClickfunction.
Now let’s handle the OnEditValueChanged event of the combo box controls. This event occurs when a new item has been selected in the combo box. The event handlers will apply the colors selected in the combo boxes to the sample text.
-
Switch to the form editor and select the
cbFontColorcontrol in the form. -
Activate the Events page of the Properties panel and click the ellipsis button of the
OnEditValueChangedevent. -
In the New Event Handler dialog, select laCode in the Test Containers list, specify laEditForm_cbFontColor_OnEditValueChanged in the Test name box, and click OK.
TestComplete will create the specified routine and display it in the Code Editor.
-
Enter the following code for the routine:
JScript
[laCode.js]
// Applies the selected font color to the sample area
function laEditForm_cbFontColor_OnEditValueChanged(Sender)
{
var frm = UserForms.laEditForm;
frm.lblSample.Style.Font.Color = GetColorByName(frm.cbFontColor.Text);
}This routine will be called when the user selects a color from the
cbFontColorcombo box. The routine obtains the RGB value of the color and applies this color to the text of thelblSamplelabel (this label serves as a preview of the current style settings). TheGetColorByNameroutine used in this event handler was described in one of the previous steps. -
In a similar way, create a handler for the
OnEditValueChangedevent of thecbBackColorcombo box. Name the routine laEditForm_cbBackColor_OnEditValueChanged and add it to the laCode unit. The routine code is below; it is very similar to thelaEditForm_cbFontColor_OnEditValueChangedroutine.JScript
[laCode.js]
// Applies the selected background color to the sample area
function laEditForm_cbBackColor_OnEditValueChanged(Sender)
{
var frm = UserForms.laEditForm;
frm.lblSample.Style.Color = GetColorByName(frm.cbBackColor.Text);
}This routine is similar to the previous one. The difference is that it applies the color selected in the
cbBackColorcombo box to the background of thelblSamplelabel.
Next, we will create a handler for the OnClick event of the check box controls. This event is raised when a check box is checked or unchecked. The event handler will set or clear the appropriate attribute (bold, italic, underline or strikeout) of the sample text. We will create a single, universal event handler and then attach it to each of the check boxes:
-
Insert the following routine into the laCode unit:
JScript
[laCode.js]
// Applies the specified font style to the sample area
function laEditForm_chkFontStyle_OnClick(Sender)
{
var frm = UserForms.laEditForm;
var style = 0;
if (frm.chkBold.Checked) style |= 0x1;
if (frm.chkItalic.Checked) style |= 0x2;
if (frm.chkUnderline.Checked) style |= 0x4;
if (frm.chkStrikeout.Checked) style |= 0x8;
frm.lblSample.Style.Font.Style = style;
} -
In the form editor, select the
chkBoldcontrol. -
Open the Events page of the Properties panel and click the down arrow button of the
OnClickevent. TestComplete will display the Select Test dialog that holds a list of all suitable routines for the event handler: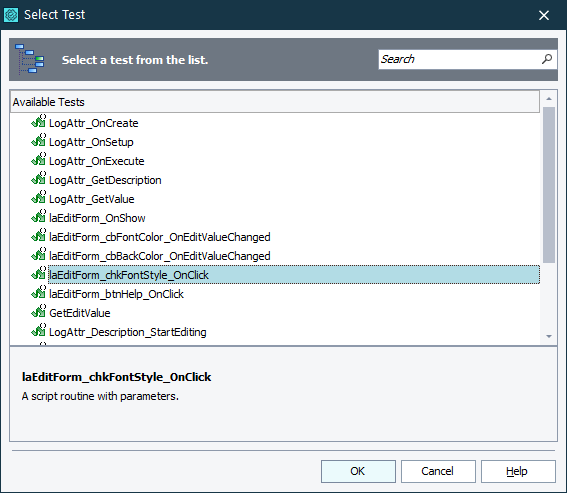
-
Select the
laEditForm_chkFontStyle_OnClickroutine in the list and click OK. - Repeat steps 2-4 for the
chkItalic,chkUnderline, andchkStrikeoutcontrols.
Finally, we will create a handler for the OnClick event of the btnHelp button. This code will be executed when the user clicks the Help button in the form.
-
In the form editor, select the
btnHelpbutton. -
Switch to the Properties panel, activate the Events page and create the event handler for the
OnClickevent. Name the routine laEditForm_btnHelp_OnClick and add it to the laCode unit. -
Specify the following code for the routine:
JScript
[laCode.js]
// Displays Help for the Log Attributes operation
function laEditForm_btnHelp_OnClick(Sender)
{
Help.ShowContext("LogAttrExtension.chm", 3041);
}This code opens the help file and displays a topic that contains information about the form.
In this tutorial, we will not create the LogAttrExtension.chm help file manually. Instead, we will copy it from an existing script extension:
-
Open Windows Explorer or any other file manager and go to the <TestComplete>\Bin\Extensions\ScriptExtensions folder.
-
Copy the AQAScriptExtensions.chm file, which resides in this folder, to the C:\My Extensions\LogAttrExtension folder.
-
Rename the file to LogAttrExtension.chm.
Note that the help file name must not contain spaces. Also, the name of the .chm help file must coincide with the name of the script extension’s .tcx file in order for TestComplete to be able to install the script extension correctly.
For detailed information on calling help topics from forms used by script extensions, see Calling Help for Script Extensions.
-
3. Saving the Form in a Special Format
To be able to use the created form in a script extension, you need to save the form in a special format:
-
Open the form editor and right-click somewhere within the form.
-
Select Export to File from the context menu. This will invoke the standard Save File dialog.
-
Save the form under the laEditForm.aqfrm name to the C:\My Extensions\LogAttrExtension folder.
There is no need to add information about the form to the description.xml file. The only requirement is that the form file resides in the same folder that the description.xml and other files of our script extension are in.
 Prev
Prev
See Also
Script Extensions
User Forms
Using Forms in Script Extensions
Handling Events in User Forms