
Now, we can start creating a design-time action. According to our plan, it will generate the checkpoint code and display it in a dialog, in which the user can copy this code to the clipboard.
1. Add Components to the Form
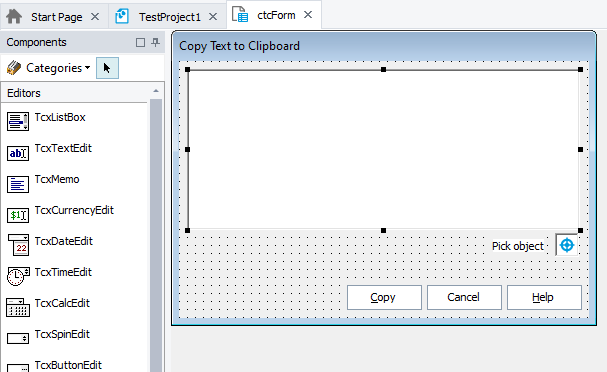
Script extensions can call user forms from scripts. We will do this to create the dialog the action will call. We added the ctcForm User Form item to our test project earlier. Configure this user form:
-
In Project Explorer, double-click UserForms | ctcForm to open the user form for editing.
-
In the Properties panel, enter the Copy Text to Clipboard string into the
Captionproperty. This string is the dialog title. -
In the Components panel, click
TcxMemo, and then click somewhere within the form to add the component. Set the following component properties in the Properties panel:-
Assign the cmScriptText value to the
Nameproperty. -
Click the ellipsis button of the
Linesproperty and clear the property value in the ensuing dialog. -
Expand the
Propertiesproperty and assign ssBoth to theScrollBarsproperty.
-
-
Select the Helpers category in the Components panel.
Add the
TObjectPickercomponent to the form. This component enables a user to choose an object on the screen and add an object name to the checkpoint code.In the Properties panel, assign ObjectPicker to the
Namecomponent property. -
Add the
TcxLabelcomponent from to the form. Place this component before theTObjectPickeron the form.Assign Pick object to the
Captionproperty. -
Add the
TBevelcomponent to the form.Assign the bsBox value to the
Shapeproperty and assign 2 to theHeightproperty. -
Select the Buttons category in the Components panel. Add a
TcxButtoncomponent to the form. This button will act as the Copy button.Specify the following values for the button properties:
Property Value NamecbCopy Caption&Copy (the ampersand indicates the hot key) DefaultTrue ModalResultmrOK -
Add one more
TcxButtonto the form. This button will act as the Cancel button.Specify the following values for the button properties:
Property Value NamecbCancel CaptionCancel CancelTrue ModalResultmrCancel -
Add the third
TcxButtoncomponent to the form and assign the following values to its properties:Property Value NamecbHelp Caption&Help This button will act as the Help button.
-
Place and resize the components on the form so that the form looks like this:
2. Create Event Handlers
Now we can create event handlers for the components. Let’s start with the OnClick event handler of the cbCopy button. This button will copy the code, which is displayed in the dialog, to the clipboard:
-
Select the
cbCopycomponent in the form and click Events in the Properties panel.
 -
Click the ellipsis button of the
OnClickevent. This will invoke the New Event Handler dialog. -
In the dialog:
-
Specify ctcForm_cbCopy_OnClick in the Test name box.
-
Select clcCode in the Test Containers list.
-
Click OK.
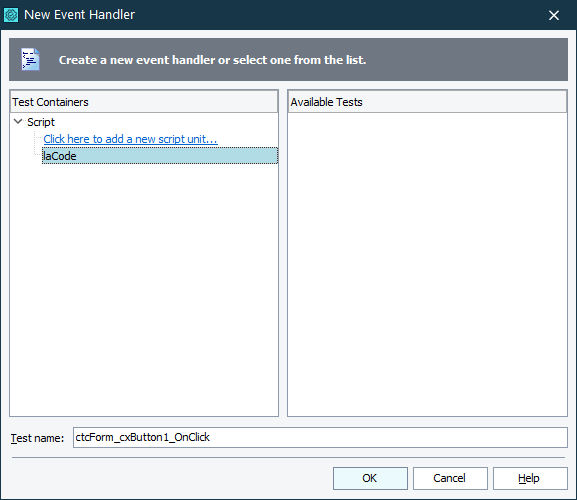
TestComplete will create the specified routine in the clcCode unit and open it for editing.
-
-
Enter the following code to the
ctcForm_cbCopy_OnClickfunction.JScript
[clcCode.js]
// Copy the text to the clipboard
function ctcForm_cbCopy_OnClick(Sender)
{
Sys.Clipboard = UserForms.ctcForm.cmScriptText.Lines.Text;
}As you can see, the code is trivial: we obtain the text that is displayed in the dialog and assign it to the
Sys.Clipboardproperty (this will place the text in the clipboard).
Now we can create event handlers for other components:
-
Switch to the form editor and select the
ObjectPickercomponent in the form. -
Click the ellipsis button of the
OnObjectPickedevent. -
In the ensuing dialog, select clcCode in the Test Containers list, specify ctcForm_ObjectPicker_OnObjectPicked in the Test name box, and click OK.
TestComplete will create a new routine and open it for editing.
-
Enter the following code to the routine:
JScript
[clcCode.js]
// Add the name of the selected object to the Copy Text to Clipboard dialog
function ctcForm_ObjectPicker_OnObjectPicked(Sender)
{
var lines;
lines = UserForms.ctcForm.cmScriptText.Lines;
lines.Text += "\r\n";
lines.Text += UserForms.ctcForm.ObjectPicker.PickedObjectName;
}This routine will be called after a user selects an object with the
TObjectPickercomponent. The routine obtains a reference to theTextproperty of thecmScriptTextcomponent (that is, it obtains the text displayed in the dialog), and then adds the name of the selected object to the text.
Similarly, you can create code for the OnClick event of the cbHelp button:
-
Select the
cbHelpbutton in the form. -
Create the event handling routine for the
OnClickevent. Name the routine ctcForm_cbHelp_OnClick and add it to the clcCode unit. -
Use the following code for the routine:
JScript
[clcCode.js]
// Show Help
function ctcForm_cbHelp_OnClick(Sender)
{
Help.ShowContext("ActionsExtension.chm", 6003);
}This code will be executed when a user clicks the Help button of the form. It will open the help file that contains information about the form.
We will not create the ActionsExtension.chm help file in this tutorial. We will copy it from an existing script extension:
- Open Windows Explorer and go to the <TestComplete>\Bin\Extensions\ScriptExtensions folder.
- Copy the AQAScriptExtensions.chm file and paste it in the C:\My Extensions\ActionsExtension folder.
- Rename the file to ActionsExtension.chm.
Note that the help file name must not contain spaces. Also, the name of the
.chmhelp file must coincide with the name of the script extension.tcxfile for TestComplete to install the script extension correctly.For detailed information on calling help topics from script extension user forms, see Calling Help for Script Extensions.
3. Save the Form in a Special Format
To use the created form in script extensions, save the form in a special format:
-
Open the form editor and right-click somewhere within the form.
-
Select Export to File from the context menu. This will invoke the standard Save File dialog.
-
Save the form under the ctcForm.aqfrm name to the C:\My Extensions\ActionsExtension folder.
 Prev
Prev