
You use OCR checkpoints to recognize and verify the text contents of a UI element on your PC screen or mobile device screen. You can create OCR checkpoints both during test recording and design time. To help you add and configure checkpoints, TestComplete includes the Checkpoint wizard.
 1. Launch the Wizard
Note for mobile testing: Select the object on the Mobile Screen (make sure the Mobile Screen window is not hidden before selecting the object). Also note that the application under test and the mobile device, where the application is running, must be prepared for testing for TestComplete to be able to access the application’s objects.
Connecting to Mobile Device Clouds and Opening Testing Sessions
Preparing for Android Testing (Legacy Mobile Support)
1. Launch the Wizard
The way you call the wizard depends on whether you are recoding a test or creating a test manually:
-
If you are recording a test
-
Click Add Check on the Recording toolbar.
-
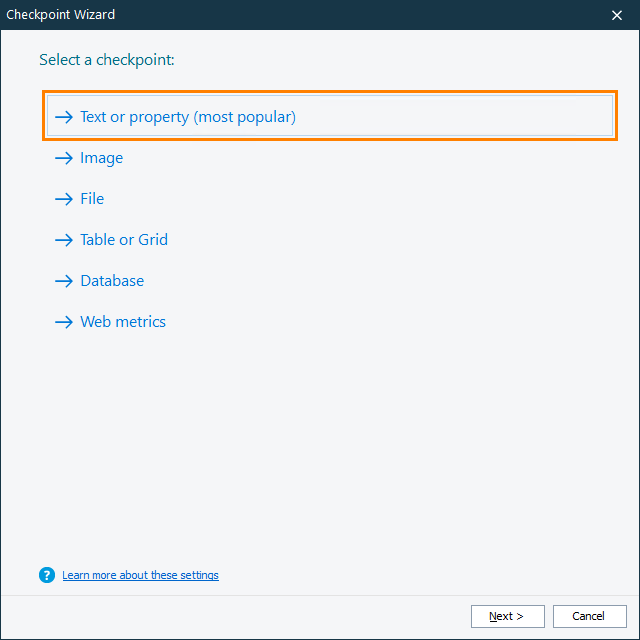
In the Checkpoint Wizard, select Test or property, and then click Next.
-
-
If you are editing a keyword test
-
Select the Checkpoints category in the Operations panel of the Keyword Test editor.
-
Find the Checkpoint Wizard operation in the list and drag it to your test. In the Checkpoint wizard, click Text or property.
– or –
Find the OCR Checkpoint operation in the list and drag it to your test.

-
-
If you are editing a script
-
Open the script to be edited.
-
Click
 on the Code Editor toolbar:
-
In the Checkpoint Wizard, select Text or property, and then click Next.
-
2. Specify an Object to Check
Select a UI element (for example, a chart, image, button, text box, list view, and so on), or a window, or any other onscreen object whose text content you want to verify.
You can specify the object in one of the following ways:
-
Pick the object with the target icon (
 )
)Watch video: Selecting Objects: 'Drag the Target...' Mode
-
Select the object and press a shortcut (
 )
)Watch video: Selecting Objects: 'Point and Fix' Mode
-
Enter the object name manually
Enter the full name (or full mapped name, or alias) of the desired object into the Object box.
For web objects: If your project is configured to use XPath expressions and CSS selectors to locate web objects, the dialog will show the list of available locators (if any) for the specified web object. You can select the needed locator from the drop-down list.
 See instructions
Once you have selected the object, click Next to proceed.
3. Specify the Data to Check
On the next page of the wizard, click OCR to command TestComplete to recognize the text content of the selected object (if you are configuring the OCR checkpoint, the wizard will do it automatically).
The page will show the captured image of the specified object and the text it has recognized in the image:
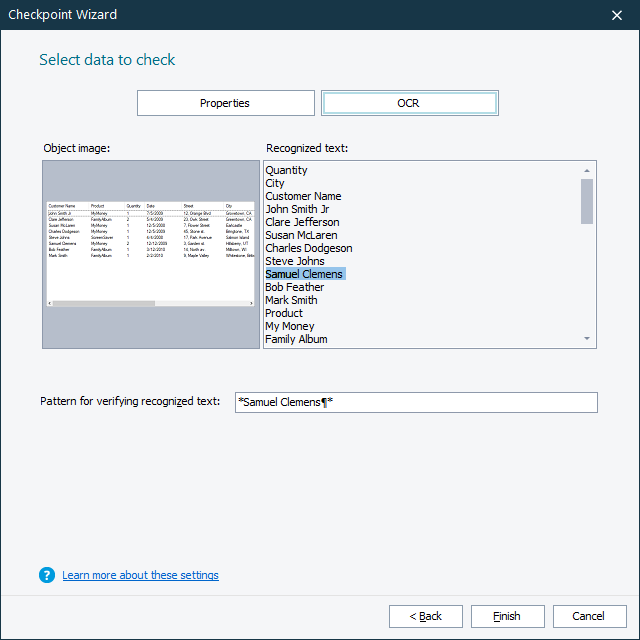
In the Pattern for verifying recognized text box, enter the string pattern against which you want to verify the recognized text. You can type it manually or you can select the needed text fragment in the Recognized text box.
The pattern can contain asterisk (*) or question mark (?) wildcards. The asterisk corresponds to a string of any length (including an empty string), the question mark corresponds to any single character (including none). Whether the string is case-sensitive depends on the Playback > Use case-sensitive parameters property of your project.
4. Close the Wizard
Click Finish to exit the Checkpoint wizard. TestComplete will add the checkpoint statement to your test.
If you are creating a checkpoint while editing a script test, TestComplete will show the Copy Text to Clipboard dialog containing the generated checkpoint code. Copy this clipboard and then paste it to the needed place in your script test.
See Also
OCR Checkpoints
About OCR Checkpoints
Checkpoint Wizard
Mobile Screen Window
Selecting an Object on the Mobile Screen (Android Testing)
Select an Object on the Mobile Screen (iOS Testing)