
This topic provides an overview of manual checkpoints. It explains how these checkpoints work, describes the requirements and explains where you can find the code that implements the checkpoint’s functionality.
 About
AboutAbout
To create a manual checkpoint, write script code that will display verification instructions on screen. For instance, you can create a user form with text and two buttons: Success and Failure. A tester will read the instructions, perform the check and then click the Success or Failure button to signal TestComplete about the result.
You can either create the user form manually or use the manual checkpoint functionality provided by TestComplete (see below). The latter includes special menu items, input and output forms, so you will concentrate on writing verification instructions and all other tasks will be performed automatically.
You create a manual checkpoint with the Create Manual Checkpoint dialog:
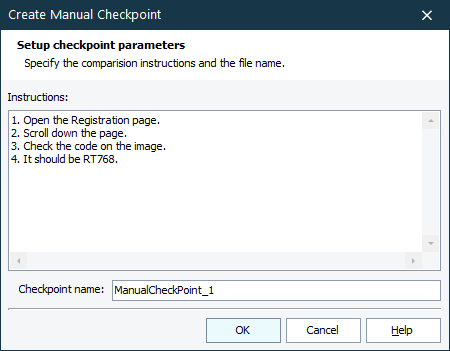
In the dialog, you specify verification instructions and the checkpoint name that specifies the name of the file to which these instructions will be saved. The file is then included into the Stores > Files collection of your test project (in other words, the instructions are saved to a file that is added to the Stores project item).
TestComplete automatically generates script code that contains a call to the ManualCheck.Compare(File) method. During the test execution, the ManualCheck.Compare method displays the Manual Checkpoint dialog that shows verification instructions and two buttons: Success and Failure.
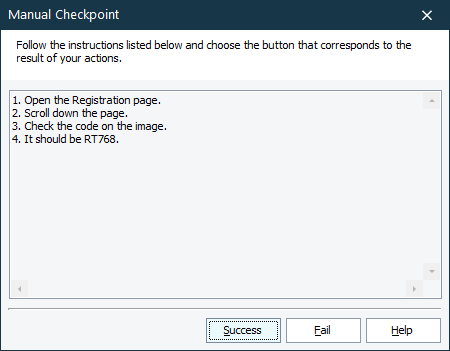
The tester reads the instructions, performs the appropriate actions and then clicks Success or Failure to inform the testing engine about the result of the check.
Creating the Checkpoint
You can insert manual checkpoints in your script code during recording or at design time. For information about this, see Creating Manual Checkpoints.
For information on how to use manual checkpoints in keyword tests, see Manual Checkpoints in Keyword Tests.
Requirements
Manual checkpoints are created with the script extensions technology. The toolbar items, dialogs and scripting objects that are used to create and work with manual checkpoints are available only if the Manual Checkpoint extension is installed in TestComplete.
Manual Checkpoints vs. Manual Testing
The concept of manual checkpoints is similar to the manual testing approach. In manual testing, TestComplete also displays dialogs that contain instructions for the tester and the Success and Fail buttons. The tester performs the displayed instructions and then clicks Success or Fail to tell the testing engine about the result. However, the difference is that manual testing is the testing approach when testers perform operations manually. However, the use of manual checkpoints implies that testing actions are performed automatically and only verification is done manually. Of course, you can create and display verification dialogs with the Manual Testing project item, but the manual checkpoint functionality provides an easier way to create these dialogs and invoke them from scripts.
Checkpoint Source Code
The manual checkpoint demonstrates how you can extend the TestComplete functionality with the script extension technology. You can find the checkpoint’s source code in the AQAScriptExtensions.tcx file that is located in the <TestComplete>\Bin\Extensions\ScriptExtensions folder. This file is a ZIP archive that has the .tcx extension. So, you can use any zip archiver to unpack files from it. For information about the extension’s files, see Pre-Installed Script Extensions.
See Also
Manual Checkpoints
Creating Manual Checkpoints
Manual Checkpoints in Keyword Tests
ManualCheck Object